Overwriting A Protected AVR Bootloader

Logo for the FIgnition 8 bit computer project

A bootloader is typically used to update application code on a microcontroller. It receives the new program from a host, writes it to flash, verifies the program is valid, and resets the microcontroller. Perhaps the most ubiquitous example is the Arduino bootloader which allows you to load code without an AVR programmer.

The bootloader resides in a special part of memory, which is protected. On the AVR, it isn’t possible to write to the bootloader memory from the application code. This is to prevent you from accidentally breaking the bootloader and bricking the device.

However, it can be useful to write to the bootloader memory. The best example would be when you need to update the bootloader itself. To accomplish this, [Julz] found a workaround that defeats the AVR bootloader protection.

The challenge was to find a way to execute the Store Program Memory (spm) instruction, which can only be executed by the bootloader. [Julz] managed to make use of the spm instruction in the existing bootloader by counting cycles and modifying registers at the right time.

Using this technique, which [Julz] calls BootJacker, the Fignition 8 bit computer could have its bootloader updated. However, this technique would likely allow you to modify most bootloaders on AVR devices.

Gatling Gun Styled Water Pistol Made Out Of… Sugru?

sugru water pistol

We admit it – we’re suckers for clever advertising of a product. The company behind Sugru, everyone’s favorite self-setting-rubber-fix-it material commissioned this awesome gatling gun styled water pistol, and it’s actually quite impressive.

Designed by [Alex Bygrave], he was instructed to build the gun out of as many standard hardware store parts as possible — and as much Sugru as he could. It’s been used to make all the seals, connections, and even the pistons, and while we can’t tell if it leaks anywhere, it’s still pretty impressive.

Unlike a normal water pistol, this one is powered by compressed CO2 canisters like the ones used for welding — meaning the pressures are much higher than a typical super soaker as well!

19Stick around after the break to see it in action – tested on the staff of Sugru themselves!

Continue reading “Gatling Gun Styled Water Pistol Made Out Of… Sugru?”

The Disintegrated Op Amp

741
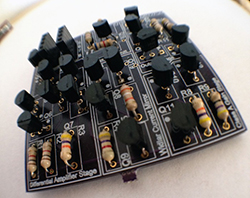
By now we’ve all seen the ‘Three Fives’ kit from Evil Mad Scientist, a very large clone of the 555 timer built from individual transistors and resistors. You can do a lot more in the analog world with discrete parts, and [Shane]’s SevenFortyFun is no exception: it’s a kit with a board, transistors, and resistors making a very large clone of the classic 741 op-amp, with all the parts laid bard instead of encapsulated in a brick of plastic.

[Shane] was inspired by the analog greats – [Bob Pease], [Jim Williams], and of course [Bob Widlar], and short of mowing his lawn with goats, the easiest way to get a feel for analog design was to build some analog circuits out of individual components.

[Shane] has a few more kits in mind: a linear dropout and switching regulators are on the top of the list, as is something like the Three Fives kit, likely to be used to blink giant LEDs.

Hackaday Reader [David] Wins A Camera From Make And Nikon


Make the shot fixed[David Schwarz] whipped up this moving time-lapse camera rig and won himself a sweet Nikon setup. You might remember our post about the Nikon Make:The Shot Challenge. [David] saw our post, and started thinking about what he wanted to enter. Like a true engineer, he finally came up with his idea with just 3 days left in the contest.

[David] wanted to build a moving time-lapse rig, but he didn’t have the aluminum extrusion rails typically used to build one. He did have some strong rope though, as well as a beefy DC motor with a built-in encoder. [David] mounted a very wide gear on the shaft of the motor, then looped the rope around the gear and two idler pulleys to ensure the gear would have a good bite on the rope. The motor is controlled by an Arduino, which also monitors the encoder to make sure the carriage doesn’t move too far between shots.

[6__pulley_system
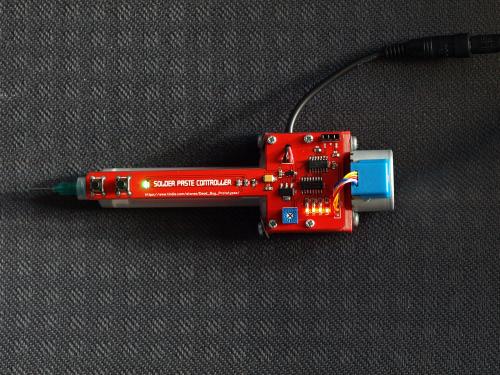
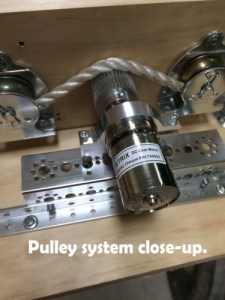
David] built and tested his rig over a weekend. On Monday morning, he gave the rig its first run. The video came out pretty good, but he knew he could get a better shot. That’s when Murphy struck. The motor and controller on his rig decided to give up the ghost. With the contest deadline less than 24 hours away, [David] burned the midnight oil and replaced his motor and controller.

Tuesday morning, [David] pulled out his trump card – a trip to Tally Lake in Montana, USA. The equipment worked perfectly, and nature was cooperating too. The trees, lake, and the shadows on the mountains in the background made for an incredible shot. Once the time-lapse photos were in the can, [David] rushed home, stitched and stabilized the resulting video. He submitted his winning entry with just 2 hours to spare.

Click past the break for more on [David’s] time-lapse rig, and to see his final video.

Continue reading “Hackaday Reader [David] Wins A Camera From Make And Nikon”

Electric Solder Paste Dispenser Speeds Up Reflow Prep

solder paste dispenser

[Geir Andersen] of Let’s Make Robots has been venturing deeper and deeper into the wonderful world of surface mounted devices, which as you know, can be tricky to solder! Not wanting to shell out a few hundred for a professional solder paste dispenser (and air compressor), [Geir] decided to build his own.

It allows him to use a standard syringe for solder paste, which can easily be refilled using this technique. The professional dispensers use air pressure to control the flow of the paste, but [Geir] decided to go the all-electric route instead. He’s hooked up a small stepper motor to a threaded shaft which can push the plunger up and down the syringe.

Couple that with a few 3D printed parts for the housing, a nicely designed PCB, and bam you have yourself a super handy solder paste dispenser! He’s even included a small potentiometer on the board to change the speed of the motor.  It might not be quite as accurate as a professional one, but as you can see in the video after the break it seems to work great for [Geir’s] purposes.

Continue reading “Electric Solder Paste Dispenser Speeds Up Reflow Prep”

The Cheapest Crystal Oven

oven

The crystals you’ll find attached to microcontrollers or RTCs are usually accurate to 100 parts per million at most, but that still means if you’re using one of these crystals as a clock’s time base, you could lose or gain a second per day. For more accuracy without an atomic clock, a good solution is an oven controlled crystal oscillator – basically, a temperature controlled crystal. It’s not hard to build one, and as [Roman] demonstrates, can be built with a transistor and a few resistors.

The heating element for this OCXO are just a few resistors placed right on the can of a crystal. A thermistor senses the heat, and with more negative feedback than the Hackaday comments section, takes care of regulating the crystal’s temperature. A trimpot is used for calibrating the temperature, but once everything is working that can be replaced with a fixed resistor.

This deadbugged circuitry is then potted in five minute epoxy. That’s a bit unconventional as far as thermal management goes, but the results speak for themselves: [Roman] can get a clock with this circuit accurate to a few seconds per year.

HammerPong Game Takes Pong To New Heights

large scoreboard with lots of flashy lights

[Jason] is back at it again with another new twist on the technically sophisticated and advanced game of Pong. Fashioned in a ‘Chuck E. Cheese’ style platform, the two players stand side by side each other with large foam hammers. A wack sends the 32 bit ARM powered dot skyward and then back down to the other player, where another wack will send the dot back whence it came. A brightly lit scoreboard keeps track of how many dots slip by.

[Jason] is a veteran of pong inspired games, but putting the HammerPong game together brought with it some new challenges. After being unable to squeeze a few MDF panels into his car, and fighting off flies, yard debris and pet dander that were trying to attach themselves to his freshly painted artwork, [Jason] managed to get his project completed.

The HammerPong is powered by an Arduino Due that controls six WS2812 LED strips and runs the background code. Various latches, shift registers and power transistors control the lights and scoreboard. Be sure to check out the linked project for more detail, and take a look at the video demonstration after the break.

Continue reading “HammerPong Game Takes Pong To New Heights”