AVR Fuse Bits Explained

Every AVR microcontroller, from the ATtiny in your thermostat to the ATMega in your Arduino, stores its configuration in a series of fuse bits. These fuse bits control settings such as the multiplier of the internal oscillator (and thus the speed of the chip), or if the reset pin can be used as a GPIO pin. [YS] just put up an awesome tutorial for understanding these fuse/lock bits, and it’s just the reference guide you’ll need when you find your AVR is running 8 times slower than you would like.

As an example, [YS] uses the ATMega48 default settings. From the factory, the ‘Mega48 ships with it’s fuse bits set to use an 8MHz internal RC oscillator with the CKDIV8 bit set. This results in the chip operating at 1MHz, a bit slow for [YS]’ liking.

By looking at the datasheet for the ATMega48, [YS] found the CKDIV8 fuse was the 7th bit in the low fuse byte. From the factory, the default value for this byte is 0b01100010. To remove the ‘divide clock by 8’ bit, [YS] needed to change the low byte to 0b11100010, or 0xE2. This is done via AVRdude by appending lfuse:w:0xE2:m to the commands entered when programming.

Fuse bits don’t need to be scary. As long as you can convert between binary and hex, can remember there are 7 bits in a byte (remember to start counting from 0), and have access to an easy to use fuse calculator, it’s possible to change all the settings on any AVR you have on hand.

            

TI Launchpad As AVR ISP Programmer

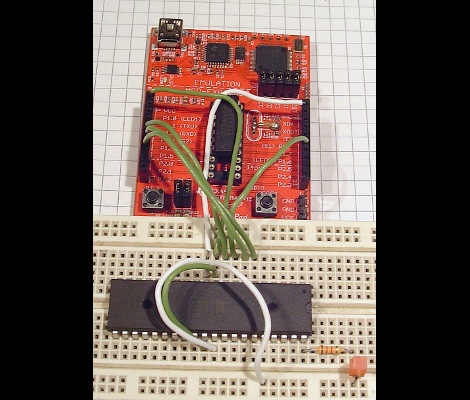
[Minifloat] is using his TI Launchpad development board as an In-System Programmer for AVR chips (translated). There are a ton of homebrew AVR programmers out there, and using an Arduino for ISP is quite popular. But recently we searched for a way to use the Launchpad as a programmer and didn’t find one. We’d venture to say this is the first.

There is one hardware modification that must be made. An external clock crystal (32.768 kHz) must be populated on the board. But since it was designed with the feature in mind that’s a pretty quick process. [Minifloat] followed Atmel’s ISP app note, and extended some of the code written for a different programmer to get things up and running. At first the device wouldn’t communicate with AVRdude, but that turns out to be a problem with the initialization conversation. AVRdude polls the connected programmer to see if it supports block mode, and the firmware on the MSP430G2211 wasn’t expecting this query. The problem was fixed and it now works.

It sounds like there are a couple of bugs left in the system. The first time AVRdude accesses the programmer after it has been plugged into the USB port it will fail. Subsequent attempts will succeed until the MSP430 chip is reset, or the USB connection is replugged. But if you’re just getting into the AVR line, this will let you figure out if you want to invest in a proper programmer.

Flash An Arduino From An SD Card

[Kevin] has been working on reverse engineering the protocol used by the Arduino IDE and porting it to the Arduino platform. Now that his BootDrive project is nearing completion, he’s ready to give every Arduino the ability to program another Arduino over an SD card.

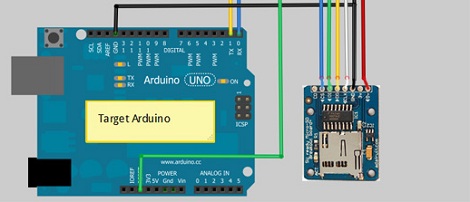
BootDrive isn’t terribly different from using an Arduino as an ISP, only now AVRdude runs on the Arduino itself and no computer is required to put new firmware into the target Arduino.  [Kevin] attached a MicroSD breakout board to an Arduino-compatible clone. When the clone starts up, it searches the SD card for a file called ‘program.hex.’ This file is sent over to the target Arduino and the new firmware is installed.

While it may not be extremely practical if you’ve only got a few Arduinos that never leave your workbench, we’re thinking this would be an invaluable tool if you need to update the software on a board already ‘in the field,’ serving as a weather station or homemade game camera. [Kevin] put up a demo of his BootDrive project; you can check that out after the break.

Continue reading “Flash An Arduino From An SD Card”

AVR Programming 02: The Hardware

You may be able to write the most eloquent code in the history of embedded systems but without a way to run it on the hardware it will be worthless. In this installment of the tutorial series we will:

  • Look at some of the available AVR programmer options
  • Place the microcontroller on a breadboard and connect it to a power supply and a programmer.
  • Use programming software to send some example code to the microcontroller

If you missed Part 1 take a few minutes to review that portion of the tutorial and then join us after the break.

Series roadmap:

Continue reading “AVR Programming 02: The Hardware”