DIY Gaming Laptop Built Entirely With Desktop Parts

Gaming laptops often tend towards implementing more desktop-like hardware in the pursuit of pure grunt. But what if you were to simply buy desktop hardware yourself, and build your own gaming laptop? That would be very cool, as [Socket Science] demonstrates for us all.

The project began with lofty goals. The plan wasn’t to build something rough and vaguely laptop-like. [Socket Science] wanted to build something of genuine quality, that for all intents and purposes, looked and worked like a proper commercial-grade laptop. Getting to that point took a full 14 months, but the final results are impressive.

Under the hood lies an AMD Ryzen 5 5600X and a XFX Radeon RX6600, hooked into an ITX motherboard with some low-profile RAM sticks. Those components were paired with a thin keyboard, a touchpad, and a portable gaming monitor. Getting all that into a thin laptop case, even a custom one, was no mean feat. Ports had to be cut down to size, weird ribbon cables had to be employed, and heatsinks and coolers had to be rearranged. To say nothing of all the work to 3D print a case that was strong and actually worked!

The full journey is quite the ride. If you want to go right back to the start, you can find part one here.

We’ve seen some builds along these lines before, but seldom few that get anywhere near this level of fit and finish. Oftentimes, it’s that kind of physical polish that is most difficult to achieve. All we can say is “Bravo!” Oh, and… video after the break.

Continue reading “DIY Gaming Laptop Built Entirely With Desktop Parts”

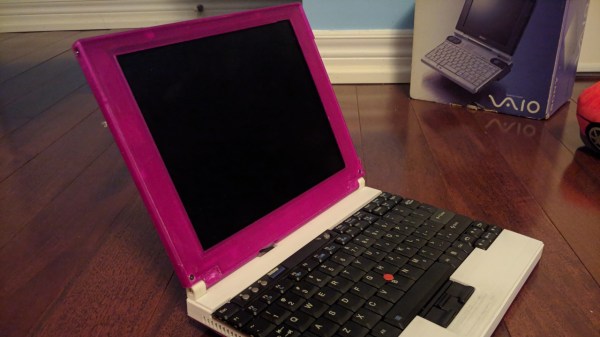
The laptop in question, with the LCD-bearing top half printed in pink, and the bottom half showing off the Thinkpad keyboard.

Pinkpad, A DIY Laptop You Must Print In Pink

Looking to build a laptop all on your own? Check out the Pinkpad, a DIY laptop project that as if appeared out of nowhere, gives you a based on an off-the-shelf Dell motherboard. This build projects an aura of unabashed competence – the website brings you to a different universe, the documentation is as curt as it is extensive, and the build evidently works.

With a Thinkpad x61 keyboard, a reasonably modern (Dell Vostro 5481, Ryzen possible) motherboard embeddable inside, and a 10″ 1024×768 screen, this ~11″ laptop packs a certain kind of punch for what’s a build-it-yourself project. Most of the value of this design is in the 3D files – which were done in Google SketchUp, and the laptop is small enough that you could print its shell reasonably quickly. Not that you should follow the parts list religiously – the screen in particular might just warrant reconsideration in your eyes. On the other hand, we wish you all the luck on your SketchUp journey if you want to modify the shell. It also isn’t lost on us that the parts list doesn’t list a battery in it.

This is an impressive project to see open-sourced, and we hope it can inspire some hackers in the custom laptop building cohort. One prominent flaw of consumer-facing technology is that you can’t always get your devices in pink, and printing your laptop’s chassis yourself is a surefire way to combat this. If this laptop’s form-factor is too commonplace for you, we’ve seen no shortage of custom laptops grace our pages, from miniature ones to CRT luggable beasts, and click on the tags below if you’d like to see more!

We thank [Max_UA] for sharing this with us!

Raspberry Pi Laptop Uses The Official Touchscreen

We’ve seen a variety of home-made laptops using the Raspberry Pi and other single board computers over the years. Usually, they combine off-the-shelf USB keyboards and trackpads with HDMI monitor panels, and cases made from layered laser cut sheet, or 3D printed plastic.

[Surferboy]’s Raspberry Pi laptop is the latest effort to come before us, and its claim to fame is the use of the official Raspberry Pi 7″ touchscreen as a display. Full instructions and 3D printer files are available on Thingiverse so you can have a go at replicating it if a portable Pi is your thing.

He’s taken the bold step of not attempting to place all the Pi’s interfaces next to the outside of the case. Instead, he’s desoldered the Ethernet and USB ports. The USB connections were wired directly to the keyboard, display, and a couple of external ports on the right-hand side of his case. This leaves the finished laptop with no Ethernet. However, losing ethernet is a worthy tradeoff for the thinner package.

[Surferboy] also brought the GPIO header to a female socket on the rear of the unit. It’s unclear exactly what battery he uses except for a reference to the battery from his keyboard. Since a keyboard battery will be too small for Pi and display we are guessing a larger pack will be necessary.

Though the Ethernet port and battery issue would probably be a dealbreaker here this has the makings of a useful and compact laptop, it will be interesting to see if it is picked up and refined by the community.

Quite a few early Pi laptops used the Motorola Lapdock, a mobile-phone-into-netbook peripheral. Some others we’ve featured have been a bit chunky, but sometimes they can be objects of beauty.

Via Recantha.co.uk.