Going On A Tangent With The Intel 8087’s Hybrid CORDIC Algorithm

Continuing their reverse-engineering of Intel’s 8087 FPU, [Ken Shirriff] and friends took a look at one of the trigonometric functions, specifically FPTAN.  The most exciting part with such reverse-engineering is probably figuring out which algorithm was used in the implementation, while trying to determine the reasoning behind the final hardware design.

If you’re running a simple MCU or MPU like the 6502 or Z80 without hardware functions you’d likely use an algorithm such as CORDIC or similar, as this requires only basic hardware features like addition, subtraction, bitshift, and look-up tables. One can also use polynomial approximation if there’s hardware support for a potential speed-up, or as is the case in the 8087, create a hybrid approach that targets speed and accuracy.

In the article the exact implementation to get to 64 bits of accuracy is detailed, starting with the 16 bits calculated using CORDIC before switching to the Padé approximant technique involving the ratio of two polynomials. Since after calculating the brunt of the final value with CORDIC the remainder is a fairly small value, this polynomial approximation is not just very accurate but also fast.

This approach allows the FPTAN and similar trigonometric functions in this FPU to hit a very high level of accuracy and not require the look-up table sizes and additional time required to work through the remaining bits with CORDIC. For those who want to see the full algorithm Intel’s engineers used, [Ken] has the full microcode listing with comments in the article as well.

As for the exact speed-up from this approach, [Ken] calculates for one value that FPTAN would spend 33% on CORDIC pseudo-division, 47% on CORDIC pseudo-multiplication and a mere 15% on the polynomial approximation along with about 5% overhead.

With the Pentium series of CPUs Intel moved completely away from CORDIC, as it’s clear that as accurate as it may be, it’s hard to scale to a significant number of bits without incurring significant time penalties. With the introduction of SIMD instructions the x87 ISA has further seen its functionality reduced, but this analysis shows once again why the 8087 made such an impact when it was released.
Analyzing The FScale Instruction In Intel’s 8087 FPU

During his continuing analysis of the architecture and microcode of Intel’s highly influential 8087 floating point unit (FPU) co-processor, [Ken Shirriff] has now arrived at the point where he can put together how the 8087’s microcode implements various x87 instructions. One of these, the FSCALE instruction turned out to be far more complicated than assumed, with one might assume to be a straightforward powers-of-two scaling turning out to entail over 140 micro-instructions and three levels of sub-routine calls just to handle all cases.

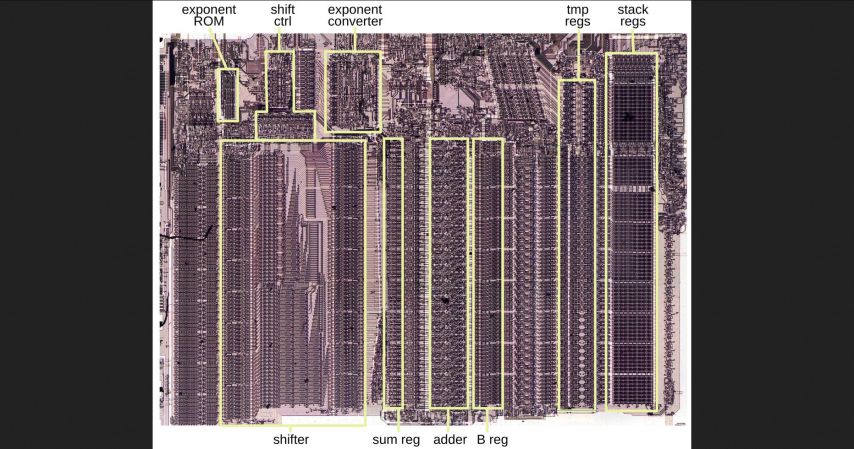
The annotated die shot in the heading image shows the functional blocks that are used by this one x87 instruction, to give some kind of idea of what amount of hardware even ‘just’ scaling a floating point number involves.

Much like with the x86’s CISC-style ISA, these 8087 instructions break down into individual steps that involve everything from loading values into registers, performing operations, checking for and handling error conditions as well as stack management. As can be seen in [Ken]’s breakdown of the FSCALE implementation in the 8087 it’s all very logical, taking a high-level instruction and doing all that’s needed for a robust implementation, without bothering the developer with the details.

Of note is that the 8087’s implementations led to the IEEE 754 floating point standard, providing what definitely at the time was one of the most mathematically accurate FPUs that somehow still was financially responsible enough to make it into a relatively affordable PC.

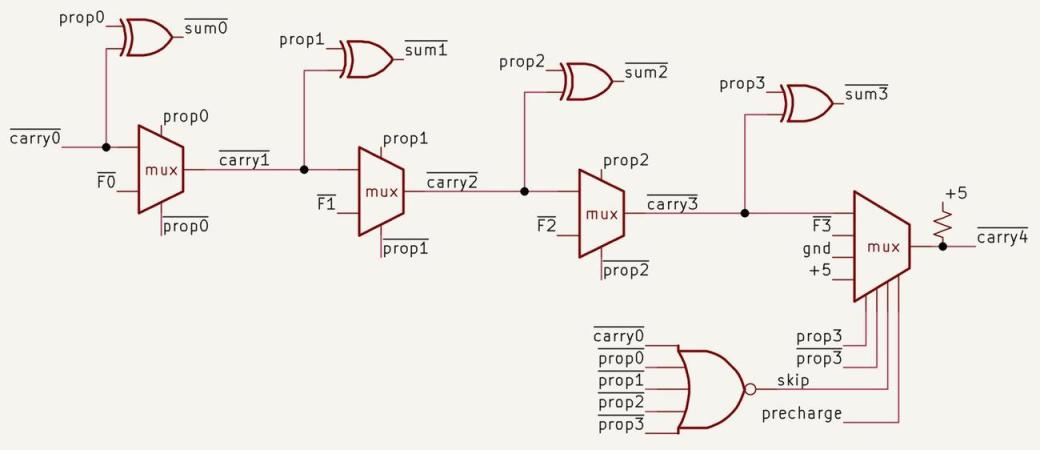
8087's 4-bit adder block. (Credit: Ken Shirriff)

The Adder At The Heart Of Intel’s 8087 FPU

As simple as the concept of adding two numbers appears at first glance, doing it in the 1970s in Intel’s 8087 FPU with its 69-bit adder was still a tall order. This is namely the core feature that many features like tangents, cosines and exponentiation rely on, so it had to be basically perfect. In a recent die-level analysis of the 8087 [Ken Shirrif] dives into the structure, layout and functioning of this ‘beating heart’ of this piece of semiconductor history.

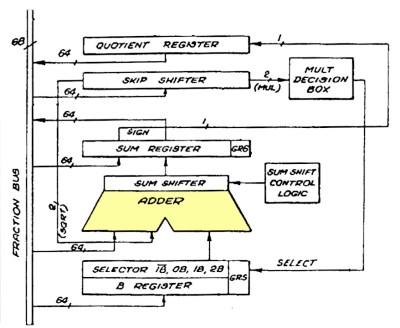
The Intel 8087 adder and associated registers. (Credit: Intel)

Although anyone can build a simple binary adder out of off-the-shelf parts including 74-series logic ICs, the problem is to make it fast so that the 69th bit doesn’t have to wait for e.g. a carry to trickle all the way through the preceding bits. The main way that this is solved is by breaking addition into 4-bit blocks, reducing the problem by a factor of four, along with an optimized Manchester carry-chain carry-lookahead implementation.

The main advantage of this variation of a carry-lookahead is that it reduces the number of required transistors, without sacrificing too much performance. Later on Intel would switch to the faster, but more transistor-intensive Kogge-Stone adder.

Implementing this entire adder with NMOS technology and wiring it all up to the rest of the die required a lot of ingenuity on the side of the Intel engineers, as previously noted this adder is effectively always used in any operation at some stage. This necessitates many surrounding registers and in turn circuitry to manage these, with part of the complexity handled in microcode and part in silicon.

How The Intel 8087 FPU Knows Which Instructions To Execute

An interesting detail about the Intel 8087 floating point processor (FPU) is that it’s a co-processor that shares a bus with the 8086 or 8088 CPU and system memory, which means that somehow both the CPU and FPU need to know which instructions are intended for the FPU. Key to this are eight so-called ESCAPE opcodes that are assigned to the co-processor, as explained in a recent article by [Ken Shirriff].

The 8087 thus waits to see whether it sees these opcodes, but since it doesn’t have access to the CPU’s registers, sharing data has to occur via system memory. The address for this is calculated by the CPU and read from by the CPU, with this address registered by the FPU and stores for later use in its BIU register. From there the instruction can be fully decoded and executed.

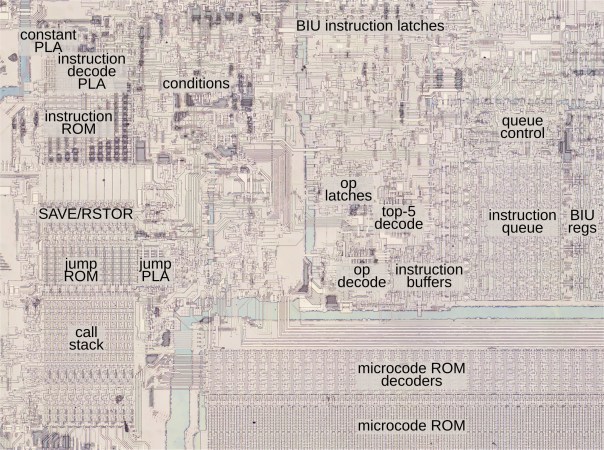
This decoding is mostly done by the microcode engine, with conditional instructions like cos featuring circuitry that sprawls all over the IC. Explained in the article is how the microcode engine even knows how to begin this decoding process, considering the complexity of these instructions. The biggest limitation at the time was that even a 2 kB ROM was already quite large, which resulted in the 8087 using only 22 microcode entry points, using a combination of logic gates and PLAs to fully implement the entire ROM.

Only some instructions are directly implemented in hardware at the bus interface (BIU), which means that a lot depends on this microcode engine and the ROM for things to work half-way efficiently. This need to solve problems like e.g. fetching constants resulted in a similarly complex-but-transistor-saving approach for such cases.

Even if the 8087 architecture is convoluted and the ISA not well-regarded today, you absolutely have to respect the sheer engineering skills and out-of-the-box thinking of the 8087 project’s engineers.