DIY Coffee Roaster Uses Cordless Drills And A Camp Stove

We’re no stranger to coffee roasting hacks, but it’s been a while since we’ve seen a new DIY roaster design. Thankfully [Larry] has been hacking together a small-batch roaster with a bunch of off-the-shelf parts. He was originally trying to make a fully-automated roasting system, but after a bunch of failed prototypes, he settled on a simple roaster design that works great.

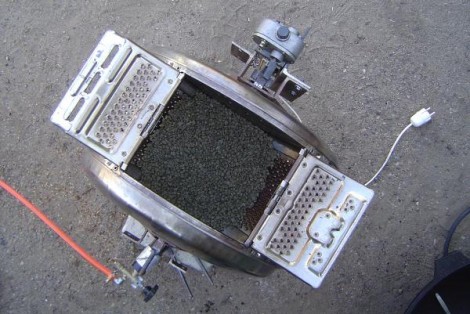
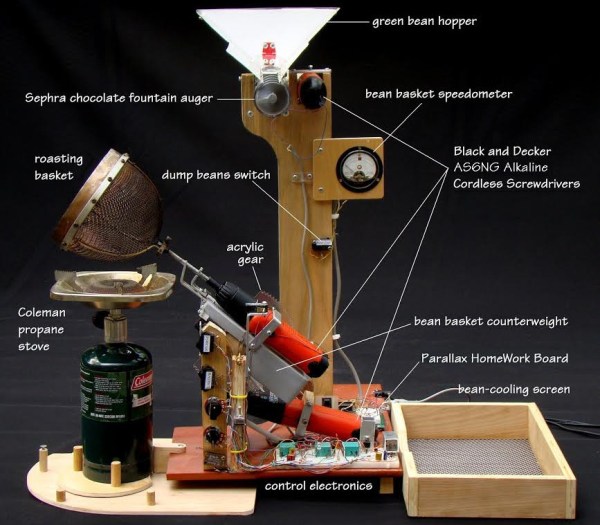
[Larry]’s roaster is designed for small batches of coffee (about 3oz). He has a small hopper with a motorized auger (cannibalized from a chocolate fountain) which drops coffee down into his roasting basket. The basket is mounted to a cordless screwdriver which rotates it to agitate the beans inside. A small camp stove provides the heat, which is placed right under the basket. The beans churn around in the roasting basket and heat up until they reach the desired roast level (typically between first and second crack).

Once the roasting is complete, another hand drill rotates the basket assembly to dump out the coffee. [Larry]’s build includes an assortment of knobs and switches which control the auger, basket speed, bean dumping, and even a “speedometer” gauge that shows how fast the basket is rotating. Want to build your own roaster? Check out the instructions for building [Larry]’s roaster or some other builds we’ve featured before.

Building A Coffee Roaster From Junk

[Rxdtxd] has tried his hand at roasting coffee beans in a frying pan. It works but he can only roast small batches at once. What he really needed was a large-scale roaster that would have no problem with a few pounds of the green beans all at once. He ended up building this large-scale coffee roaster out of junk parts.

The vessel which holds the beans is the drum from a top-loading washing machine. It was headed for the junk pile, but the fully-enclosed drum is perfect for this purpose. After acquiring it [Rxdtxd] set out welding a frame that would hold either side by the pivot points. He used a geared motor to automate the process. The output shaft on the gear box is meant to drive a chain, but he just welded some pieces onto the gear to use as a coupling.

In the picture above he’s giving the roaster a thorough testing with about ten pounds of beans. A portable gas stove placed below the rotating drum supplies the heat. After the beans have reached the desired darkness he pours them out into a large skillet to cool. Take a peek at the roasting action in the clip after the break.

Continue reading “Building A Coffee Roaster From Junk”

Another Take On Roasting Those Beans

[Andrew] takes his coffee very seriously and like any hardcore aficionado he wanted to do the roasting himself. The coffee roaster design uses a heat gun for the roasting and sources an old bread maker as a vessel. As part of the automatic bread making process there’s a little agitator arm inside which keeps the beans moving while the heat is applied. A computer controls the heat gun, adjust with feedback from a temperature sensor. We had a bit of a laugh reading about melted temperature sensors, but design flaws aside this computer interface allows rather strict control of the roasting profile.

Reader [Youseff] tipped us off about this after seeing the Popcorn Coffee Bean roaster from last week.

Hack Together A Coffee Roaster

For most people, making coffee entails taking a couple scoops out of a can of pre-ground coffee, adding water, and pressing “Go” on the drip machine. To others coffee brewing is an artform, and want as much control over the process as possible. For those without an overflowing bank account for a home roasting machine, Evil Mad Scientist Labs have put together a general guide for throwing together a Coffee Bean Roaster and cooler (which is apparently just as important as roasting) from a low cost hot air popcorn popper. The home roasting scene is even big enough to warrant its own Wikipedia page, which also mentions using a popcorn popper as a bean roaster.

The guide includes some great simple circuit diagrams to keep in mind when hacking your own, as well as a good explanation why you shouldn’t just clip out the heating coil for cooling mode.