Hackaday Prize Entry: DC Motor Controller

There are a lot of cheap Chinese CNC machines out there with okay mechanics and terrible electronics. The bearings aren’t complete crap, but the spindle of these CNC machines is a standalone PWM controller with a pot to control the speed. This means you can’t control the spindle speed with LinuxCNC or Mach3.

For his Hackaday Prize entry, [SUF] is building a DC motor controller for a Chinese spindle motor that doesn’t use any kind of encoder. The first part of that project is fairly easy; [SUF] has already built a high current driver. The second bit is a little it harder – because these spindles don’t have an encoder, [SUF] will have to read voltage spikes on the motor poles, giving him the RPM of the spindle. From there, it’s a bit of PID code to get this spindle running at a desired RPM and connecting it to a CNC control box.

So far, [SUF] has a second version of his board waiting for assembly. In the first version of the board, the switching time for the MOSFET was a little slow, but that’s all corrected in the current revision. It’s a great project to extend the capability of these cheap CNC machines, and perfect project for the Hackaday Prize.


The 2015 Hackaday Prize is sponsored by:

DIY Coffee Roaster Uses Cordless Drills And A Camp Stove

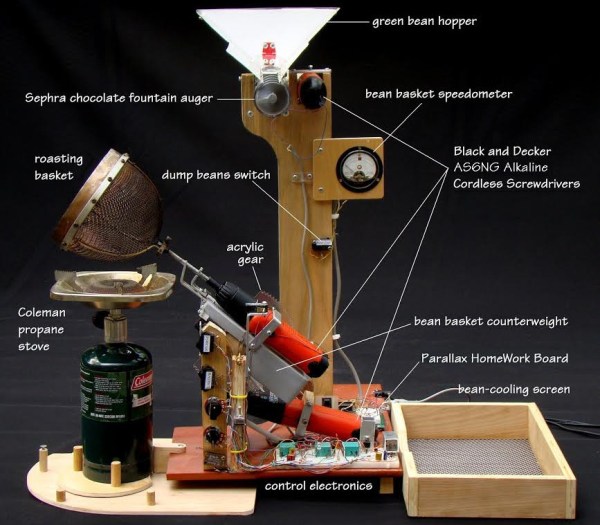
We’re no stranger to coffee roasting hacks, but it’s been a while since we’ve seen a new DIY roaster design. Thankfully [Larry] has been hacking together a small-batch roaster with a bunch of off-the-shelf parts. He was originally trying to make a fully-automated roasting system, but after a bunch of failed prototypes, he settled on a simple roaster design that works great.

[Larry]’s roaster is designed for small batches of coffee (about 3oz). He has a small hopper with a motorized auger (cannibalized from a chocolate fountain) which drops coffee down into his roasting basket. The basket is mounted to a cordless screwdriver which rotates it to agitate the beans inside. A small camp stove provides the heat, which is placed right under the basket. The beans churn around in the roasting basket and heat up until they reach the desired roast level (typically between first and second crack).

Once the roasting is complete, another hand drill rotates the basket assembly to dump out the coffee. [Larry]’s build includes an assortment of knobs and switches which control the auger, basket speed, bean dumping, and even a “speedometer” gauge that shows how fast the basket is rotating. Want to build your own roaster? Check out the instructions for building [Larry]’s roaster or some other builds we’ve featured before.

Drawer Blade

Smarter-than-wood Saw Blade Makes Perfect Foldable Joints

[Andrew Klein] knows the pain of building drawers from plywood. It can be a pain to get all of the pieces measured and cut just right. Then you have to line them up, glue them together, and clamp them perfectly. It’s time-consuming and frustrating. Then one day it hit him that he might be able to make the whole process much easier using a custom saw blade.

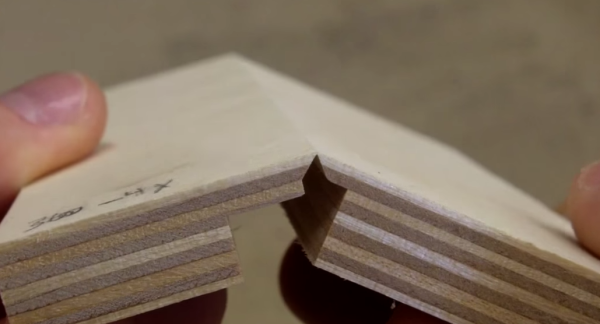
The the video below, [Andrew] does a great job explaining how the concept works using a piece of paper. The trick is that the plywood must be cut in a very specific shape. This shape results in the plywood just barely being held together, almost as if it’s hinged. The resulting groove can then be filled with wood glue, and the plywood is folded over on itself. This folding process leaves no gaps in the wood and results in a strong joint. Luckily this special shape can be cut with a specialized saw blade.

This new process removes the requirement of having five separate pieces for a drawer. Instead, only four cuts are needed on a single piece of square plywood. The corners are then removed with a razor blade and all four sides are folded up and into place. [Andrew] shows that his prototype blade needs a little bit of work, but he’s so hopeful that this new invention will be useful to others. Continue reading “Smarter-than-wood Saw Blade Makes Perfect Foldable Joints”

FPGAs Keep Track Of Your Ping Pong Game

It’s graduation time, and you know what that means! Another great round of senior design projects doing things that are usually pretty unique. [Bruce Land] sent in a great one from Cornell where the students have been working on a project that uses FPGAs and a few video cameras to keep score of a ping-pong game.

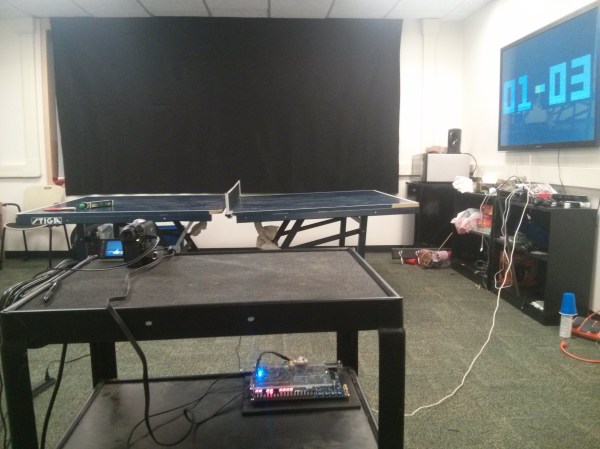
The system works by processing a live NTSC feed of a ping pong game. The ball is painted a particular color to aid in detection, and the FPGAs that process the video can keep track of where the net is, how many times the ball bounces, and if the ball has been hit by a player. With all of this information, the system can keep track of the score of the game, which is displayed on a monitor near the table. Now, the players are free to concentrate on their game and don’t have to worry about keeping score!

This is a pretty impressive demonstration of FPGAs and video processing that has applications beyond just ping pong. What would you use it for? It’s always interesting to see what students are working on; core concepts from these experiments tend to make their way into their professional lives later on. Maybe they’ll even take this project to the next level and build an actual real, working ping pong robot to work with their scoring system!

Continue reading “FPGAs Keep Track Of Your Ping Pong Game”

Hacklet 47 – Thermal Imaging Projects

Thermal imaging is the science of converting the heat signature of objects to an image visible to humans. Everything above absolute 0 gives off some heat, and thermal imagers allow us to see that – even if there is no visible light in the room. Historically, thermal imaging systems have been large and expensive. Early systems required liquid nitrogen cooling for their bolometer sensors. Recent electronic advances have brought the price of a thermal image system from the stratosphere into the sub $300 range – right about where makers and hackers can jump in. That’s exactly what’s happened with the Flir Lepton module and the Seek Thermal camera. This week’s Hacklet is all about thermal imaging projects on Hackaday.io!
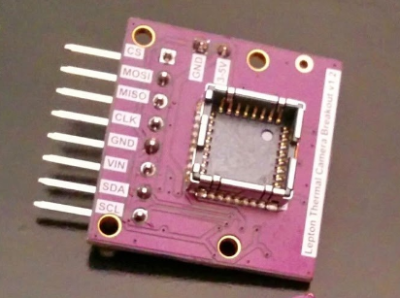
We start with [Pure Engineering] and Flir Lepton Thermal Camera Breakout. Flir’s Lepton thermal camera created quite a stir last year when it debuted in the Flir One thermal iPhone camera. The Lepton module used in the Flir One is a great standalone unit. Interfacing only requires an I2C interface for setup and an SPI interface for image data transfer. Actually using the Lepton is a bit more of a challenge, mainly because of its packaging. [Pure Engineering] made a simple breakout board which makes using the Lepton easy. It’s also breadboard compatible – which is a huge plus in the early phases of any project.
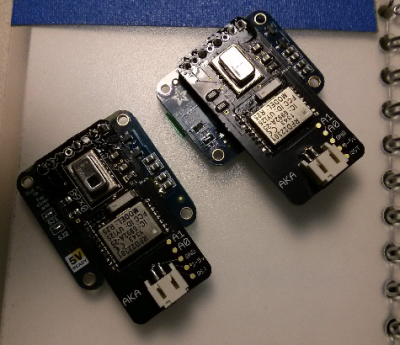
 

grideyeNext up is [AKA] with GRID-EYE BLE-capable thermal camera. This project is a Bluetooth low energy (BLE) thermal camera using Panasonic’s Grid-EYE 64 pixel thermal sensor. 64 pixels may not sound like much, but an 8×8 grid is enough data to see quite a bit of temperature variation. If you don’t believe it, check the project page for a video of [AKA] using Grid-EYE’s on-board OLED display. Grid-EYE was a Hackaday Prize 2014 semifinalist, and we featured a bio on [AKA] last year. The only hard part with building your own Grid-EYE is getting the sensor itself. Panasonic doesn’t sell them to just anyone, so you might have to jump through a few hoops to get your own.


pylepton[Kurt Kiefer] brought the FLIR Lepton to the Raspberry Pi with pylepton video overlay. This project uses the Lepton to overlay thermal data with images captured by the Raspbery Pi camera module. The Lepton interfaces through the I2C and SPI ports on the Pi’s GPIO pins. The results are some ghostly images of black and white thermal views over color camera images – perfect for your next ghost hunting expedition!  The entire project is implemented in Python, so it’s easy to import and use pylepton in your own projects. [Kurt] even gives an example of capturing an image with just 5 lines of code. Nice work, [Kurt]!
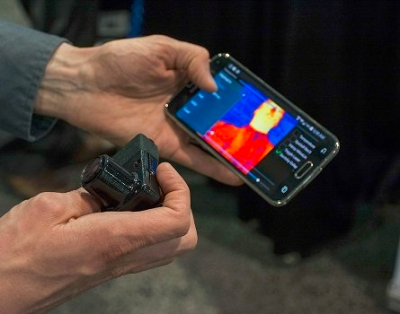


wificamFinally we have [Erik Beall] with WiFi Thermal Camera. [Eric] is using an 82×62 diode array to create thermal images. Unlike microbolometer sensors, diode/thermopile sensors don’t need constant calibration. They also are sturdier than Microelectricomechanical System (MEMS) based devices. This particular project users an array from Heimann Sensor. As the name implies, the sensor is paired with a WiFi radio, which makes using it to capture and display data easy. [Erik] must be doing something right, as WiFi Thermal Camera just finished a very successful Kickstarter, raising $143,126 on a $40,000 initial goal.

Are you inspired? A thermal imager can be used to detect heat loss in buildings, or heat generated by electrical faults – which means it would be a great project for the 2015 Hackaday Prize! If you want to see more thermal imaging projects, check out the thermal imaging projects list!

That’s it for this week’s Hacklet, As always, see you next week. Same hack time, same hack channel, bringing you the best of Hackaday.io!

Hacking The United States Postal Service (Kinda)

The United States Postal Service (USPS) is fixture of American life with its roots going back to colonial times. It operates the largest civilian vehicle fleet in the world, delivering about half a billion pieces of mail a day. As with any system of that size it’s always interesting to peek and poke at to see how it works. Unfortunately, it’s not as fun to hack as the phone system once was, but that didn’t stop some hackers pranksters from giving it a go.

So how do you “hack” the mail? Simple, by testing its own rules. The folks at [Improbable Research] did just that and some of the results were interesting enough that we thought we would share them with you. They started with testing valuable items to see how honest USPS employees would be. First they attached a $20 bill to a post card. Yep, it showed up just 4 days later, and the money was still there. So they decided to see if sentimental items, that normally would be refused by the postal service, might skate through.  They were able to send both an un-boxed single rose, and a human tooth (in a clear plastic box) without issue. Both arrived just fine, despite the rule that human remains are not allowed to be shipped via USPS.  We’ll let you read some of the other items they tried.

So the next time you’re in Hawaii, forget about sending that generic, boring post card back home. Instead, slap some stamps on a coconut to let your friends know exactly how much fun you’re having.

With that said, we wouldn’t be doing our job looking out for our readers if we didn’t mention that before you try anything too outlandish, you can be fined for abuse of the postal system, even as a recipient. There was a fair amount of fallout when those guys sent a camera through the mail. Have fun, but not at someone else’s expense.

Pen Gun

Pneumatic Pen Gun Is Fit For James Bond

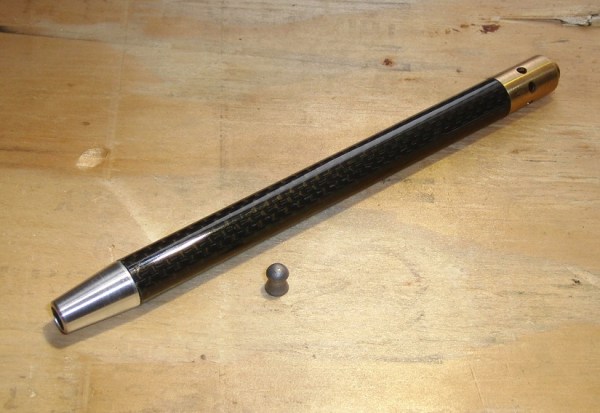
The James Bond franchise is well-known for many things, but perhaps most important to us hackers are the gadgets. Bond always had an awesome gadget that somehow was exactly the thing he needed to get out of a jam. [hw97karbine’s] latest project would fit right into an old Bond flick. He’s managed to build a single-shot pellet gun that looks like a pen.

[hw97karbine] started out by cutting the body from a tube of carbon fiber. He used a hacksaw to do the cutting, and then cleaned up the edges on a lathe. A barrel was cut from a piece of brass tubing with a smaller diameter. These two tubes will eventually sit one inside of the other. A custom front end cap was machined from brass. One end is ribbed and glued into the carbon fiber tube. The barrel is also glued to this end of the front cap, though it’s glued to the inside of the cap. The other end of the cap has 1/8″ BSP threads cut into it in order to allow for attachments.

A rear end cap is machined from Delrin. This piece also has a Delrin piston placed inside. The piston has a small piece of rubber used as a gasket. This piston valve is what allows the gun to operate. The rear cap gets glued into place and attached to a Schrader valve, removed from an automotive tire valve stem.

To pressurize the system, a bicycle pump is attached to the Schrader valve. This pushes the piston up against the barrel, preventing any of the air from escaping. The piston doesn’t make a perfect seal, so air leaks around it and pressurizes the carbon fiber tube. The Schrader valve prevents the air from leaking out of the pen body. A special machined button was threaded onto the Schrader valve. When the button is pressed, the air escapes; the sudden pressure imbalance causes the piston to shoot backwards, opening up a path for the air to escape through the barrel. This escaping air launches the projectile. The whole process is explained better with an animation.

Now, the question left in our mind: is this the same pressure imbalance concept that was used in that vacuum pressure bazooka we saw a couple years back?

Continue reading “Pneumatic Pen Gun Is Fit For James Bond”