As everyone knows, no matter how many drill bits one owns, one inevitably needs a size that isn’t on hand. Well, if you ever find yourself needing to drill a hole that’s precisely 13 mm, here’s a trick from [AvE] to keep in mind for doing it with a 1/2″ bit. It’s a hack that only works in certain circumstances, but hey, it just may come in handy some day.
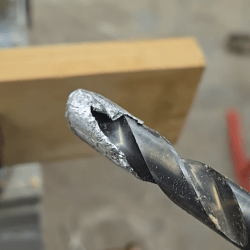
 So the first step in making a 13 mm hole is to drill a hole with a 1/2″ bit. That’s easy enough. Once that’s done, fold a few layers of tinfoil over into a small square and lay it over the hole. Then put the drill bit onto the foil, denting it into the hole (but not puncturing it) with the tip, and drill at a slow speed until the foil wraps itself around the bit like a sheath and works itself into the hole. The foil enlarges the drill bit slightly and — as long as the material being drilled cooperates — resizes the hole a tiny bit bigger in the process. The basic idea can work with just about any drill bit.
It’s much easier demonstrated than described, so watch it in action in the video around the 2:40 mark which will make it all very clear.
It’s not the most elegant nor the most accurate method (the hole in the video actually ends up closer to 13.4 mm) but it’s still something worth keeping in the mental toolbox. Just file it away along with laying your 3D printer on its side to deal with tricky overhangs.
Continue reading “How To Make A 13 Mm Hole With A 1/2″ Drill Bit”


