[Jaimie’s] Giant Hexapod Project

Warning, this may be a duplicate post. We all agree we’ve seen this before, but can’t find it in our archive. If it is, sorry. If it isn’t enjoy one of the most awesome projects we’ve seen in a long time.

Meet [Jaimie Mantzel] an eccentric, and very hyper, individual. He’s done many projects, but this one in particular stands out as being quite ambitious. [Jaimie] is building a giant hexapodal walker that he can ride in. Dubbed simply “Giant Robot”, the 12 foot tall and 18 foot wide robot began construction in 2007. This individual is so full of energy, you’ll get tired just watching his videos. We’ve included, below, his introduction video as well as the video where his giant robot takes its first steps. Note that there are 67 videos of the build process. Unfortunately, as of the last video in January 2011, the robot is unfinished.

Don’t worry though, we know [Jaimie] is still alive. We saw him recently coming up with cool toy ideas.

If this has left you with an insatiable craving for a video of a fully functional giant walking hexapod octopod, don’t forget about mondo spider.

[Thanks Kamil]

Continue reading “[Jaimie’s] Giant Hexapod Project”

Upgrading A Digital Multimeter To Tell The Temperature

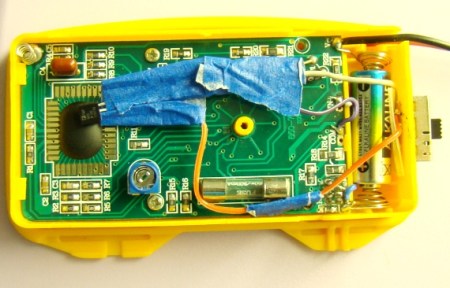
[Rajendra] tipped us off to this really slick hack he’s done to allow his multimeter to tell the ambient temperature. He’s basically measuring the output of an LM35 temp sensor that he has mounted in the case. The circuit is extremely simple and only requires the sensor, a couple resistors, and a switch so that you can return to normal function. When finished, you’ll have a multimeter that will display the ambient temperature when set to to the correct range (0-200 mV in his case). The switch is there so that you can return your multimeter to normal function afterwards.  While [Rajendra] chose to display ambient temperature, you could just as easily create an external probe for measuring other things.

Arduino Uno BIOS Flasher

We’ve seen the Arduino used to flash BIOS chips several times now. But these hacks are almost always the result of a bad flash. This time around [GNUtoo] is interested in putting a tool in your hands which can be used to flash Coreboot to your motherboard. His offering uses the Arduino Uno, but there are several other hardware options covered as well.

The firmware makes use of the serprog-duino library which was crafted at writing to flash memory chips. On the computer side of things the flashrom package pushes the BIOS image to the Arduino. The nice thing is the flashrom is a common packge in Linux repositories so it’s probably just an apt-get away.

The process isn’t fast, taking about ten minutes to program a 1 Mb chip. But if you’re just interested in loading an open source BIOS alternative this is easy to set up.

Sign And Speak Glove

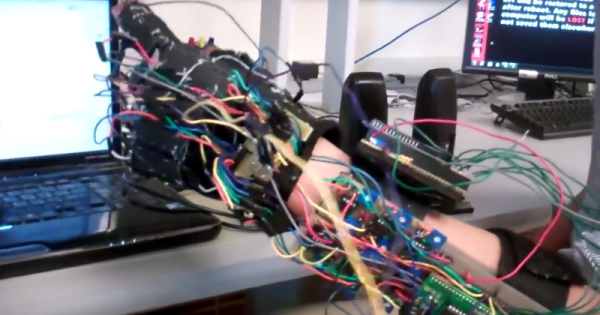
This wire covered glove is capable of turning your hand gestures to speech, and it does so wirelessly. The wide range of sensors include nine flex sensors, four contact sensors, and an accelerometer. The flex sensors do most of the work, monitoring the alignment of the wearer’s finger joints. The contact sensors augment the flex sensor data, helping to differentiate between letters that have similar finger positions. The accelerometer is responsible for decoding movements that go along with the hand positions. They combine to detect all of the letters in the American Sign Language alphabet.

An ATmega644 monitors all of the sensors, and pushes data out through a wireless transmitter. MATLAB is responsible for collecting the data which is coming in over the wireless link. It saves it for later analysis using a Java program. Once the motions have been decoded into letters, they are assembled into sentences and fed into a text-to-speech program.

You’ve probably already guess that there’s a demo video after the break.

Continue reading “Sign And Speak Glove”

Chocolate Extrusion Printer Is Halfway To Making S’mores

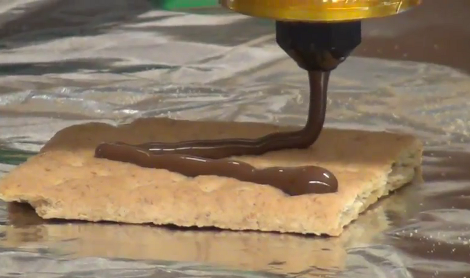
Chocolate has got to be one of the worst choices as a printing medium. It’s extremely fussy when it comes to melting point, and even in the right state the flow of the material is not going to play nicely with high-resolution designs. With this in mind, we applaud the progress the student team from Carnegie Mellon University has made with WonkaBot,  their chocolate extrusion printer.

Unlike the syringe-based paste extruder from last month, this offering uses an auger to push chocolate through a heated printer head. They’re using it to print designs on graham crackers. We love the UI they came up with for the task. It uses a virtual graham cracker as a canvas on your laptop and allows you to use the touchpad or mouse to draw your design. That input is then converted to g-code and sent to the CNC machine for printing. See it in action after the break.

Continue reading “Chocolate Extrusion Printer Is Halfway To Making S’mores”

Huge Water And Light VU Meter Plus More

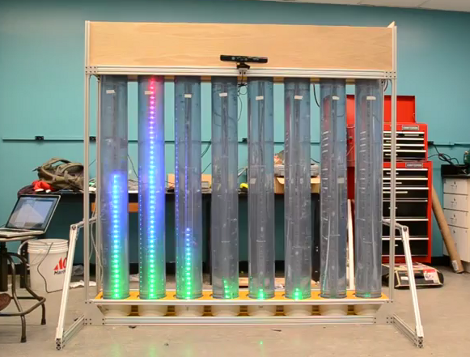
This is the senior design project for a group at the University of Vermont. It’s a wet, bubbly, blinky, interactive thing. Each column is a clear tube filled with water, with a string of fully addressable RGB LEDs suspended in the center. In idle mode, the lights scroll through a series of interesting patterns while the water is filled with bubbles to add some depth to the presentation. There is also a VU meter function, as seen here and during the Portal theme song that ends the video demo after the break.

A Teensy++ board is used to address the display. It’s set up to receive serial commands from a Processing script which is responsible for generating the animations. At the top of the frame you can see there’s a Kinect sensor. By standing in the standard post (we think it should be called the Kinect mug shot) the installation will automatically switch over to body control. We could see this thing making its way into a long airplane terminal hallway, following the travelers along their trek from one terminal to the next.

Continue reading “Huge Water And Light VU Meter Plus More”

Automatic Airplane Tracking; What Radar-systems Engineers Do For Kicks

[G. Eric Rogers] is a radar-systems engineer who just happens to live within sight of the aircraft approach path for the local airport. We wonder if that was one of the criteria when looking for a home? Naturally, he wanted his own home-based system for tracking the airplanes. He ended up repurposing a motorized telescope for this purpose.

The system does not actually use Radar for tracking. Instead, the camera strapped to the telescope is feeding a video experimenter shield. A tracking algorithm analyzes the video and extrapolates vector data. From there, the base unit can be controlled by the Arduino via an RS232 interface.

There are some bugs in the system right now. The Arduino has something of an ADHD problem, losing interesting and going to sleep in the middle of the tracking process. [Eric’s] workaround uses the RS232 board to periodically reset the Arduino, but he hopes to squash this bug soon.