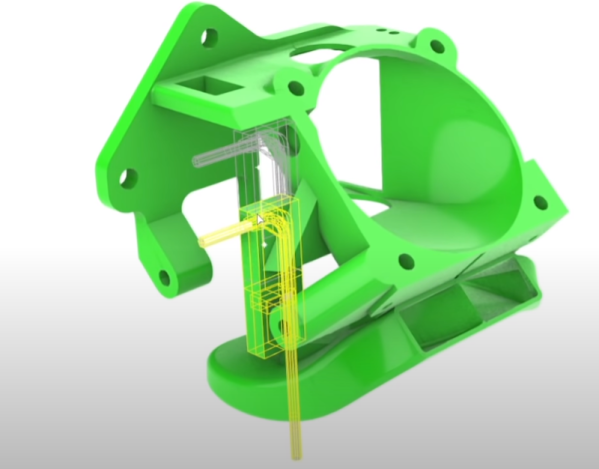
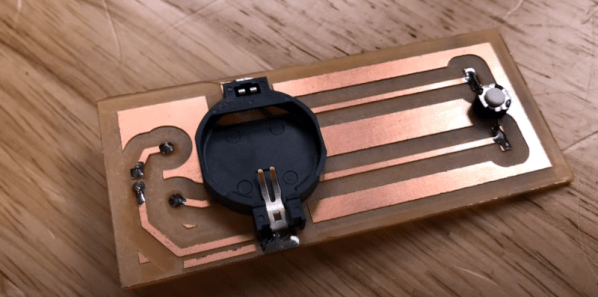
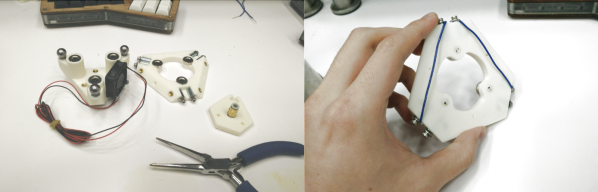
Homemade Probe For 3D Printer: $3

You have a few choices if you want to use a probe to level your 3D printer bed. Rarely, you’ll see optical or capacitive probes. More commonly, though, your probe will sense a metal print or uses a physical probe to touch the print bed. [Design Prototype Test] has long used a BLTouch which uses the latter method. However, putting it in a heated build chamber prevented it from working so he set out to make his own simple design using an Allen key.

We’ve seen Allen key sensors before, but usually, they use a microswitch. We’ve also seen microswitches used to directly probe the bed. But, in this case, a 3D printed fan shroud uses an optical sensor to note when the Allen key hits the bed.

Continue reading “Homemade Probe For 3D Printer: $3”

3D Printer Bed Probing Using A Tact Switch And Coin Cell

Inspired by his CNC’s leveling system, [Chuck] built a small PCB to help level his 3D printer and he shares the details in the video you can see below. The idea is simple, the nozzle pushes down on the PCB which has a tact switch underneath. When the switch closes, an LED lights.

In practice, you measure the height of the board and use that for your Z offset, and you are done. Our only concern would be how repeatable the switch is. Granted, most people use a piece of paper and that’s probably not totally repeatable or accurate either. Proper feeler gauges are the “right” way to do it, but we know only a few people who do that.

If you ever look into the repeatability of various Z probes like the proximity sensors or the little pins that drop out of a 3D Touch probe, they aren’t that repeatable. Some people use microswitches, too, which is pretty similar to this approach and is apparently good enough.

The board is available, but it is simple enough that you could create it — or an equivalent — with just about any method you use for your PCBs. [Chuck’s] prototype board was milled. We are always surprised more people don’t use the nozzle itself to sense the bed. Some people go to a lot more trouble than just electrical contact even for CNC.

Continue reading “3D Printer Bed Probing Using A Tact Switch And Coin Cell”

Hotend Becomes The Z Probe With A Kinematic Coupling

3D Printer tool changers are bedazzling to watch, but even failed attempts at tool changers can yield something marvelous. Such is the case for [Raymond] who transformed a tool changer attempt into a perfectly capable z-level probe that uses the hotend itself as a limit switch.

The secret sauce behind this mechanism: a kinematic coupling. This coupling takes two planar surfaces and perfectly constrains them relative to each other by mating them together at exactly 6 points of contact. The result is that repeatedly separating and joining the two surfaces will always land them in the same spot within a few microns. To transform these surfaces into a switch, we need only run a small current between the points of contact. That was easy since there were all-metal balls and pins making the connection. Both surfaces are held together with magnets with the upper surface holding the hotend. To trip the limit switch, the printer simply lowers the z-height until the hotend “probes” the bed, defeating the magnets and breaking the current. Presto! No switches or P.I.N.D.A. probes. Just good old fashioned electricity and steel pins.

With so much focus on pricey probes and repeatable switches, it’s great to see some good old-fashioned geometry guiding the precision behind this printer’s sensing. It’s also heartwarming hear that the whole project was actually inspired by another coupling-equipped 3D printer that landed here a few years ago! Finally, if you’re curious to see some other folks getting some more mileage out of kinematic couplings, have a look at this homebrew CNC touch probe.