A 3D Printed Kinematic Camera Mount

[Enginoor] is on a quest. He wants to get into the world of 3D printing, but isn’t content to run off little toys and trinkets. If he’s going to print something, he wants it to be something practical and ideally be something he couldn’t have made quickly and easily with more traditional methods. Accordingly, he’s come out the gate with a fairly strong showing: a magnetic Maxwell kinematic coupling camera mount.

If you only recognized some of those terms, don’t feel bad. Named for its creator James Clerk Maxwell who came up with the design in 1871, the Maxwell kinematic coupling is self-orienting connection that lends itself to applications that need a positive connection while still being quick and easy to remove. Certainly that sounds like a good way to stick a camera on a tripod to us.

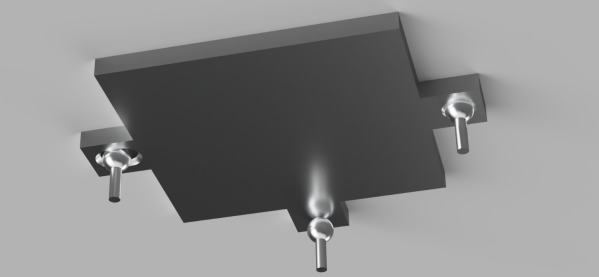
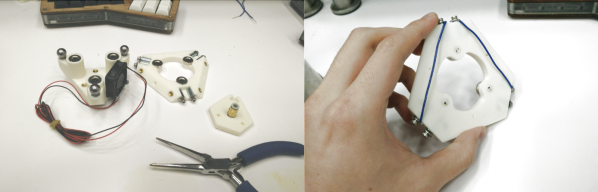
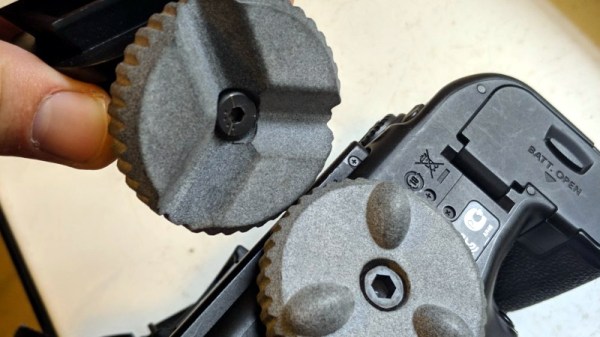
But the Maxwell design, which consists of three groves and matching hemispheres, is only half of the equation. It allows [enginoor] to accurately and repeatably line the camera up, but it doesn’t have any holding power of its own. That’s where the magnets come in. By designing pockets into both parts, he was able to install strong magnets in the mating faces. This gives the mount a satisfying “snap” when attaching that he trusts it enough to hold his Canon EOS 70D and lens.

[enginoor] says he could have made the holes a bit tighter for the magnets (thereby skipping the glue he’s using currently), but otherwise his first 3D printed design was a complete success. He sent this one off to Shapeways to be printed, but in the future he’s considering taking the reins himself if he can keep coming up with ideas worth committing to plastic.

Of course we’ve seen plenty of magnetic camera mounts in the past, but we really like the self-aligning aspect of this design. It definitely seems to fit the criterion for something that would otherwise have been difficult to fabricate if not for 3D printing.

Expanding 3D Printer Bed Stays True Under Fire

It’s hard to pass up another lesson in good machine design brought to us by [Mark Rehorst]. This time, [Mark] combats the relentless forces of bed deformation due to thermal expansion.

Did you think your printer stayed the same size when it heated up? Well, think again! According to [Mark’s] calculations, when heated, the bed can expand by as much as half a millimeter in the x/y direction. While x/y deformation seems like something we can ignore, that’s not always true. If our bed is rigidly fixed in place, then that change in dimension will only result in a warped bed as it tries to make space for itself.

Don’t give up yet though. As sinister as this problem may seem, [Mark] introduces a classic-but-well-implemented solution: and adjustable kinematic coupling. The kinematic coupling holds the bed at the minimum number of points to keep it rigid while exposing thumbscrews to dial in a level bed. What’s special about this technique is that the coupling holds the bed perfectly rigid whilst allowing it to thermally expand!

This is the beauty of “exact constraint” design. Parts are held together only by the minimum number of points needed to guarantee a specific relationship. Here that relationship is coplanarity between the the nozzle’s x/y plane and the bed. Even when the bed expands this relationship holds. Now that is magic.

With such a flood of 3D printed parts on the market, building a printer has never been easier! Nevertheless, it’s easy to pin ourselves into a corner re-tuning a poor design that skips a foundation on the base principles. If you’re curious about more of these principles behind 3D printer design, check out [Mark’s] thorough walkthrough on the CoreXY design.

Hotend Becomes The Z Probe With A Kinematic Coupling

3D Printer tool changers are bedazzling to watch, but even failed attempts at tool changers can yield something marvelous. Such is the case for [Raymond] who transformed a tool changer attempt into a perfectly capable z-level probe that uses the hotend itself as a limit switch.

The secret sauce behind this mechanism: a kinematic coupling. This coupling takes two planar surfaces and perfectly constrains them relative to each other by mating them together at exactly 6 points of contact. The result is that repeatedly separating and joining the two surfaces will always land them in the same spot within a few microns. To transform these surfaces into a switch, we need only run a small current between the points of contact. That was easy since there were all-metal balls and pins making the connection. Both surfaces are held together with magnets with the upper surface holding the hotend. To trip the limit switch, the printer simply lowers the z-height until the hotend “probes” the bed, defeating the magnets and breaking the current. Presto! No switches or P.I.N.D.A. probes. Just good old fashioned electricity and steel pins.

With so much focus on pricey probes and repeatable switches, it’s great to see some good old-fashioned geometry guiding the precision behind this printer’s sensing. It’s also heartwarming hear that the whole project was actually inspired by another coupling-equipped 3D printer that landed here a few years ago! Finally, if you’re curious to see some other folks getting some more mileage out of kinematic couplings, have a look at this homebrew CNC touch probe.