Tweezing Diodes

Surface mount diodes are simple enough — all you need to do is make sure you have the anode and cathode in the right order when you place them on the pad when you solder them. These SMD diodes come in industry-standard packages, but do you think there’s an industry-standard way of marking the cathode? Nope, not by a long shot. To solve the problem of figuring out which way the electrons go through his LEDs, [Jesus] built a simple pair of LED tweezers.

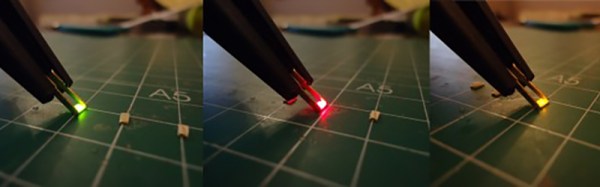
The purpose of these tweezers is to figure out which way is up on a LED. To do this, [Jesus] picked up a pair of multimeter and power supply compatible SMD test clips that are sufficiently tweezy. These tweezers come with red and black wires coming out the back, but cutting those leads off, peeling back the insulation and adding a CR2032 battery holder and 220Ω resistor turns these tweezers from a probe into an electrified poker.

To figure out what the arcane symbols on the bottom of an SMD diode mean, all [Jesus] has to do is touch each side of the pair of tweezers to one of the contacts on a LED. If it lights up, it’s that way around. If it doesn’t light up, the battery is dead, or the diode is backwards. It’s a great project, especially since these SMD test clip tweezer things can be had from the usual online retailers for just a few bucks. We would recommend a switch and marking which tweeze is ground, though.

Fail Of The Week: New Hackerspace Burglarized Days Before Opening

Starting up a new hackerspace from the ground up is a daunting task. Before you even think about the fun stuff like tools and a space, you’ve got a ton of social engineering to do. Finding like-minded people with the drive and passion for seeing the project through is a major stumbling block where many projects falter. If you get past that, then figuring out a corporate structure and getting funds together to start building something can be difficult, as can local permits and the endless red tape that always seems to accompany anything seen as new or innovative.

But finally the magic day comes for your group to open the doors on the new hackerspace, perhaps with an open house or some event to bring the community in and maybe rustle up some paying members. It should be a happy occasion, but for a new hackerspace near Houston, the grand opening celebration was thwarted when thieves broke into the space and cleaned out all their tools days before it opened.

Continue reading “Fail Of The Week: New Hackerspace Burglarized Days Before Opening”

Your Next Desktop… QNX?

QNX has a long checkered history as an embedded operating system. QNX was always famous for being a real time operating system with a microkernel architecture. That is, kernel functions run as a set of coordinated tasks instead of as a single piece of code. A recent release of QNX 7 (see video, below) allows it to run on 64-bit desktop computers and [elahav] decided to tackle turning this embedded RTOS into a desktop operating system.

That might sound far-fetched, but QNX is a POSIX-compliant system and has all the features you’d expect in a system like Linux or BSD. It just isn’t aimed at the desktop market and therefore doesn’t have a lot of tools for running the desktop. QNX isn’t the kind of RTOS you’ll find on an Arduino. It is more common in things like automobile systems (for example, it runs General Motor’s OnStar system).

He started with a mini ITX board and installed QNX. Usually, you develop for an embedded system on a workstation and then just ship the code over to the target system, but [elahav] took the time to get a build system working on the target. There was one problem. The built-in vi editor was primitive by modern standards. He is usually an emacs user, but even vim would be better than the “stock” vi. While an emacs port would be possible, it would also require porting over a lot of libraries, so his first project was to get the vim source code to compile.

Turned out not to be as easy as he had hoped. The build system expected certain GNU tools that didn’t exist yet (although standard versions of the tools, like grep, did exist). So he had to figure out how to cross compile vim. In retrospect, [elahav] decided he should have just ported the GNU tools first. He did have to remove some old code from vim that was aimed at an older version of QNX.

Continue reading “Your Next Desktop… QNX?”

Hack Your Hike With This Arduino Puzzle Geocache

For those who love to hike, no excuse is needed to hit the woods. Other folks, though, need a little coaxing to get into the great outdoors, which is where geocaching comes in: hide something in the woods, post clues to its location online, and they will come. The puzzle is the attraction, and doubly so for this geocache with an Arduino-powered game of Hangman that needs to be solved before the cache is unlocked.

The actual contents of a geocache are rarely the point — after all, it’s the journey, not the destination. But [cliptwings]’ destination is likely to be a real crowd pleaser. Like many geocaches, this one is built into a waterproof plastic ammo can. Inside the can is another door that can only be unlocked by correctly solving a classic game of Hangman. The game itself may look familiar to long-time Hackaday readers, since we featured it back in 2009. Correctly solving the puzzle opens the inner chamber to reveal the geocaching goodness within.

Cleverly, [cliptwings] mounted the volt battery for the Arduino on top of the inner door so that cachers can replace a dead battery and play the game; strangely, the cache entry on Geocaching.com (registration required) does not instruct players to bring a battery along.

It looks like the cache has already been found and solved once since being placed a few days ago in a park north of Tucson, Arizona. Other gadget caches we’ve featured include GPS-enabled reverse caches, and a puzzle cache that requires IR-vision to unlock.

Continue reading “Hack Your Hike With This Arduino Puzzle Geocache”