Luxmeter Meets Linux

Over the past 30 years the price of hardware has slowly but surely come down, and it’s now possible to buy all manner of widgets and gizmos online for less than the price of a fancy Italian dinner. By and large this is a good thing, but it’s not uncommon to find that your new tools are let down by the software side of things. Of course, you can always develop your own solution – and in [ThePhil]’s case, that’s exactly what he did.

The hardware in question was a PCE-174 luxmeter, which came with an uncooperative Windows application as standard. This simply wouldn’t do, so [ThePhil] set about developing a Linux version in Python. This was achieved through the aid of documentation, not of the PCE-174, but its sibling from another corporation – the Extech HD450. The two meters were similar enough that the Extech’s better documentation was able to fill in the gaps of [ThePhil]’s understanding.

[ThePhil] has diligently implemented the full feature set of the PCE-174, and has documented the project well. There are even notes on the version numbers of various dependencies, which will surely be a great help if someone’s trying to run the code five years down the track.

It’s a great lesson that one need not be at the mercy of the software one is given. For a great many cases, it’s possible to roll your own solutions that are robust and get the job done. This approach can be taken to great lengths – you can go so far as replacing an entire camera firmware, if you so wish.


Camera Light Meter

Upgrading An Old Camera With A New Light Meter

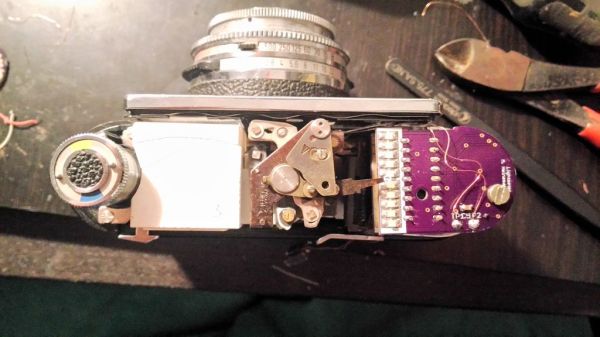
[Marc] has an old Voigtländer Vito CLR film camera. The camera originally came with an analog light meter built-in. The meter consisted of a type of solar panel hooked up to a coil and a needle. As more light reached the solar panel, the coil became energized more and more, which moved the needle farther and farther. It was a simple way of doing things, but it has a down side. The photo panels stop working over time. That’s why [Marc] decided to build a custom light meter using newer technology.

[Marc] had to work within the confines of the tiny space inside of the camera. He chose to use a LM3914 bar display driver IC as the primary component. This chip can sense an input voltage against a reference voltage and then display the result by illuminating a single LED from a row of ten LEDs.

[Marc] used a photo cell from an old calculator to detect the ambient light. This acts as a current source, but he needed a voltage source. He designed a transimpedence amplifier into his circuit to convert the current into a voltage. The circuit is powered with two 3V coil cell batteries, regulated to 5V. The 5V acts as his reference voltage for the display driver. With that in mind, [Marc] had to amplify this signal further.

It didn’t end there, though. [Marc] discovered that when sampling natural light, the system worked as intended. When he sampled light from incandescent light bulbs, he did not get the expected output. This turned out to be caused by the fact that incandescent lights flicker at a rate of 50/60 Hz. His sensor was picking this up and the sinusoidal output was causing problems in his circuit. He remedied this by adding two filtering capacitors.

The whole circuit fits on a tiny PCB that slides right into position where the original light meter used to be. It’s impressive how perfectly it fits considering everything that is happening in this circuit.

[Thanks Mojay]