Building A Knife By Hand Is Just As Hard As You Think

Carl Sagan once said: “If you wish to make an apple pie from scratch, you must first invent the universe.” In other words, the term “scratch” is really a relative sort of thing. Did you grow the apples? Did you plant the wheat to make the flour? Where do you keep your windmill, incidentally? With Carl’s words in mind, we suppose we can’t say that [Flannagill] truly built this incredible knife from scratch, after all, he ordered the sheet steel on Amazon. But we think it’s close enough.

He was kind enough to document the epic build in fantastic detail, including (crucially), the missteps he made along the way. While none of the mistakes were big enough to derail the project, he mentions a few instances where he wasted time and money trying to take shortcuts. Even if making your own knives at home isn’t on your short list of summer projects, we’d wager there’s something in this build log you can learn from regardless.

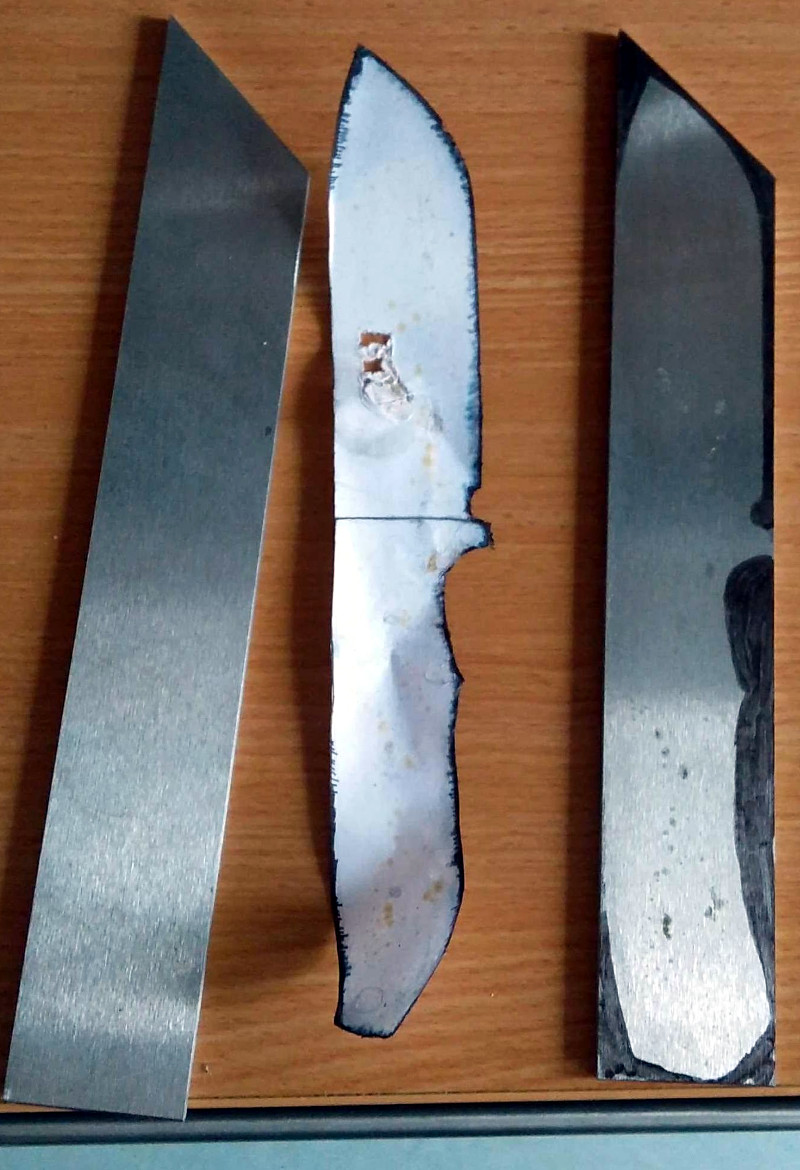
So how does one build a knife? Slowly and methodically, if what [Flannagill] has written up is any indication. It started with a sketch of the knife on a piece of paper, the outline of which was then transferred to a piece of tool steel with nothing more exotic than a permanent marker. An angle grinder was then used to follow the outline and create the rough shape of the final knife.

From there, the process is done almost entirely with hand files. Here [Flannagill] gives one of his most important pieces of advice: don’t cheap out on the tools. He bought the cheapest set of files he could, and paid the price: he says it took up to 14 hours to complete just one side of the knife. Once he switched over to higher quality files, the rest of the work went much faster.

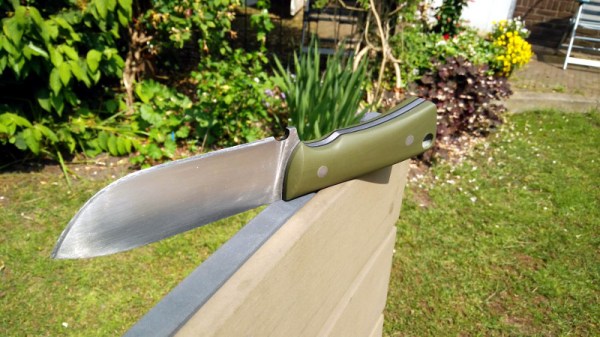
After filing and sanding the knife blank, it went into a charcoal fire to be hardened, followed by a total of 4 hours in a 200 C (~400 F) oven to heat temper it. Finally the handle pieces (which are officially known as “scales”) were attached, and finished with considerably less labor intensive woodworking methods. The final result is a gorgeous one of a kind specimen that [Flannagill] is rightly very proud of.

If you’re worried this process looks a bit too quick and easy for you, don’t worry. You can always go the [Bil Herd] route and make a forge out of your old sink if you’d rather start your apple pie a bit closer to the tree.

The Latest 3D Printed Fad: Flexible Armor And Pangolin Cosplay

Last week, [David Shorey] came along to the monthly Hackaday meetup in Pasadena. These meetups feature speakers and drinks, projects and chit-chat, and sometimes a few demos of what the local Hackaday community has been working on. [David]’s impromptu demo was something no one had ever seen before. It’s 3D printed tiles embedded in fabric. This is the beginning of 3D printed flexible armor, a great method for cosplay builds, and a really cool way to add another trick to your 3D printing toolkit.

Hexagons tesselate. Image credit: DrainSmith

The steps to reproduce this project are actually very easy. The most important bit is the fabric itself. This is just a piece of tulle, a fine fabric mesh that’s usually used for bridal veils. According to members of the 3D printing community, you can pick up some tulle in the fabric department of any WalMart. The steps to reproduce this technique are simply to print three layers, pause the print and move the head out of the way, lay the tulle down on the print, and hit resume.

Judging from the commentary surrounding this new technique, there are a few tips and tricks to get the most out of this 3D printable fabric. The fabric should be taut and held down with either tape or binder clips. Melting or burning doesn’t seem to be an issue, but tulle made out of nylon is fairly common, and printing 3D panels with exotic filaments that require high temperatures may result in a mess.

While very cool, there are some limitations to the technique. If, for example, you are building a suit of body armor out of bendable tessallatable panels, you will have to assemble a quilt made out of panels as large as your print bed. This could be made easier by sewing (or gluing) the tulle/scale assembly onto a larger piece of fabric. Alternatively, the process could be modified for use with an Infinite Build Volume printer. This would give you yards and yards of 3D printed scales, ready to be fashioned into an outfit.

This is one of the most interesting techniques to bring 3D printing into the domain of ‘soft’ hacks and fashion we’ve ever seen. If you want to check out what’s possible with this, be sure to follow [David] on Twitter and out his Instagram. There are a lot of really great ideas there.

As with most ideas in 3D printing, this is one that’s been done before, albeit at not such a high level. [Drato] a.k.a. [RobotMama] did pretty much the same thing a few months ago, and we thank her for her contribution to the community.

Slide Rule For Musical Scales

For all those engineers who dabble in music [Magnetovore] has your back. Musicians simply must know their scales and he came up with a papercraft slide rule for major and minor scales.

The system is very easy to use. He’s uploaded PDF files that let you print out the mask for the top layer and bar chart and directions for the bottom layer. The top layer is laid out like a piano keyboard, with windows for each key and a couple of windows to identify the major and minor scales being displayed. Just slide the mask until each key is a solid color. The color codes show the tonic, third, and dominant for each key so you know where to start. In the video after the break you can see how it works by playing all of the non-black keys in order. But wait, if you order now you’ll get the slide rule for Cello scales at the same low-cost; free!

This is a fun quick-reference, but you really should know your Circle of Fifths. Continue reading “Slide Rule For Musical Scales”