Curing A Parrot’s Amnesia With BLEAH

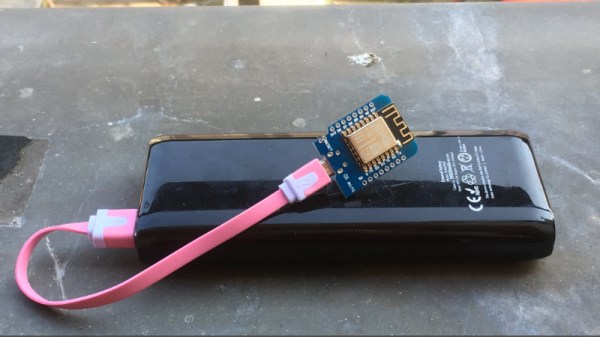
[Dandu] recently wrote in to tell us how he managed to revive his Parrot Flower Power after the manufacturer told him it couldn’t be repaired. To save you the trouble of opening Google in another tab, the Parrot Flower Power is a Bluetooth Low Energy (BLE) “smart” device for your flower pot. Because of course that’s a thing.

A healthy Flower Power connected

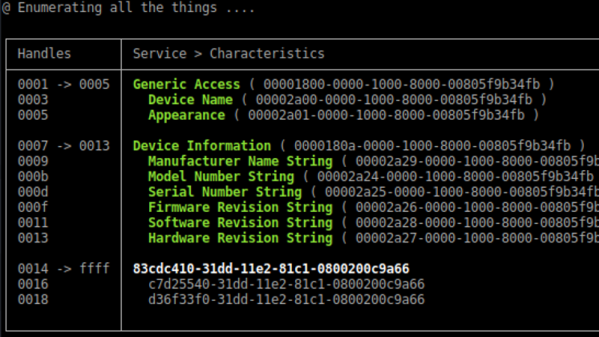
When [Dandu] noticed his Flower Power was no longer being detected by his iOS devices, he contacted support who told him that sadly this was a hardware failure and that he should just throw it away. But he had his doubts about this diagnosis as other devices such as his Raspberry Pi could still communicate with it. Upon closer inspection, he realized that the Flower Power didn’t have a name, and could only be contacted by its MAC address directly. Reasoning the lack of a name might be upsetting the “It Just Works” sensibility of his iGadget, [Dandu] started researching if there was some way to get the device to take a new name remotely.

Luckily for our hero, BLE is kind of broken. Searching for a solution to his problem brought him to a blog post by the creator of BLEAH which demonstrated exactly what [Dandu] was looking to do. Following along, it took only a single command to push a new name to the Flower Power’s BLE configuration. With that, his “broken” device was brought back to life. Why the device lost its name, or how to prevent it from happening in the future are questions for another day. [Dandu] will take the win.

If you’re interested in the popular new technology that’s compromising our security in the name of convenience and improved battery life, the rabbit hole starts here.

Celebrating The Olympics With Flaming Windmills

Like many of us, [Gustav Evertsson] was looking for an excuse to set stuff on fire and spin it around really fast to see what would happen. Luckily for him (and us) the Winter Olympics have started, which ended up being the perfect guise for this particular experiment. With some motors from eBay and some flaming steel wool, he created a particularly terrifying version of the Olympic’s iconic linked rings logo. Even if you won’t be tuning in for the commercials Winter Games, you should at least set aside 6 minutes to watch this build video.

The beginning of the build starts with some mounting brackets getting designed in Fusion 360, and you would be forgiven if you thought some 3D printed parts were coming up next. But [Gustav] actually loads the design up on a Carbide 3D CNC and cuts them out of wood.

A metal hub is attached to each bracket, and then the two pieces are screwed onto a length of thin wood. This assembly is then mounted up to the spindle of a geared motor rated for 300 RPM. The end result looks like a large flat airplane propeller. Five of these “propellers” are created, one for each ring of the Olympic’s logo.

Once the sun sets, [Gustav] takes his collection of spinners outside and lines them up like windmills. At the end of each arm is a small ball of fine-grade steel wool, which will emit sparks for a few seconds when lighted. All you’ve got to do is get the 10 pieces of steel wool alight at the same time, spin up the motors, and let persistence of vision do the rest. If you can manage the timing, you’ll be treated with a spinning and sparking version of the Olympic rings that wouldn’t look out of place in a new Mad Max movie.

Generally speaking, we don’t see much overlap between the hacker community and the Olympics. You’d have to go all the way back to 2012 to find another project celebrating this particular display of athleticism. We would strongly caution you not to combine both of these Olympic hacks at the same time, incidentally.

Continue reading “Celebrating The Olympics With Flaming Windmills”

Custom Parts Feeder Aims To Keep Pace With Pick And Place

When your widgets have proven so successful that building them gets to be a grind, it might be time to consider a little mechanical help in the form of a pick and place machine (PnP). If you’re going to roll your own though, there’s a lot to think about, not the least of which is how to feed your beast with parts.

Managing the appetite of a PnP is the idea behind this custom modular parts feeder, but the interesting part of [Hans Jørgen Grimstad]’s work-in-progress project has more to do with the design process. The feeders are to support a custom PnP being built in parallel, and so the needs of one dictate the specs of the other. Chief among the specs are the usual big three: cheap, fast, and reliable. But size is an issue too insofar that the PnP could be working with dozens of component reels at once. Flexibility was another design criteria, so that reels of varied width can be accommodated.

With all that in mind, [Hans] and company came up with a pretty slick design. The frame of the feeder is made out of the PCBs that house the motors for handling the tape, and the ATmega168 that controls everything. Tapes are driven by a laser-cut sprocket driven by 3D-printed worm gears. The boards have fingers that mate up to the aluminum extrusion that the PnP will be built from, and at only a few millimeters wider than the tape, lots of feeders can be nestled together. The video below shows the feeder undergoing some tests.

Alas, this build isn’t quite done, so you’ll have to check back for the final schematics and PCB files if you want to build one for yourself. While you’re waiting, you might want to build your own pick and place.

Continue reading “Custom Parts Feeder Aims To Keep Pace With Pick And Place”

The Latest 3D Printed Fad: Flexible Armor And Pangolin Cosplay

Last week, [David Shorey] came along to the monthly Hackaday meetup in Pasadena. These meetups feature speakers and drinks, projects and chit-chat, and sometimes a few demos of what the local Hackaday community has been working on. [David]’s impromptu demo was something no one had ever seen before. It’s 3D printed tiles embedded in fabric. This is the beginning of 3D printed flexible armor, a great method for cosplay builds, and a really cool way to add another trick to your 3D printing toolkit.

Hexagons tesselate. Image credit: DrainSmith

The steps to reproduce this project are actually very easy. The most important bit is the fabric itself. This is just a piece of tulle, a fine fabric mesh that’s usually used for bridal veils. According to members of the 3D printing community, you can pick up some tulle in the fabric department of any WalMart. The steps to reproduce this technique are simply to print three layers, pause the print and move the head out of the way, lay the tulle down on the print, and hit resume.

Judging from the commentary surrounding this new technique, there are a few tips and tricks to get the most out of this 3D printable fabric. The fabric should be taut and held down with either tape or binder clips. Melting or burning doesn’t seem to be an issue, but tulle made out of nylon is fairly common, and printing 3D panels with exotic filaments that require high temperatures may result in a mess.

While very cool, there are some limitations to the technique. If, for example, you are building a suit of body armor out of bendable tessallatable panels, you will have to assemble a quilt made out of panels as large as your print bed. This could be made easier by sewing (or gluing) the tulle/scale assembly onto a larger piece of fabric. Alternatively, the process could be modified for use with an Infinite Build Volume printer. This would give you yards and yards of 3D printed scales, ready to be fashioned into an outfit.

This is one of the most interesting techniques to bring 3D printing into the domain of ‘soft’ hacks and fashion we’ve ever seen. If you want to check out what’s possible with this, be sure to follow [David] on Twitter and out his Instagram. There are a lot of really great ideas there.

As with most ideas in 3D printing, this is one that’s been done before, albeit at not such a high level. [Drato] a.k.a. [RobotMama] did pretty much the same thing a few months ago, and we thank her for her contribution to the community.

ESP8266 Broadcasts Memorial WiFi Spam

John Perry Barlow, founding member of the Electronic Frontier Foundation and Freedom of the Press Foundation, died on February 7th, 2018. To say that he left his mark on the Internet, and by extension modern culture, is something of an understatement. He may not be a household name, but between this activism (online and off), lectures, written work, and various entrepreneurial projects, his 70 years of life were surely not wasted. Barlow was once quoted as saying “I want to be a good ancestor”, and by pretty much any metric it would seem he made good on that goal.

To mark his passing, [Moritz Metz] came up with a rather unusual memorial. Using a bit of code on an ESP8266 board, he created a device that would broadcast out Barlow’s “A Declaration of the Independence of Cyberspaceline-by-line in the form of 228 WiFi SSIDs. Perhaps not the most effective way to get Barlow’s words out to the people, but we’ll give him extra points for style.

The code itself is based on FakeBeaconESP8266, which as the name implies, allows the user to create fake WiFi networks. to broadcast the manifesto of your choosing, you need only add in the appropriate sendBeacon() lines at the bottom of the code. It would appear that prefixing each line with a number is required to make devices scanning for networks show the lines of text in proper sequence. At least on the devices demoed, anyway.

Just to be clear: you should definitely not do this. Jamming up the local environment with a bunch of fake networks is a pretty terrible idea. But as a memorial for a man who occasionally claimed to be an anarchist, you could do worse. Plus we have to admit “Giants of Flesh and Steel” is an awesome name for a network.

Continue reading “ESP8266 Broadcasts Memorial WiFi Spam”

Review: CXG E90W Temperature-Controlled Soldering Iron

It’s an entertaining pastime when browsing the array of wonders available from the other side of the world at the click of the mouse, to scour the listings of the unusual, the interesting, or the inexpensive. Sometimes when you find something unexpected you are rewarded with a diamond in the rough, while at other moments your bargain basement purchase is revealed as a hilariously useless paperweight. This is a game in which the stake is relatively low and the reward can be significant, so rarely does an order for some parts or sundries go by without a speculative purchase.

The latest to arrive is a soldering iron. The CXG E90W is a 90W mains-powered temperature controlled iron with its control electronics built into its handle. Such irons are by no means unusual, what makes this one different is that it has a low price tag.

The Miniware TS100, an iron I quite like and the current darling of the pack, is priced at nearly £50 ($71). Just how can this iron priced at just under £15 ($21) be any good? I placed one on the order, and waited for delivery.

Continue reading “Review: CXG E90W Temperature-Controlled Soldering Iron”

A RISC-V That The Rest Of Us Can Understand

There is great excitement in the world of microprocessors, surrounding the RISC-V architecture. This is an open source modular instruction set specification that has seen implementations on FPGAs, and is starting to emerge in dedicated silicon.

If you are not yet up to speed on what is probably going to be the most important microprocessor development of a generation, you should watch this video. As [Robert Baruch] sets out to demonstrate, the combination of RISC technology and a modular instruction set means that the simplest processor compliant with the RISC-V specification can be surprisingly accessible. And to demonstrate this he’s building one from LSI and MSI TTL CMOS chips, something we’d more usually expect to see in a recreation of a much older architecture.

The video below the break is the first of a forthcoming series, and in it he introduces the project and gives us an easily-understandable overview of RISC-V before explaining the mechanics of a register for his RISC-V implementation. This will be his first module, and he’s created a PCB for it. He runs through its design, his choice of indicator LEDs, and then his choice of PCB house. There is also a breakout board, with two of the PCI sockets he’ll be using for his backplane. Finally we see the board being tested, with LEDs lighting up in response to values being stored in a completed register.

[Robert] has appeared on these pages many times before, among the most recent with his TMS9900-based breadboard computer. This build moves away from his retro fare though, and should be well worth watching for future installments.

Continue reading “A RISC-V That The Rest Of Us Can Understand”