Ply Your Craft With Tubular Origami

Researchers at the University of Pennsylvania have just published a paper on creating modular tubular origami machines which they call “Kinegami”, a portmanteau of “kinematic” and “origami”.
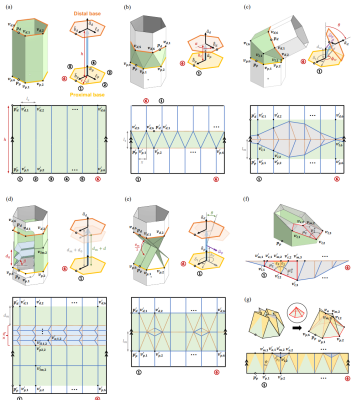
Diagrams of "kinegami" folds for various modules and joint mechanism

The idea behind their work is to create individual modules and joint mechanisms that can then be chained together to create a larger “serial” robot. Some example joints they propose are “prismatic” joints, allowing for linear motion, and “revolute” joints, which allow for rotational motion. One of the more exciting aspects of this process is that the joint mechanisms are origami-like structures which can be constructed from a single piece of flat material which is folded and glued together to make the module. Of particular interest is that the crease pattern for the origami-like folds can be laser cut into a material, cardboard or thin acrylic for example, which can be used as a guide to create the resulting structure. The crease patterns for the supporting structures, such as tubes or joints, can be taken from pre-formatted patterns or customized, so this method is very accessible to the hobbyist and could allow for a rich new method of rapid project prototyping.

The researchers go on to discuss how to create the composition of modules from a specification of joints and links (from a “Denavit-Hartenberg” specification) to attaching the junctures together while respecting curvature constraints (via the “Dubins path”). Their paper offers the gritty details along with the available accompanying source files. Origami hacking is a favorite subject of ours and we’ve featured articles on the use of origami in medical technology to creating inflatable actuators.

Video after the break!

Continue reading “Ply Your Craft With Tubular Origami”

A Fractal Papercraft Tree

Sometimes there are projects that we introduce with a bit of context, some background, and other times as with [RayP2]’s fractal papercraft tree, we introduce them simply because they are beautiful.

It’s a deceptively simple design of a repeating pattern of the same shape getting ever smaller with each iteration, and terminating in a tetrahedron with branches from each of its faces. It’s not origami, instead it’s a cut-and-glue design, and its construction is a surprisingly involved affair with some lateral thinking required to bend the tabs on the smaller branches. The design was first prototyped with plain paper, before a final version was made with card stock. The part that makes it exceptional is that he used shiny gold card stock with the gold side on the inside, meaning that when lit from the trunk the end of each branch glows attractively. Fitting the light required a modification to the trunk design, but this doesn’t take away from the whole.

The result is an attractive sculpture, a talking point, and something with a mathematical angle to boot, which we like. It’s certainly not been the first papercraft ptoject we’ve shown you, though perhaps these paper retrocomputers are a little less artistic.

Make Your Own Tabletop Game Organizers With Online Tool

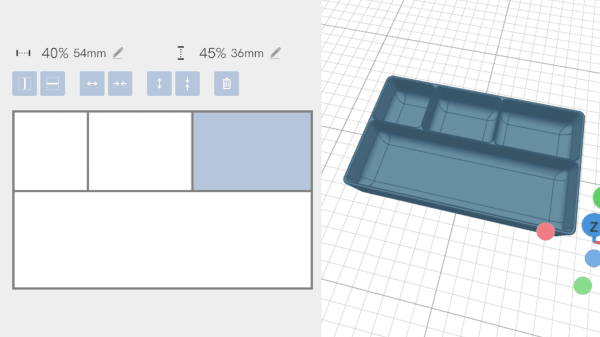
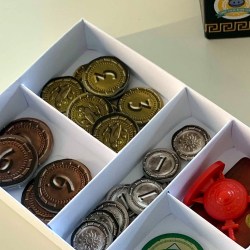
There is a vibrant cottage industry built around selling accessories to improve the storage and organization of tabletop games, but the more DIY-minded will definitely appreciate [Steve Genoud]’s deckinabox tool, which can create either 3D-printable designs, or ones more suited to folded paper or cardstock. Making your own organizer can be as satisfying as it is economical, and [Steve]’s tool aims to make customization simple and easy.

The tool can also generate models for folded paper or cardstock.

The interface for customizing the 3D-printable token tray, for example, begins with a simple filleted receptacle which one can split into additional regions by adding horizontal or vertical separators. The default is to split a given region down the middle, but every dimension can of course be specified.  Things like filleting of edges (for easier token scooping) and other details are all handled automatically. A handy 3D view gives a live render of the design after every change.

[Steve] has a blog post that goes into some added detail about how the tool was made, and it makes heavy use of replicad, [Steve]’s own library for generating browser-based 3D models in code. Intrigued by the idea of generating 3D models programmatically, and want to use it to make your own models? Don’t forget to also check out OpenSCAD; chances are it’s both easier to use and more capable than one might think.

Retro Computers From Paper

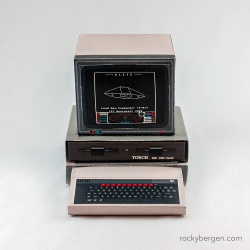
Want to start your own collection of retro computers, for free? Well graphic designer [Rocky Bergen]’s collection of paper craft models might be the answer. [Rocky] has designed over a dozen models of old computers, including classics such as the IMSAI 8080, Commodore Pet, and the BBC Microcomputer to name just a few.

The completed size of these models isn’t mentioned, but inspecting the PDF file of a randomly selected Commodore C64 model shows it was intended to be printed on A3 paper ( 297 x 420 mm, or roughly the size of an 11 x 17 ANSI C page if you think better in inches ). That still doesn’t give us the finished size of a model, but one collector posted on [Rocky]’s site that when he scaled it to A4 paper, the resulting computer was a perfect match for use with common 1/6 scale dolls and dollhouses (also known as playscale). Of course, the pattern existing as a computer PDF file, you can scale it to any size you want.

We’ve covered a few paper craft projects in the past, including these cool automata, a claw from a crane game, and even a gyroscope that really spins. Check out the video below the break to see [Rocky] assembling the Apple II paper craft model. Thanks to [CollegeCop] for sending this into our tip line.

Continue reading “Retro Computers From Paper”

Circuit Board Origami Puts You Face-to-Face With Low-Poly Electronics

Paper craft has been around almost as long as paper itself. It’s fun to mimic paper craft and origami with low-poly 3D prints, and [Stephen Hawes] wondered whether it could be done with copper-clad PCBs. Two years after the question arose, we have the answer in the form of a fantastical mask with light-up eyes. Check it out in the video below.

[Stephen] started with a model (Update: [kongorilla]’s 2012 low poly mask model from back in 2012 was the starting point for this hack) from the papercraft program Pepakura Designer, then milled out dozens of boards. Only a few of them support circuitry, but it was still quite the time-consuming process. The ATmega32U4 on the forehead along with the fold-traversing circuitry serve to light up the WS2812B eyes. Power runs up the copper tube, which doubles as a handy mounting rod to connect to the 3D printed base.

Continue reading “Circuit Board Origami Puts You Face-to-Face With Low-Poly Electronics”

Make The Product By Hacking The Catalogue

We’ve all had that moment of seeing a product that’s an object of desire, only to realize that it’s a little beyond our means. Many of us in this community resolve to build our own, indeed these pages are full of projects that began in this way. But few of us have the audacity of [vcch], who was so taken with the QLockTwo expensive designer word clock that they built their own using the facsimile of its face on the front of QLock’s own catalogue. The claim is that this isn’t an unauthorized copy as such because no clock has been copied — as far as we’re aware there’s nothing against taking the scissors to a piece of promotional literature, and it certainly differs from the usual word clocks we’ve seen.

So how has this masterpiece of knock-off engineering been performed? The catalog cover has a high-quality cut-out rendition of the clock face, and the pages behind are thick enough to conceal an addressable LED. By cutting slots through the pages enough space is created for strips of LEDs, which are then hooked up to a Wemos D1 that runs the show. The software is provided, et voila! A faithful facsimile of the original QLockTwo, in part produced by QLock themselves. We applaud the ingenuity involved, but like [vcch] we’d say that if you like the QLockTwo then perhaps you’d like to consider buying one.

Paper Strandbeest Is Strong Enough To Walk

Most readers will be familiar with the work of the Dutch artist Theo Jansen, whose Strandbeest wind-powered mechanical walking sculptures prowl the beaches of the Netherlands. The Jansen linkage provides a method of making machines with a curious but efficient walking gait from a rotational input, and has been enthusiastically copied on everything from desktop toys to bicycles.

One might think that a Jansen linkage would be beyond some materials, and you might be surprised to see a paper one. Step forward [Luis Craft] then, with a paper walking Strandbeest. Designed in Blender, cut on a desktop CNC paper cutter, and driven by a pair of small robots linked to an Arduino and controlled by a Bluetooth link, it has four sets of legs and can push around desktop items. We wouldn’t have thought it possible, but there it is.

He claims that it’s an origami Strandbeest, but we’re not so sure. We’re not papercraft experts here at Hackaday, but when we put on our pedantic hat, we insist that origami must be made of folded paper in the Japanese style rather than the cut-and-glue used here. This doesn’t detract from the quality of the work though, as you can see in the video below.

We think this is the first paper Strandbeest we’ve seen, but we’ve brought you countless others over the years. Here’s [Jansen]’s latest, wave-like take on the idea.

Continue reading “Paper Strandbeest Is Strong Enough To Walk”