Finite Element Analysis Results In Smart Infill

If you would like to make a 3D print stronger, just add more material. Increase the density of the infill, or add more perimeters. The problem you’ll encounter though is that you don’t need to add more plastic everywhere, only in the weak areas of the part that will be subjected to the most stress. Studying where parts will be the weakest is the domain of finite element analysis, and yes, you can do it in Fusion 360. With the right techniques, you can make a stronger part on your 3D printer, and [Stefan] is here to show you how to do it.

The inspiration for this build comes from [Adrian Bowyer]’s blog, where he talks about adding ‘fibers’ to the interior of 3D printed objects to increase strength. These ‘fibers’ aren’t really fibers at all, but long, thin, cylindrical voids. The theory of this is that the slicer will interpret this as a hole and place perimeters around these voids, effectively increasing the density of the infill in a local area in the print. Combine this with finite element analysis, and you get a part that is stronger where it needs to be, and doesn’t waste plastic.

However, there is an easier way. Fusion 360 and ANSYS Finite Element Simulation are both free-ish tools that allow for some amount of finite element analysis on an imported 3D object. This can be used to find the weakest part of any 3D print, and it can this can be exported as a 3D mesh. Slic3r has a modifier mesh function, and combining this finite element analysis mesh (printed at 100% infill) with the original part (printed at 10% or so infill) results in something that’s strong where it needs to be, doesn’t waste plastic, and is much easier to set up than [Adrian Bowyer]’s ‘fiber’ technique.

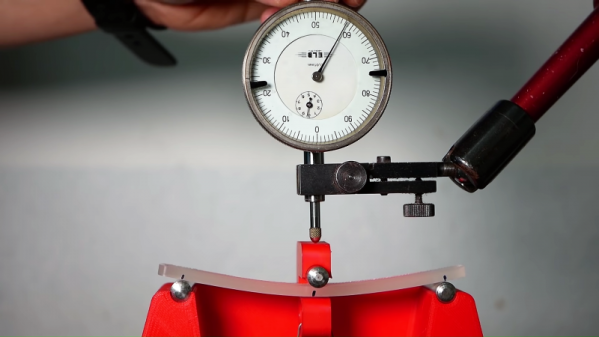
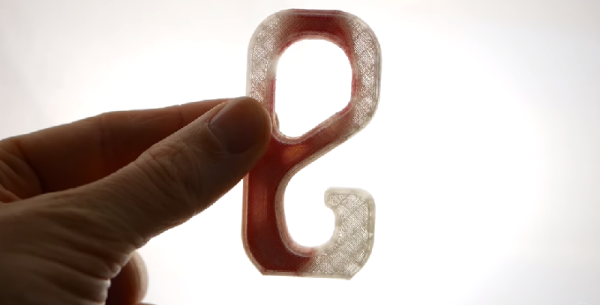
After printing a few 3D printed hooks with varying degrees and techniques of infill, [Stefan] found the baseline of 2 perimeters failed in a test hook at about 50kg load. The Smart Infill hook failed at about 100kg. Not bad, and the fancy-pants hook only weighs about 30% more.

You can check out a video of the entire toolchain and testing below. Thanks [Keith] for sending this one in.

Continue reading “Finite Element Analysis Results In Smart Infill”

Measuring The Stiffness Of 3D-Printed Parts

How do you choose filament when you want strong 3D-printed parts? Like most of us, you probably take a guess, or just use what you have on hand and hope for the best. But armed with a little knowledge on strength of materials, you might be able to make a more educated assessment.

To help you further your armchair mechanical engineer ambitions, [Stefan] has thoughtfully put together this video of tests he conducted to determine the stiffness of common 3D-printing plastics. He’s quick to point out that strength and stiffness are not the same thing, and that stiffness might be more important than strength in some applications. Strength measures how much stress can be applied to an element before it deforms, while stiffness describes how well an element returns to its original state after being stressed. The test rig [Stefan] built for the video analyzes stiffness by measuring the deflection of printed parts under increasing loads. Graphing the applied force versus the deflection gives an indication of the rigidity of the part, while taking the thickness of the material into account yields the bending modulus. The results are not terribly surprising, with polypropylene being the floppiest material and exotic composite filaments, like glass fiber or even “nanodiamond” reinforced PLA coming out as the stiffest. PLA, the workhorse filament, comes in around the middle of the pack.

[Stefan] did some great work here, but as he points out, in the final analysis it almost doesn’t matter what the stiffness and strength of the filament are since you can easily change your design and add more material where it’s needed. That only works up to a point, of course, but it’s one of the many advantages of additive manufacturing.

Continue reading “Measuring The Stiffness Of 3D-Printed Parts”

3D-Printed Vise Is A Mechanical Marvel

We often wonder how many people have 3D printers and wind up just printing trinkets off Thingiverse. To get the most out of a printer, you really need to be able to use a CAD package and make your own design. However, just like a schematic editor doesn’t make your electronic designs work, a CAD program won’t ensure you have a successful mechanical part.

[TheGoofy] has a 100% 3D printed vise that looks like it is useful. What’s really interesting, though, is the video (see below) where he explains how printing affects material strength and other design considerations that went into the vise.

Continue reading “3D-Printed Vise Is A Mechanical Marvel”