Testing Part Stiffness? No Need To Re-invent The Bending Rig

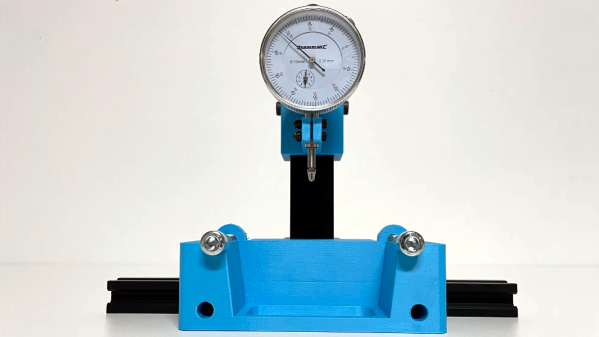
If one is serious about testing the stiffness of materials or parts, there’s nothing quite like doing your own tests. And thanks to [JanTec]’s 3-Point Bending Test rig, there’s no need to reinvent the wheel should one wish to do so.

The dial caliper can be mounted to a fixed height, thanks to a section of 3030 T-slot extrusion.

Some simple hardware, a couple spare pieces of 3030 T-slot extrusion, a few 3D-printed parts, and a dial indicator all come together to create a handy rig that will let one get straight to measuring.

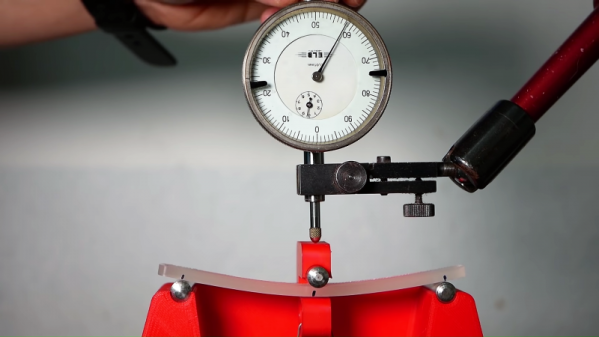
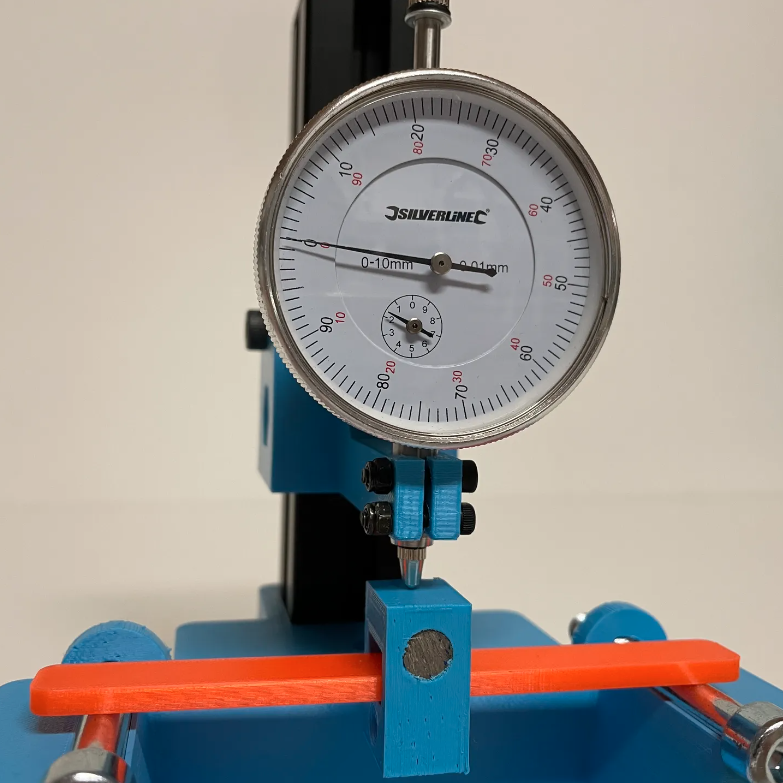
Here is how it works: stiffness of a material is measured by placing a sample between two points and applying a known force to the middle of the sample. This will cause the material to bend, and measuring how far a standardized sample deforms under a known amount of force (normally accomplished by a dial indicator) is how one can quantify a material’s stiffness.

When a material talks about its Young’s modulus (E) value, it’s talking about stiffness. A low Young’s modulus means a material is more elastic, a high value means the material is more stiff. (This shouldn’t be confused with strength or toughness, which are more about resistance to non-recoverable deformation, and resistance to fracture, respectively.)

Interested in results, but don’t want to get busy doing your own testing? Someone’s already been there and done that: here’s a great roundup of measurements of 3D-printed parts, using different filaments.

Electroplating 3D Printed Parts For Great Strength

Resin 3D printers have a significant advantage over filament printers in that they are able to print smaller parts with more fine detail. The main downside is that the resin parts aren’t typically as strong or durable as their filament counterparts. For this reason they’re often used more for small models than for working parts, but [Breaking Taps] wanted to try and improve on the strength of these builds buy adding metal to them through electroplating.

Both copper and nickel coatings are used for these test setups, each with different effects to the resin prints. The nickel adds a dramatic amount of stiffness and the copper seems to increase the amount of strain that the resin part can tolerate — although [Breaking Taps] discusses some issues with this result.

While the results of electroplating resin are encouraging, he notes that it is a cumbersome process. It’s a multi-step ordeal to paint the resin with a special paint which helps the metal to adhere, and then electroplate it. It’s also difficult to ensure an even coating of metal on more complex prints than on the simpler samples he uses in this video.

After everything is said and done, however, if a working part needs to be smaller than a filament printer can produce or needs finer detail, this is a pretty handy way of adding more strength or stiffness to these parts. There’s still some investigating to be done, though, as electroplated filament prints are difficult to test with his setup, but it does show promise. Perhaps one day we’ll be able to print with this amount of precision using metal directly rather than coating plastic with it.

Thanks to [smellsofbikes] for the tip!

Continue reading “Electroplating 3D Printed Parts For Great Strength”

Measuring The Stiffness Of 3D-Printed Parts

How do you choose filament when you want strong 3D-printed parts? Like most of us, you probably take a guess, or just use what you have on hand and hope for the best. But armed with a little knowledge on strength of materials, you might be able to make a more educated assessment.

To help you further your armchair mechanical engineer ambitions, [Stefan] has thoughtfully put together this video of tests he conducted to determine the stiffness of common 3D-printing plastics. He’s quick to point out that strength and stiffness are not the same thing, and that stiffness might be more important than strength in some applications. Strength measures how much stress can be applied to an element before it deforms, while stiffness describes how well an element returns to its original state after being stressed. The test rig [Stefan] built for the video analyzes stiffness by measuring the deflection of printed parts under increasing loads. Graphing the applied force versus the deflection gives an indication of the rigidity of the part, while taking the thickness of the material into account yields the bending modulus. The results are not terribly surprising, with polypropylene being the floppiest material and exotic composite filaments, like glass fiber or even “nanodiamond” reinforced PLA coming out as the stiffest. PLA, the workhorse filament, comes in around the middle of the pack.

[Stefan] did some great work here, but as he points out, in the final analysis it almost doesn’t matter what the stiffness and strength of the filament are since you can easily change your design and add more material where it’s needed. That only works up to a point, of course, but it’s one of the many advantages of additive manufacturing.

Continue reading “Measuring The Stiffness Of 3D-Printed Parts”

Harley-Hardened Wire Helps High-Gain Antenna Hack

What does a Harley-Davidson motorcycle have to do with building antennas? Absolutely nothing, unless you happen to have one and need to work-harden copper wire to build a collinear antenna for LoRa.

We’ll explain. Never being one to settle, [Andreas Spiess] needed a better antenna for his LoRa experiments. Looking for high gain and an omnidirectional pattern, he bought a commercial colinear antenna, which is a wire with precisely spaced loops that acts like a stack of dipoles. Sadly, in a head-to-head test [Andreas] found that the commercial antenna was no better than lower gain antennas in terms of range, and so he decided to roll his own.

Copper wire is a great material for antennas since it can be easily formed without special tools and it solders like a champ. But the stuff you get at the home center is nowhere near stiff enough for a free-standing vertical whip. This is where the Harley came in: [Andreas] used his Hog to stretch out the 1.75-mm diameter (a little bigger than #14 AWG) copper wire. Not only did the work-hardening stiffen the wire, it reduced its diameter to the 1.4 mm needed for the antenna design. His vector network analyzer told him that ground-plane elements and a little fiddling with the loop diameter were needed to get the antenna to resonate at 868 MHz, but in the end it looks like the antenna is on track to deliver 5-dBi of gain.

Of course there are plenty of other ways to stretch out a wire — you could just stretch it out with hanging weights, or even with a go-kart motor-powered winch if you’re ambitious. But if you’ve got a bike like that, why not flaunt it?

Continue reading “Harley-Hardened Wire Helps High-Gain Antenna Hack”

Variable Stiffness Joints For Robots And More

The human body has many miraculous capabilities that we often take for granted. One of the more subtle ones is the variable stiffness of your joints. In technical terms, stiffness refers to the ability to resist a load. Delicately manipulating an artist’s paint brush, for example, doesn’t require much load resistance, but does require fine control. However, that same artist might pick up a bowling ball with a stiffer joint (and, usually, less fine control).

[Christopher Churchill] and some colleagues have a novel mechanical device that can rapidly change stiffness. The device could have applications in robotics and other devices. It can also transmit or attenuate vibration since non-stiff joints don’t pass vibrations as easily as stiff ones.

Continue reading “Variable Stiffness Joints For Robots And More”