Drone + Ground Penetrating Radar = Mine Detector?

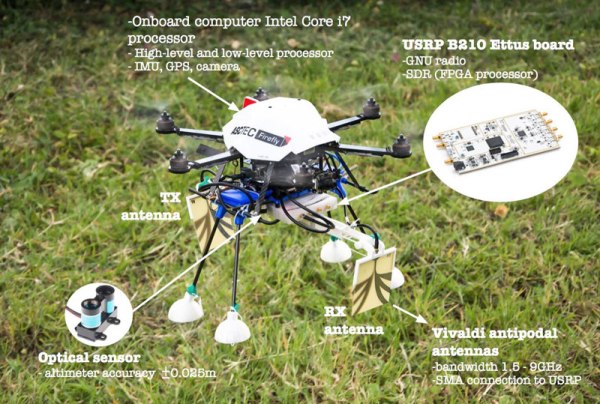
Most civilized nations ban the use of landmines because they kill indiscriminately, and for years after they are planted. However, they are still used in many places around the world, and people are still left trying to find better ways to find and remove them. This group is looking at an interesting new approach: using ground-penetrating radar from a drone [PDF link]. The idea is that you send out a radio signal, which penetrates into the ground and bounces off any objects in there. By analyzing the reflected signal, so the theory goes, you can see objects underground. Of course, it gets a bit more complicated than that (especially when signals get reflected by the surface and other objects), but it’s a well-established technique even though this is the first time we’ve seen it mounted on a drone. It’s a great idea: the drone allows you to have the transmitting and receiving antennas separated with both mounted on pole extensions, meaning that the radio platform can move. Combined with a pre-planned flight, and we’re looking at a system that can fly over an area, scan what is under the ground, and store the data for analysis.

[Via RTL-SDR]

Continue reading “Drone + Ground Penetrating Radar = Mine Detector?”

MTPO HDTV on Wall Lag Fix

Mike Tyson’s Punchout Patch Gives HDTV Lag A K.O.

They just don’t make them like they used to. Digital televisions have rendered so many of the videogames designed in the days where CRTs ruled the earth virtually unplayable due to display lag. Games that were already difficult thanks to tight reaction time windows can become rage inducing experiences when button presses don’t reflect what’s happening onscreen. A game that would fall into the aforementioned category is Mike Tyson’s Punchout for the NES. However, NES homebrew developer [nesdoug] created a patch for the 31 year old classic that seeks to give players playing on modern displays a fighting chance.

MTPO Poster 1980s

The lag fix patch for Mike Tyson’s Punchout seeks to alleviate some of the display lag inherent in digital displays by adjusting the gameplay speed. Some of the early stages aren’t altered very much, but the later fights incur more significant slowdown to compensate for modern display lag. It’s evident that [nesdoug] is a longtime fan of the game as he also uploaded a remix patch that mixes up the stages and color palettes.

The patch itself comes in the form of an IPS file. To apply the lag fix patch you’ll need an IPS patching tool, like Lunar IPS, along with your own personal backup ROM of Mike Tyson’s Punchout. A checksum value is provided on the lag fix patch download site to ensure you have a usable ROM file. Do note that the ROM file is overwritten in the process of applying the patch, so make sure to put the original file in a safe place. After patching is complete the fun can be had using your favorite NES emulator, or using a flashcart if you’re seeking to play on original hardware.

If you’re looking to dump your own NES cartridges without the plug and play convenience of devices like the Retrode, there is a tutorial in the video below the  break:

Continue reading “Mike Tyson’s Punchout Patch Gives HDTV Lag A K.O.”

New Controller For Retro Console

In the world of retro gaming, when using emulators and non-native hardware it’s pretty common to use whatever USB controller happens to be available. This allows us to get a nostalgic look while using a  configurable controller. One thing that isn’t as common is using the original hardware while still finding a way to adapt a modern controller to an old console. This is exactly what you need though, when you’re retro gaming on a platform with notoriously terrible controllers.

[Scott] enjoys his Atari 5200 but the non-centering and generically terrible joystick wasn’t well received even in the early 80s when the console was in its prime. He decided that using a Dual Shock controller from a Playstation 2 would provide a much better gaming experience, and set about building an adapter. He found that in a way the Dual Shock controller was an almost perfect pairing for the Atari because it has two analog control sticks built-in already. There’s also an array of information on pairing the Dual Shock controller with AVR microcontrollers, so he wouldn’t have to reinvent the wheel. From there, it was just a matter of pairing communications protocols between the two pieces of hardware.

The project page goes into quite a bit of detail on SPI communication protocols and the needs of both the Atari and the Playstation controller. If you’re a retro gaming fan, really into communication protocols, or have always had a love-hate relationship with your Atari because the controllers were just that bad, it’s worth checking out. If this is too much, though, there are other ways to get that Atari nostalgia.

Thanks to [Baldpower] for the tip!

Continue reading “New Controller For Retro Console”

Measuring The Stiffness Of 3D-Printed Parts

How do you choose filament when you want strong 3D-printed parts? Like most of us, you probably take a guess, or just use what you have on hand and hope for the best. But armed with a little knowledge on strength of materials, you might be able to make a more educated assessment.

To help you further your armchair mechanical engineer ambitions, [Stefan] has thoughtfully put together this video of tests he conducted to determine the stiffness of common 3D-printing plastics. He’s quick to point out that strength and stiffness are not the same thing, and that stiffness might be more important than strength in some applications. Strength measures how much stress can be applied to an element before it deforms, while stiffness describes how well an element returns to its original state after being stressed. The test rig [Stefan] built for the video analyzes stiffness by measuring the deflection of printed parts under increasing loads. Graphing the applied force versus the deflection gives an indication of the rigidity of the part, while taking the thickness of the material into account yields the bending modulus. The results are not terribly surprising, with polypropylene being the floppiest material and exotic composite filaments, like glass fiber or even “nanodiamond” reinforced PLA coming out as the stiffest. PLA, the workhorse filament, comes in around the middle of the pack.

[Stefan] did some great work here, but as he points out, in the final analysis it almost doesn’t matter what the stiffness and strength of the filament are since you can easily change your design and add more material where it’s needed. That only works up to a point, of course, but it’s one of the many advantages of additive manufacturing.

Continue reading “Measuring The Stiffness Of 3D-Printed Parts”

An Open Source Toy Synth

If you thought the future of electronic musical instruments was massive Emerson-class modular synths, giant MPCs with pads the size of Dance Dance Revolution machines, or hilariously expensive polysynths, you couldn’t be more wrong. The future is, effectively, toys. Those tiny little Korgs you can stuff in your pocket are selling like hot cakes, and Pocket Operators are king of the hill. One of the more interesting musical toys is the Organelle, an aluminum enclosure with maple buttons laid out in a keyboard configuration. It’s a synth, it’s a sound engine, and it does produce some interesting noises. All the software is Open Source, but the hardware isn’t. That leaves it up to someone else to make the hardware for the rest of us. That’s exactly what [mitchell] is doing for his Hackaday Prize entry.

The core of this build is a Nanopi Neo Core, or basically an Allwinner H3 breakout board with 256 MB of RAM running at 1.2 GHz. This runs the basic Organelle scripts, and has all the drivers to become a MIDI device. Added to that, there’s a DAC, a small TFT screen, an STM32F103 for reading the buttons, encoders, and pots, a sound card, a USB hub IC, and a battery torn from a Kindle.

The idea for this project is to have something along the lines of the Teenage Engineering OP-1, another of the very fancy ‘toy’ synths, but also to build something that anyone else can build. [mitchell] is just about there, and the prototype PCB he made actually works. There’s still a lot more work to do, but this is an exceptionally interesting project we can’t wait to see hit prime time.

Logic Analyzers For FPGAs: A Verilog Odyssey

Sometimes you start something simple and then it just leads to a chain reaction of things. I wanted to write a post about doing state machines in Verilog and target the Lattice iCEstick board that we often use for quick FPGA projects. That led to a small problem: how do you show what’s going on inside? In this series of posts, we’ll look at building a logic analyzer into an FPGA to help debug itself, instantiating memory, and — finally — state machines.

Logic analysis is a common tool in FPGA development. If you use Altera, they have Signal Tap available that lets you build a simple logic analyzer into the FPGA that talks back to your PC. Xilinx has ChipScope which is about the same. Sometimes those tools either cost money or are limited in some way in the free versions. I have my sights set on a tool that can be used with the Lattice architecture.

Sure, you can ship data out on I/O pins and then use a regular logic analyzer to pick up the data. But that isn’t very handy. So I thought about writing a generic logic analyzer component. But before I did I decided to check to see if someone else had already done it.

Spoiler alert: they did, but I wanted something a little different so I wound up extending the program significantly. What I wound up with is a reasonably portable Verilog logic analyzer that can produce traces like this one:

Keep in mind, this isn’t a simulation. This is real data pulled off the actual FPGA. Yes, that is gtkwave producing the plots, but the input data is a VCD file generated from samples taken inside the FPGA.

Continue reading “Logic Analyzers For FPGAs: A Verilog Odyssey”

Contest Results: Raspberry Pis Put On A Show

Some of the most satisfying projects of all are the ones that do something visual. All the network routers, data loggers, and thermostats are great. But we are visual creatures and even a humble blinking LED is enough to give you a little rush even compared to finding a large prime number. We wanted to see what our community could do visually with a Raspberry Pi so we challenged you with the Visualize it with Pi contest.

As always, the competition was brisk, with a lot of great projects. This contest showed off the trend towards using LED modules and assemblies to add visuals to projects. Why not? They are cheap enough and a well-integrated module can make a project simple to wire and integrate.

We didn’t see as many media-related projects as you might expect, although there was one tied into Stranger Things, one to Tron, and the virtual reality lighting project did have some Star Wars images. Projects ranged from the practical storage box labels to the whimsical lemonade bottle that strobes to the beat of the music. If none of that is hardcore enough for you, there was even a Raspberry Pi-controlled radio telescope. You can find all the entries over on Hackaday.io. Now let’s see which entries managed to turn the head of the judging panel.

Continue reading “Contest Results: Raspberry Pis Put On A Show”