Putting A Poor Man’s Vector Analyzer Through Its Paces

If anything about electronics approaches the level of black magic, it’s antenna theory. Entire books dedicated to the subject often merely scratch the surface, and unless you’re a pro with all the expensive test gear needed to visualize what’s happening, the chances are pretty good that your antenna game is more practical than theoretical. Not that there’s anything wrong with that — hams and other RF enthusiasts have been getting by with antennas that work without really understanding why for generations.

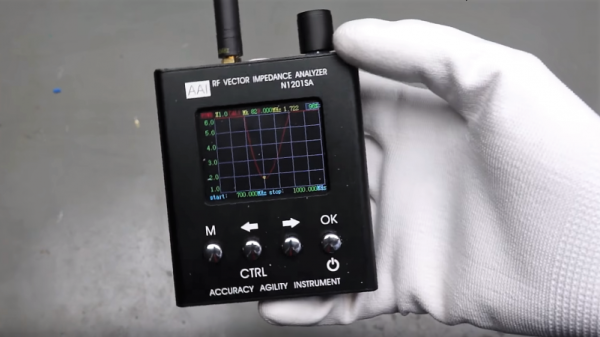
But we’re living in the future, and the tools to properly analyze antenna designs are actually now within the means of almost everyone. [Andreas Spiess] recently reviewed one such instrument, the N1201SA vector impedance analyzer, available from the usual overseas sources for less than $150. [Andreas]’s review does not seem to be sponsored, so it seems like we’re getting his unvarnished opinion; spoiler alert, he loves it. And with good reason; while not a full vector network analyzer (VNA) that will blow a multi-thousand dollar hole in your wallet, this instrument looks like an incredible addition to your test suite. The tested unit works from 137 MHz to 2.4 GHz, so it covers the VHF and UHF ham bands as well as LoRa, WiFi, cell, ISM, and more. But of course, [Andreas] doesn’t just review the unit, he also gives us a healthy dose of theory in his approachable style.

[The guy with the Swiss accent] has been doing a lot of great work these days, covering everything from how not to forget your chores to reverse engineering an IoT Geiger counter. Check out his channel — almost everything he does is worth a watch.

Continue reading “Putting A Poor Man’s Vector Analyzer Through Its Paces”

The Early Bird Repairs A Slug

When faced with a problematic Bird slug, [Robert Meister] didn’t give up. He pecked away at the slug and brought us all along for the ride. If that sentence didn’t make sense to you, read on!

Anyone who’s been to a hamfest has seen a Bird meter. The Bird Model 43 watt meter is the defacto standard for measuring transmitter power in-line. Bird meters don’t just work from DC to light though. In fact, the model 43 itself is just a bit of transmission line and a meter movement.  The magic happens inside the swappable measurement element. These elements, affectionately called “slugs” are calibrated for a frequency band and power range. An example would be the model 4410-6, which works from 50 – 200 MHz, at up to 1 kW. Most hams have a collection of these slugs to go with the bands they transmit on.

[Robert]’s problem child was a model 100E element, good for 100 watts on 400 – 1000 MHz. The meter output seemed erratic though. A bit of troubleshooting with a second meter and a known good slug isolated the problem to the 100E. The problem was isolated to the slug, but how to fix it?

Slugs are sealed brass containers, each of which is calibrated to 5% accuracy at the factory. They are the closest thing you’ll find in the ham world to “no user serviceable parts inside”. Still, [Robert] had nothing to lose. He soaked the slug in a bit of Xylene solvent to loosen the glue holding the metal label on. Behind that were a painted screw and a hole for a calibration pot. We’re guessing the paint is Bird’s idea of tamper detection.

Pulling the screw out, and removing the nylon cover on the back of the slug revealed the real story. The slug contained a calibrated sensing loop, a diode, the calibration pot, and a terminating resistor. In [Robert]’s case, all he had to do was clean the contacts on the slug, and things worked fine.

For 11 years, anyway. After that, the slug started acting up again. Cleaning didn’t fix the problem this time. [Robert] ended up replacing the calibration potentiometer with a similar model from Digi-key. He re-calibrated the slug against his known good meter. It may not be a lab quality calibration, but this slug should be good for another few decades in his shack.

Visualizing RF Standing Waves

Standing waves are one of those topics that lots of people have a working knowledge of, but few seem to really grasp. A Ham radio operator will tell you all about the standing wave ratio (SWR) of his antenna, and he may even have a meter in the shack to measure it. He’ll know that a 1.1 to 1 SWR is a good thing, but 2 to 1 is not so good. Ask him to explain exactly what a standing wave is, though, and chances are good that hands will be waved. But [Allen], a Ham also known as [W2AEW], has just released an excellent video explaining standing waves by measuring signals along an open transmission line.

[Source: Wikipedia]
[Source: Wikipedia]
To really understand standing waves, you’ve got to remember two things. First, waves of any kind will tend to be at least partially reflected when they experience a change in the impedance of the transmission medium. The classic example is an open circuit or short at the end of an RF transmission line, which will perfectly reflect an incoming RF signal back to its source. Second, waves that travel in the same medium overlap each other and their peaks and troughs can be summed. If two waves peak together, they reinforce each other; if a peak and a trough line up, they cancel each other out.

Continue reading “Visualizing RF Standing Waves”

Automatic Antenna Tuner

Automatic Antenna Tuner

To get the best power transfer into an antenna, tuning is required. This process uses a load to match the transmission line to the antenna, which controls the standing wave ratio (SWR).

[k3ng] built his own automatic antenna tuner. First, it measures the SWR of the line by using a tandem match coupler. This device allows the forward and reflected signals on the line to be extracted. They are buffered and fed into an Arduino for sampling. Using this data, the device can calculate the SWR. The RF signal is also divided and sampled to measure frequency.

To automate tuning, an Arduino switches a bank of capacitors and inductors in and out of the circuit. By varying the load, it can find the ideal matching for the given antenna and frequency. Once it does, the settings are stored in EEPROM so that they can be recalled later.

After the break, check out a video of the tuner clicking its relays and matching a load.

Continue reading “Automatic Antenna Tuner”