The Early Bird Repairs A Slug

When faced with a problematic Bird slug, [Robert Meister] didn’t give up. He pecked away at the slug and brought us all along for the ride. If that sentence didn’t make sense to you, read on!

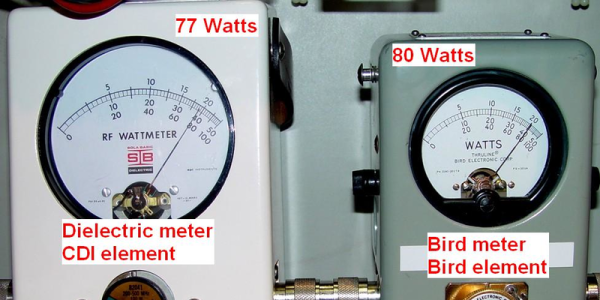
Anyone who’s been to a hamfest has seen a Bird meter. The Bird Model 43 watt meter is the defacto standard for measuring transmitter power in-line. Bird meters don’t just work from DC to light though. In fact, the model 43 itself is just a bit of transmission line and a meter movement.  The magic happens inside the swappable measurement element. These elements, affectionately called “slugs” are calibrated for a frequency band and power range. An example would be the model 4410-6, which works from 50 – 200 MHz, at up to 1 kW. Most hams have a collection of these slugs to go with the bands they transmit on.

[Robert]’s problem child was a model 100E element, good for 100 watts on 400 – 1000 MHz. The meter output seemed erratic though. A bit of troubleshooting with a second meter and a known good slug isolated the problem to the 100E. The problem was isolated to the slug, but how to fix it?

Slugs are sealed brass containers, each of which is calibrated to 5% accuracy at the factory. They are the closest thing you’ll find in the ham world to “no user serviceable parts inside”. Still, [Robert] had nothing to lose. He soaked the slug in a bit of Xylene solvent to loosen the glue holding the metal label on. Behind that were a painted screw and a hole for a calibration pot. We’re guessing the paint is Bird’s idea of tamper detection.

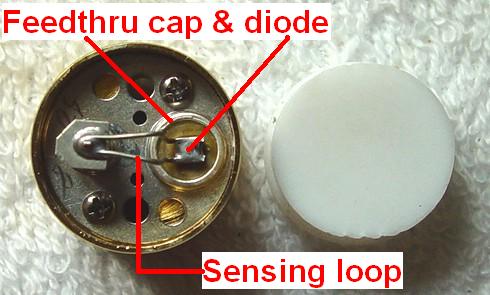
Pulling the screw out, and removing the nylon cover on the back of the slug revealed the real story. The slug contained a calibrated sensing loop, a diode, the calibration pot, and a terminating resistor. In [Robert]’s case, all he had to do was clean the contacts on the slug, and things worked fine.

For 11 years, anyway. After that, the slug started acting up again. Cleaning didn’t fix the problem this time. [Robert] ended up replacing the calibration potentiometer with a similar model from Digi-key. He re-calibrated the slug against his known good meter. It may not be a lab quality calibration, but this slug should be good for another few decades in his shack.

Carbon Quantum Dots In Your Favorite Color

Citizen scientist extraordinaire [Thought Emporium] put out a new video about colorful quantum dots which can be seen below the break. Quantum dots are a few nanometers wide and you can tell which size they are by which color they fluoresce. Their optical and electrical properties vary proportionally with size so red will behave differently than purple but we doubt they will taste like “cherry” and  “grape.” Let’s not find out. This makes sense when you realize that a diamond will turn into black powder if you pulverize it. Carbon is funny like that.

[Thought Emporium] uses the video for two purposes. The first is to demonstrate the process he uses to make different size quantum dot in his home lab. The second purpose is to implore the scientific community, in general, to take better care when publishing scientific papers. A flimsy third reason is to show that the show must go on. Partway through, all the batteries for his light were dead so he hastily soldered a connection for his benchtop power supply.

We’ve mentioned [Thought Emporium] a few times before. Another of his carbon-based experiments involved graphene creation. How about magnetic DNA extraction? [Thought Emporium] did that too. If you can’t get enough magnets, how about implanting one?

Continue reading “Carbon Quantum Dots In Your Favorite Color”

A Solar Freakin’ Walkway

Looking to add a little pizzazz to your back garden? Are those strings of lights hung in the trees looking a little dated? Why not try lighting your garden path with DIY solar-powered pavers?

If [jfarro]’s project looks like a miniature version of the much-touted solar freakin’ roadways concept, rest assured that there are huge differences. For one, these lighted pavers actually work — trust me on this; I live not far from the demo site for the Solar Roadways and the degree to which it underwhelms cannot be overstated. Granted, a garden path is a lot simpler to engineer than a road, but many of the challenges remain.

Using recycled glass blocks that are usually reserved for walls and windows, [jfarro] figured out how to attach Neopixel rings to the underside and waterproof them with a silicone conformal coating. The 12 lighted pavers he built draw considerable current, so a 45-watt solar array with charge controller and battery were installed to power the pavers. An Arduino and a motion sensor control the light show when someone approaches; more complicated programs are planned.

Hats off the [jfarro] for taking on a project like this. We don’t often see builds where electrical engineering meets civil engineering, and even on a small scale, dealing with dirt, stone, and water presents quite a few challenges. Here’s hoping his project lasts longer than the Solar Roadways project did.

Continue reading “A Solar Freakin’ Walkway”

Encrypt Data On The Fly On A Pi With Cryptopuck

There was a time that encryption was almost a dirty word; a concept that really only applied to people with something to hide. If you said you wanted to encrypt your hard drive, it may as well have been an admission to a crime. But now more than ever it’s clear that encryption, whether it’s on our personal devices or on the web, is a basic necessity in a digital society. The age of Big Data is upon us, and unless you’re particularly fond of being a row in a database, you need to do everything you can to limit the amount of plaintext data you have.

Of course, it’s sometimes easier said than done. Not everyone has the time or desire to learn how the different cryptographic packages work, others may be working on systems that simply don’t have the capability. What do you do when you want to encrypt some files, but the traditional methods are out of reach?

Enter the latest project from [Dimitris Platis]: Cryptopuck. By combining the ever-versatile Raspberry Pi Zero, some clever Python programs, and a few odds and ends in a 3D printed case, he has created a completely self-contained encryption device that anyone can use. Stick a USB flash drive in, wait for the LED to stop blinking, and all your files are now securely encrypted and only accessible by those who have the private key. [Dimitris] envisions a device like this could be invaluable for reporters and photographers on the front lines, protesters, or really anyone who needs a discreet way of quickly securing data but may not have access to a computer.

The hardware side is really just the Pi, a switch, a single LED for notifications, and a battery. The real magic comes from the software, where [Dimitris] has leveraged PyCrypto to perform the AES-256 encryption, and a combination of pyinotify and udiskie to detect new mounted volumes and act on them. The various Python scripts that make up the Cryptopuck suite are all available on the project’s GitHub page, but [Dimitris] makes it very clear the software is to be considered a proof of concept, and has not undergone any sort of security audit.

For some background information on how the software used by the Cryptopuck works you may want to check out this excellent primer from a few years back; though if you’d like to read up on why encryption is so important, you don’t need to go nearly as far back in time.

Continue reading “Encrypt Data On The Fly On A Pi With Cryptopuck”

Hackaday Prize Entry: IoT Nixie Clocks

Nixie clocks are the in thing right now, and they have been for at least a decade. For his Hackaday Prize entry, [mladen] is bringing things into the 21st century with a USB-powered, IoT Nixie clock. It displays the time, temperature, the current cryptocurrency price in fiat, your current number of Twitter followers, the number of updoots on your latest reddit meme, or anything else that can be expressed as four digits.

This Nixie clock uses four IN-12B tubes, with the dot, which are more or less standard when it comes to small Nixie clocks. These tubes are mounted directly to a PCB, which is in turn mounted at 90 degrees to the main board, providing a slim form factor for the machined wood or aluminum enclosure.

The control electronics are built around the ESP8266, with a handy USB connection providing the power and a serial connection. A BQ3200 real time clock keeps the time with the help of a supercapacitor. The killer feature here is a piezo sensor to detect taps on the enclosure. Hit the clock once, and it displays the time. Hit it two times, and the current balance of your bitcoin wallet is displayed. It’s a great project, and [mladen] is hoping to turn this project into a product and put it up on Crowdsupply soon. All in all, a great entry to The Hackaday Prize.

Ask Hackaday: What Tools Do You Reach For First?

Let’s face it, in your workshop there are convenient tools, and there are quality tools, but so often they aren’t both. Think back to the tools you reach for first. Very often for me, speed and convenience win out. I don’t want to look too hard for that drill or saw, and want them to work as expected when I reach for them. At the same time, there are some tools that simply must be stored away, and can’t perch on my workbench forever or sit on a shelf.

It really is a balancing act sometimes. I don’t have a sure fire formula for when to break out the expensive tools, and what jobs are easy with the less expensive. I’ll lay out some of my most-often utilized tools in my arsenal, then I want to hear from you on your own faves.

Continue reading “Ask Hackaday: What Tools Do You Reach For First?”

Recreating The Mythbusters Rocket Chevy – At Scale

If you tuned into the first ever episode of Mythbusters way back when, you’ll remember a certain rocket-powered Chevy Impala. [David Windestal] decided to recreate this – at 1:10 scale.

The car in question is a Hobbyking Desert Fox RC car – normally a four-wheel drive truck which ships ready-to-run, making it a great way to get a project started quickly. Rocket power is provided by the same type of motor used in the Swedish Rocket Knives we’ve covered previously.

Initial testing proves unsuccessful – the car simply tumbles out of control when the rocket is fired. It takes a beating, losing a wheel in the process. Following on from this, a decision is made to cook up a slower burning rocket motor and switch to an asphalt surface for testing. This is much more succesful and the car begins to see some properly high speeds, nearly peeling the tyres off the rim in the process!

It’s a fun concept that could likely be replicated with off-the-shelf rocket motors, too. Throw us your ideas for better rocket powered transports in the comments below.

[Thanks to Heinrich for the tip!]
Continue reading “Recreating The Mythbusters Rocket Chevy – At Scale”