By the time you get to the point in a home CNC build where you’re adding control electronics you may be ready for the simplest means to an end possible. In that case, grab your Arduino and heat up that etching solution to make your own GRBL compatible shield.
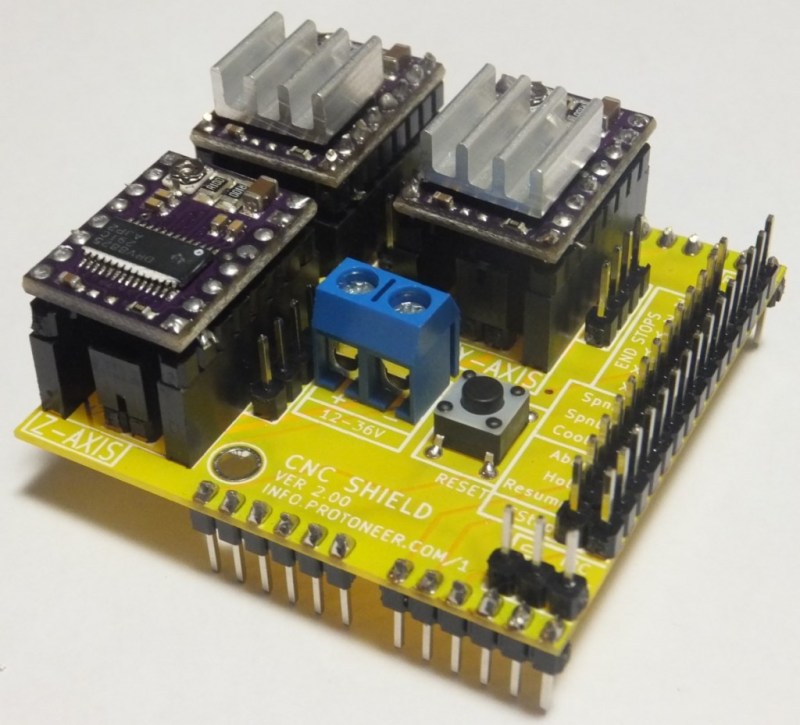
This familiar footprint manages to contain everything you need for a three-axis machine. The purple boards slotted into the pairs of SIL headers are Pololu Stepper motor drivers. Going this route makes replacing a burnt out chip as easy as plugging in a new module. The terminal block in the center feeds the higher voltage rail necessary for driving the motors. The DIL header on the right breaks out all of the connections to the limiting switches (two for each axis), spindle and coolant control, as well as three buttons for pause, resume, and abort. There’s even a header for SPI making it easier to add custom hardware if necessary.
This is a dual-layer board which may not be ideal for your own fabrication process. [Bert Kruger] posted his Gerber files for download if you want to put in a small run with OSH Park or a similar service.


Want! The designer should commercialize this.
Who follows Grbl, do you guys know what version it’s on currently? I have a tiny CNC rig I’ve been planning to put it on but did not like the serial comms in an early version (compared to Replicat.org implementation). Anyone here knows both to comment on differences between most recent versions?
P.S. At some point it looks like stacking shields ontop of an Arduino becomes rather counter-productive. I would think that with the development that went into making this shield it might have been easier to just laid it all out on single PCB, including the Atmega chip. It takes a while to get a CNC rig setup and working and it’s virtually a guarantee that you would not want to pull Arduino from it once it gets going, so why bother with a development board? A flat(ter) PCB will make for easier mounting, too…
Perhaps that’s the evil genius behind with the arduino being designed the way it was. More arduino basic boards sold, the more money for the non-profit has to continue it’s work. The licensing of this project allows you and anyone to take from it what you need to fork to the design you feel is more practical. I agree a single board is more generally practical. But that depends on the patience and skill of the designer
Right, if you are after one board you will have to stay away from this shield. http://blog.protoneer.co.nz/arduino-more-core-shield/
I am going to use this to extend GRBL in the future via I2C. The software bit is not there yet, but at-least we now have ways of extending the CNC setup with hardware.
It would seem relatively straight forward to integrate an Arduino Pro Mini or similar with a Pololu DRV8825 board, and integrate that assembly with the stepper it controls and a PSU to power it and you have a fully self-contained super-servo. It can have its own connections to its own limit switches and/or position feedback and connected back to the central controller with a four-wire I2C bus.
My only question is where is a DRV8825-like solution that can pack up to 6 Amps of current for driving larger NEMA 34 steppers.
You really need something like Gecko Drivers for any serious cnc.
If your chip burn out, it means your a bad designer.
errr…. *you’re
Yeah, was wondering about why those were made to be replaced. Why not add protection instead of easy replacement?
For starters because they aren’t making the stepper drivers they are using Pololu driver boards. Probably because they are proven, fairly widely used and easier than doing all the work for the stepper drivers in house.
Secondly because in the unlikely even that anything burns out it is probably going to be one or two but not all of your stepper drivers. So would you rather have the option of replacing just the bad driver(s) or having to potentially junk good drivers because they were integrated into the board?
If it were me I’d be going modular too, especially when modular saves me time and money. Hope for the best, plan for the worst :)
Plus as Pololu introduces more drivers you get the option to upgrade. That is why I like the DRV8825 pololu drivers cause it gives you the option of increasing the micro steppering to 1/32. More options basically… :)
Good protection is non-trivial. The chips used on the driver modules claim both overcurrent and overtemperature protection. Though I haven’t used this particular chip, I’ve seen my share of others with similar features burn up when a fault occurs, even though they’re supposedly protected.
In the end, it’s often nicer to go with a cheaper, replaceable module; at least until you get the bugs worked out.
Chip? Which chip? Atmega is not interfacing with the steppers directly, the stepper drivers are on their own little (replaceable) boards. So, what prevents you from using an IC socket in case anything that can burn out really does? Anyway, if this was MCU you were concerned about, I don’t see how it’s any more protected if it’s on an Arduino board, given that you still need all the exact same connections.
It would be nice if someone made something like this for 3D printing. Something that’s simple to set up, flexible, and could work with just about any setup. That way you could get started much easier, just mashing a few motors and a hot end together into a (possibly sort-of decent) homemade printer. The key would be making it simple like arduino, and flexible enough to make use of any configuration of combination (or lack there of) of hardware. Imagine being able to just get up and make a printer in a weekend whenever you feel like it, just like arduino projects!
M,many 3D printer control boards run like that – RAMPS and RAMBo are the two I’m most familiar with. RAMPS is almost identical to the board above, except it also has MOSFET outputs for the HBP and nozzle heaters, a fan output, and thermistor inputs.
RAMBo does what polytechnick mentioned above – takes 5 stepper driver chips (just the ICs, not full Pololu/compatible breakout boards), puts them on a single (4-layer) board with four thermistor input circuits, 6 MOSFETs (two for nozzle heaters, three for fans and one for the HBP, but that’s just how they’re labeled – use them however you like), fuses for the individual subsections (one for the motors and onboard 5V regulator, one for the fan and nozzle heater MOSFETs, one for the HBP MOSFET), and an Atmega2560 and Atmega32u2. Plug your motors, heaters, fans and thermistors in; fork/download Marlin; load Marlin in the Arduino IDE; upload; troubleshoot inevitable hardware, software and firmware inconsistencies and issues; start printing.
johnnyr has done a great job on RAMBo, but if you want to look at some of what else that’s out there, http://reprap.org/wiki/Comparison_of_Electronics has a list – I’ve played with the Sanguinololu and Azteeg X3 controls as well. I didn’t find either objectionable, just chose a different route.
I suppose that works, but its never quite a swell put together or easy to use as arduino.
http://reprap.org/wiki/Arduino_Mega_Pololu_Shield
Making it simple and extendable is what I am aiming for. By using a similar setup to my More-Core Shield (http://blog.protoneer.co.nz/arduino-more-core-shield/) I can add specialized shields that take commands from GRBL and sub-manage tasks.
#Things like a dedicated PID like heater controller that focuses just on the heating for a 3d printer. It could be made very accurate and with a manual override while the job is running so you can find the perfect temperature for each color filament or material
# Probing systems to make setting up your machine super simple.
# Closed loop Spindle speed controller that will keep a spindle at a set speed even while under load.
..and maybe some RGB LED’s to give you a visual state of the machine. (You need to have fun and be creative with these things… :)
The buttons for resume and abort are a nice touch and mysteriously missing from some of the more commercial offerings.
A 4th motor mount would have been nice for A-axis or 3D printer modification of CNCs…but I guess you can’t have everything in life and I should really just get off my lazy ass and design my own ;)
GRBL currently does not support 4-axis mode.
There are brunches of the GRBL code that can do more than 3 but they might need a more expensive Arduino’s as we are starting to hit the limit on the ATMega328.
Code ‘brunches’ conjures up images of waffles, eggs benedict and h4x0rs ;)
LOL :)
This is nothing new. See the Synthetos website:
http://www.synthetos.com/
They have a GRBL shield:
https://www.synthetos.com/project/grblshield/
But more importantly, see their TinyG board, which rocks!:
https://www.synthetos.com/project/tinyg/
That shield is a single PCB containing all the stepper driver ICs on it. If one the drivers dies you need to either buy/build another board or replace the IC yourself.
Like a ramps board? Or one of the many clones/forks.
Yes… Now you have one more option… :P
Lets not forget the Sanguinololu.
reprap.org/wiki/Sanguinololu
It is what I have been using for both my 3D printer (Prusa i1) and my eShapeoko. Single board with removable steppers.
It is also the board used in the Cyclone-PCB-Factory that featured a few days ago.
Wait ! I have such a GBRL one-sided shield. But with only 2 axis and sockets for the easydriver (which is double the pololu drivers) and connectors for a laser driver. You can download the eagle files and modify them. Did i mention it is single sided?
http://tinyurl.com/nc9y89a
I have seen it before and I like it… ;)
How is the laser engraver working out? Would love to do a project like that in the future.
Which materials are you planning on cutting/engraving? Using a low-powered laser diode requires a very careful choice of materials and even different colors for the same materials will work differently (or not at all: http://elabz.com/laser-cutting-diy/ )
That shield is nice.
I use a very similar one: http://www.reactivesubstance.com/shop.html
The big difference is that it’s got space for four controllers. This allows you to either have spindle control or run two motors on the Y axis, which massively helps with axis drag.