Homebrew Binaural Microphone Lets You Listen Like A Human

We humans may not have superpowers, but the sensor suite we have is still pretty impressive. We have binocular vision that autofocuses and can detect a single photon, skin studded with sensors for touch, heat, and pain, and a sense of smell that can detect chemicals down to the parts per trillion range. Our sense of hearing is pretty powerful, too, allowing us to not only hear sounds over a 140 dB range, but also to locate its source with a fair degree of precision, thanks to the pair of ears on our heads.

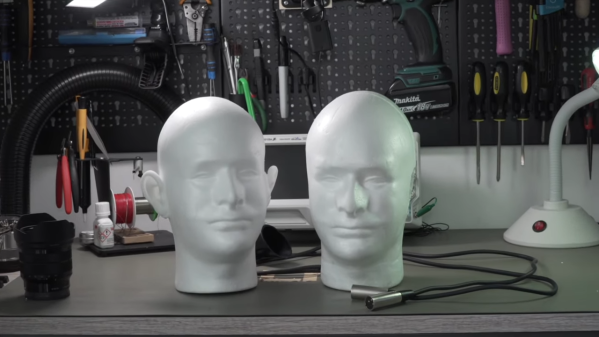
Recreating that binaural audio capture ability is the idea behind this homebrew 3D microphone. Commercially available dummy head microphones are firmly out of the price range of [LeoMakes] and most mortals, so his was built on a budget from a foam mannequin head and precast silicone rubber ears, which you can buy off the shelf, because of course you can.

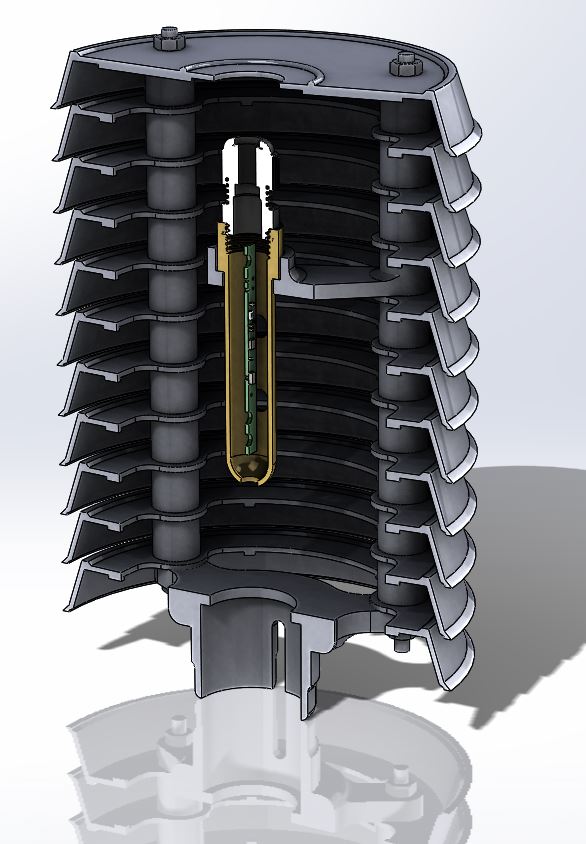
Attached to the sides of the foam head once it got the [Van Gogh] treatment, the ears funnel sound to tiny electret cartridge microphones. [Leo] learned the hard way that these little capsule mics can’t use the 48-volt phantom power that’s traditionally pumped up the cable to studio microphones; he fixed that problem with a resistor in parallel with the mic leads. A filtering capacitor, an RC network between the cold line and ground on the balanced audio line, and a shield cleverly fashioned from desoldering braid took care of the RF noise problem.

The video after the break shows the build and test results, which are pretty convincing with headphones on. If you want to build your own but need to learn more about balanced audio and phantom power, we’ve got a short primer on the topic that might help.

Continue reading “Homebrew Binaural Microphone Lets You Listen Like A Human”

RF Shield Turns Arduino (And PC) Into Shortwave Radio

Microcontrollers tend to consume other kinds of electronics. A project you might once have done with a 555 now probably has a cheap microcontroller in it. Music synthesizers? RC controllers? Most likely, all microcontroller-based now. We always thought RF electronics would be immune to that, but the last decade or two has proven us wrong. Software-defined radio or SDR means you get the RF signal to digital as soon as possible and do everything else in software. If you want an introduction to SDR, Elektor now has an inexpensive RF shield for the Arduino. The Si5351-based board uses that oscillator IC to shift RF signals down to audio frequencies and then makes it available to the PC to do more processing.

The board is available alone or as part of a kit that includes a book. There’s also a series of Elektor articles about it. There’s also a review video from Elektor about the board in the video, below.

Continue reading “RF Shield Turns Arduino (And PC) Into Shortwave Radio”

Winter Is Coming, This Clock Will Let You Know When

For Game of Thrones fans, it’s an awkward time. The show has ended its run on HBO (not without a certain level of controversy), the planned prequel is still years away, and who knows when George R. R. Martin will actually get around to writing the final books in the series. Fans have no choice but to entertain themselves while waiting for further tales of adventure from Westeros, which is how we get things like this motorized clock from [Techarge].

Inspired by the now iconic opening sequence from the HBO series, elements of the 3D printed model spin around while the theme song is played courtesy of a DFPlayer Mini MP3 player module and small 2 watt speaker. The audio hardware, motor, and four digit LED display module in the front are all connected to an Arduino with a custom PCB shield, giving the inside of the clock a very clean and professional appearance.

Around the back side [Techarge] has two small push buttons to set the hour and minutes, and a large toggle to control the music and movement. As of right now it needs to be switched on and off manually, but a future enhancement could see it kick on hourly.  We’d also like to see an RTC module added to the PCB, or better yet, switch over to the ESP8266 and just pull the time down from NTP.

Who knows? By the time you’ve built one of these clocks for yourself, and the hand-made Iron Throne phone charger stand to go with it, maybe ol’ George will have slipped out a new book. But don’t count on it.

A Self-Expanding PWM Driver

For smaller microcontrollers, having enough outputs for the job is sometimes a challenge. A common solution is to do some sort of multiplexing with the available outputs or perhaps something more advanced such as Charlieplexing, but another good option is to use a specialized driver board. What’s even better is if you can daisy chain driver boards to get even more outputs.

[Eric] has been working on a 16 channel LED project but first wanted to build a driver board with 8 channels. Before building a full 16 channel version he realized that he could take the same 8 channel board, make a mirror image of it, and attach it underneath the first board with headers in order to double the number of channels available. Without having to build a separate 16-channel board, this shortcut saved [Eric] some time and a great deal of effort.

This is a great example of working smarter, not harder. Each of the 8 or 16 channels has full PWM support as well to support PWM dimming, and a similar board could be built for motor control as well. It’s a good illustration of how good design can end up working for you as well. And if you need even more outputs, Charlieplexing is one way to get them.

Continue reading “A Self-Expanding PWM Driver”

Announcing The “Take Flight With Feather” Contest

The Adafruit Feather is the latest platform for microcontroller development, and companies like Particle, Sparkfun, Seeed Studios, and of course Adafruit are producing Feather-compatible devices for development and prototyping. Now it’s your turn! The Take Flight With Feather contest challenges you to design a board to fit in the Feather ecosystem, with the grand prize of having your boards manufactured for you and listed for sale on Digi-Key.

To get started, take a look at the current Feather ecosystem and get acquainted with this list of examples. From there, get to work designing a cool, useful, insane, or practical Feather. But keep in mind that we’re looking for manufacturability. Electron savant Lady Ada will be judging each board on the basis of manufacturability.

What’s a good design? We’re looking for submissions in the following categories:

  • The Weirdest Feather — What’s the most ridiculous expansion board you can come up with?
  • You’ll Cut Yourself On That Edge — We’re surrounded with bleeding-edge tech, what’s the coolest use of new technology?
  • Retro Feather — Old tech lives on, but can you design a Feather to interact with it? Is it even possible to build a vampire Ethernet tap or an old acoustically-coupled modem?
  • Assistive Tech — Build a Feather to help others. Use technology to improve lives.
  • Wireless Feather — Add a new wireless technology to the Feather ecosystem

In addition to the grand prize winner, five other entries (one in each of the 5 categories above) will receive $100 Tindie gift certificates. The contest begins now and runs through December 31st. To get started, start a project on Hackaday.io and use the “Submit Project To” dropdown box on the left sidebar of your project page to enter it in the contest.

Stack Of Plant Saucers, Transformed Into Low Cost Solar Shield

For serious data collection with weather sensors, a solar shield is crucial. The shield protects temperature and humidity sensors from direct sunlight, as well as rain and other inclement weather, without interfering with their operation. [Mare] managed to create an economical and effective shield for under three euros in materials.

It began with a stack of plastic saucers intended for the bottom of plant pots. Each of these is a lot like a small plate, but with high sides that made them perfect for this application. [Mare] cut the bottom of each saucer out with a small CNC machine, but the cut isn’t critical and a hand tool could also be used.

Three threaded rods, nuts, and some plastic spacers between each saucer yields the assembly you see here. When mounted correctly, the sensors on the inside are protected from direct exposure to the elements while still allowing airflow. As a result, the readings are more accurate and stable, and the sensors last longer.

The top of the shield is the perfect place to mount a UV and ambient light sensor board, and [Mare] has a low-cost DIY solution for that too. The sensor board is covered by a clear glass dish on top that protects the board without interfering with readings, and an o-ring seals the gap.

3D printing is fantastic for creating useful components, and has been instrumental in past weather station builds, but projects like these show not everything needs to be (nor should be) 3D printed.

Don’t Forget Your Mints When Using This Synthesizer

While synthesizers in the music world are incredibly common, they’re not all keyboard-based instruments as you might be imagining. Especially if you’re trying to get a specific feel or sound from a synthesizer in order to mimic a real instrument, there might be a better style synth that you can use. One of these types is the breath controller, a synthesizer specifically built to mimic the sound of wind instruments using the actual breath from a physical person. Available breath controllers can be pricey, though, so [Andrey] built his own.

To build the synthesizer, [Andrey] used a melodica hose and mouthpiece connected to a pressure sensor. He then built a condenser circuit on a custom Arduino shield and plugged it all into an Arduino Mega (although he notes that this is a bit of overkill). From there, the Arduino needed to be programmed to act as a MIDI device and to interact with the pressure sensor, and he was well on his way to a wind instrument synthesizer.

The beauty of synthesizers is not just in their ability to match the look and sound of existing instruments but to do things beyond the realm of traditional instruments as well, sometimes for a greatly reduced price point.

Continue reading “Don’t Forget Your Mints When Using This Synthesizer”