A Deck Screw Extruder

deck

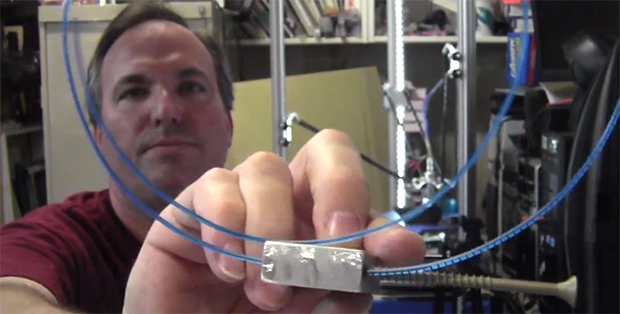
A lot of great ideas happen in the middle of the night, and for [Werner] it’s no different. One night he came up with an idea for a new 3D printer extruder, and after a very basic prototype, we’d have to say he might be on to something. It’s basically a deck screw acting as a worm gear to drive filament, but this simple idea has a lot of really cool advantages.

There are two really interesting features of this extruder, should [Werner] ever decide to flesh out his idea into a real prototype. First, the stepper motor for this extruder can be extremely small and mounted directly above the extruder. This opens up the doors to easily creating multi-extrusion printers that can handle more than one filament. Secondly, using a deck screw as a worm gear means there is a huge area of contact between the plastic filament and the driver gear.

Whereas the usual extruder setup only makes contact with the plastic filament along one or two splines of a hobbed bolt, [Werner]’s design drives the filament along the entire length of the deck screw worm gear. This could easily translate into much more accurate extrusion without all the fiddling around with springs and hobbed bolts today’s extruders have.

In any event, it’s a very interesting idea, and we’d love to see [Werner] or someone else make a functioning extruder with this design.

One Pixel Video Game Rises From RGB Button Hardware

rgb-button-one-pixel-video-game

This project was completely component driven. [Christopher] and [Robert] wanted to try out buttons with an RGB backlight option. They found the one shown above, which looks fantastic. It should since it costs over twenty bucks in single units. What they came up with is a one pixel video game that works like a color matching version of Simon Says. The button will show you the target color for just a moment. The player then holds the button as it fades through colors. Releasing it at the right instant will produce a green flash, a wrong shade results in a red flash.

They went with an Arduino Mega for the project as that was within easy reach. A hunk of protoboard is used as a shield, it includes the button itself, connected through some current limiting resistors to the pins that drive the LED. There is also a tactile switch which actuates the AVR’s reset pin.

When trying to get the LED to fade through the full range of colors [Christopher] was hit with a common problem. Since our eyes don’t detect changes in low and high intensity light the same way, you can’t use linear changes in PWM and get a smooth result. He fixed this by using Gaussian curves to set the intensity levels.

Continue reading “One Pixel Video Game Rises From RGB Button Hardware”

Getting SPI On A Router

router

Cheap routers such a s the TP-LINK 703n and the TP-LINK MR3020 (seen above) can be used for much more than just connecting your laptop to your cable modem. They’re actually very small Linux boxes and with OpenWRT, you can control every aspect of these tiny pocket-sized computers. It’s frequently been suggested that these routers are awesome substitutes for the usual methods of getting Internet on a microcontroller, but how do you actually do that? The onboard serial port is a great start, but this also dumps output from the Linux console. What you need here is an SPI connection, and [ramcoderdude] has just the solution for you.

Linux already has a few SPI modules, but these are only accessible with kernel drivers. Traditionally, the only way to access SPI is to recompile the kernel, but [coderdude] created a kernel module that allows any device running the Attitude Adjustment OpenWRT image to dynamically allocate SPI busses.

He’s already submitted this patch to the OpenWRT devs, and hopefully it will be included in future updates. Very cool, we think, and something that can open a whole lot of doors for hacking up routers very easily.

HHO Generator Makes Bubbles That Go Boom

Here’s [Phil] showing off the components he used to make an HHO generator. The device uses household items to generate hydrogen and oxygen from water using electrolysis.

He’s using a plastic Nesquik container as the vessel for his experiment. Inside is water doped with a bit of baking soda. The lid plays host to the majority of components. There are electrodes which stick through the lid of the container. To help boost the productivity of the generator these electrodes have several metal washers suspended between. It’s importnat to avoid a short circuit so they’re mounted with the plastic bolt from a toilet seat, and isolated using hot glue. A plastic tube used collects the gasses. You can tweak the ratio of what’s being collected by reversing the polarity of the battery.

It’s interesting to see soap bubbles lit on fire in the demo video. But there are more serious uses for this concept. People have been working on making it feasible to power cars from the hydrogen generated this way. We’ve also seen a plastic bottle rocket powered from an HHO generator, and there’s always the thought of building your own miniature dirigible.

Continue reading “HHO Generator Makes Bubbles That Go Boom”

Reverse Engineering The Die Of A ULN2003 Transistor Array

uln2003-die-reverse-engineering

We’re no strangers to looking at uncapped silicon. This time around it’s not just a show and tell, as one transistor form a ULN2003 chip is reverse engineered.

The photo above is just one slice from a picture of the chip after having its plastic housing remove (decapped). It might be a stretch to call this reverse engineering. It’s more of a tutorial on how to take a functional schematic and figure out how each component is placed on a photograph of a chip die. Datasheets usually include these schematics so that engineers know what to expect from the hardware. But knowing what a resistor or transistor looks like on the die is another story altogether.

The problem is that you can’t just look at a two dimensional image like the one above. These semiconducting elements are manufactured in three dimensions. The article illustrates where the N and P type materials are located on the transistor using a high-res photo and a reference diagram.

If you want to photograph your own chip dies there are a few ways to decap them at home.

Hackaday Staff Update

2013-08-15-Hackaday-Staff

It’s been just over three weeks since Supply Frame bought Hackaday and a lot has been going on. Almost all of it has been behind the scenes as we make our way through the scaffolding that was built up over the years to run the site. I’ll share more on that as things develop. But now I’d like to introduce you to the staff.

We’ve actually had a staff page for about a year but I’m not sure it was ever announced. Check out the Staff roll call to see a picture and bio of each of our team members. [Brian Benchoff] and I make up the editorial team. [Eric Evenchick] joins us once again as a writer. And over the last couple of weeks we hired [Mathieu Stephan] (aka Limpkin), [Josh Marsh], and [Michael Ciuffo] (aka ch00f). The six of us come from a wide range of backgrounds. We have interests and skill sets that complement each other, and as we get used to working as a team this will equate to better features and more original content. Please join me in welcoming the new writers, and long live Hackaday!


Electronic Wedding Attire For A Geeky Wedding

In the past we featured many projects that were used at [Bill] and [Mara]’s wedding. However we forgot the most important thing: their electronically enhanced clothes.

As you can see from the picture above, the wife opted for LEDs while the husband preferred Electro Luminescent (EL) wires/panels. The ATtiny based platform LilyTiny was picked to control all the LEDs, and charlieplexing was implemented as only 4 IO pins were available. Animations were made using Vixen and exported via a python script.

To power the EL wires, [Bill] hacked a Sparkfun EL battery pack/inverter. He removed the shell and took out the inverter part, reverse engineered the design enough to figure out how to bypass the onboard microcontroller that generated the on/off/blink function. Finally, he 3D printed enclosures to pack the electronics with one Li-Ion battery pack. A boost regulator was used to supply the 12v required by the EL panel power supply.

Don’t forget to also check out their centerpieces and wedding invitations that we previously featured.