Reaction Time Challenge

reactionChallenge

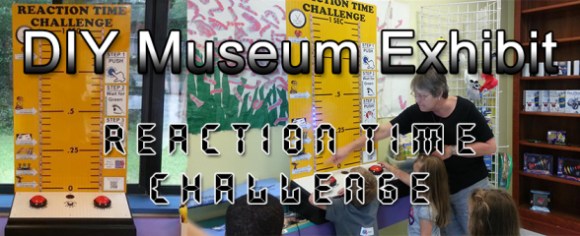
We’re not sure where [Bill Porter] finds all of his free time, but we’re glad he’s put it to such good use by building an exhibit piece for the local science museum: Reaction Time Challenge. It’s likely that we were all inspired to love science as kids in a museum like this, and [Bill’s] contribution is already fascinating its young audience. The challenge lets two participants test how fast they can smack a big red button after a randomly-generated countdown. The time taken for the players to react is translated into the RGB LED strips, measuring how fast they managed to hit the button.

Builds like this one need to clearly communicate how they should be used; you don’t want confused children bamming around on your cabinet. First, [Bill] guts the dim LEDs inside the big plastic buttons and replaces them with some brighter ones. To keep the connections clean, he takes the cannibalized ends of an Ethernet cable and hooks the speaker and buttons to an Ethernet jack. The jack sits snugly in a project box where it connects to an Arduino. Two RGB LED strips run from the opposite end of the box, daisy-chaining from the bottom of the cabinet to the top, then back down again. See it all come together in the video after the break.

[Bill’s] museum must be pretty lucky; he resurrected the “Freeze Frame” exhibit for them just over a year ago and has done a bunch of other projects for them over the years.

Continue reading “Reaction Time Challenge”

Electronic Wedding Attire For A Geeky Wedding

In the past we featured many projects that were used at [Bill] and [Mara]’s wedding. However we forgot the most important thing: their electronically enhanced clothes.

As you can see from the picture above, the wife opted for LEDs while the husband preferred Electro Luminescent (EL) wires/panels. The ATtiny based platform LilyTiny was picked to control all the LEDs, and charlieplexing was implemented as only 4 IO pins were available. Animations were made using Vixen and exported via a python script.

To power the EL wires, [Bill] hacked a Sparkfun EL battery pack/inverter. He removed the shell and took out the inverter part, reverse engineered the design enough to figure out how to bypass the onboard microcontroller that generated the on/off/blink function. Finally, he 3D printed enclosures to pack the electronics with one Li-Ion battery pack. A boost regulator was used to supply the 12v required by the EL panel power supply.

Don’t forget to also check out their centerpieces and wedding invitations that we previously featured.

The BatBox: Portable Power, Polished And Professional. Plus Smoke!

batBox

About the size of a shoebox and stuffed with a compact battery/inverter combo, the BatBox packs a mean wallop at 480Wh. What else was [Bill Porter] supposed to do with his free time? He’s already mailed out electronic wedding invitations and built custom LED centerpieces for the reception. He and his wife [Mara] then made an appearance in a Sunday roundup tying the knot by soldering a circuit together. Surely the LED Tetris Tie would have been in the ceremony had it existed. This time, though, [Bill’s] scrounged up some leftover electronics to put a realistic spin on a Minecraft favorite: the BatBox.

A pair of 18V high energy density batteries connect up to a 12V regulator, stepping them down to drive a 110VAC inverter. The BatBox also supplies 5V USB and 12VDC output for portable devices. Unfortunately, [Bill]’s first inverter turned out to be a low-quality, voltage-spiking traitor; it managed to let the smoke out of his fish tank’s LED bar by roasting the power supply. Undeterred, [Bill] pressed on with a new, higher-quality inverter that sits on an acrylic shelf above the batteries. OpenBeam aluminum extrusion seals up the remainder of the enclosure, completing the BatBox with a frame that looks both appealing and durable.

Really, Really Geeky Wedding Invitations

invitation

Being real, ultimate geeks, [Bill] and [Mara] didn’t want to settle for plain, paper-based wedding invitations. No, they wanted something cooler, and came up with their own DIY electronic wedding invitations.

Since they would be making the invitations themselves, [Bill] and [Mara] needed a simple circuit that could be easily mass produced. They turned to the classic microcontroller-powered blinking LED circuit powered by an ATtiny13.

The first order of business was producing 50 printed circuit boards for each of the invitations. For this, [Bill] picked up an Xerox Phaser laser printer off of ebay and a few sheets of copper-clad kapton film. The etch resist was printed directly onto the kapton film and etched in a bath of ferric chloride, effectively making a flexible PCB.

These circuit boards were soldered up and laminated between the printed invitation and the card stock cutter with the help of a Silhouette Cameo paper cutter. After the cards were assembled, the battery was wired up and the cards shipped out.

The microcontroller inside the card was programmed to be asleep most of the time, waking up only every few seconds to check a light sensor to determine if the card was opened or not. If the microcontroller sensed the card was open, the lights began blinking, making it one of the most memorable wedding invitations [Bill] and [Mara]’s guests will ever receive.

You can check out a demo of the invitations after the break.

Continue reading “Really, Really Geeky Wedding Invitations”

This Marriage Proposal Is The Best PCB Design Ever

best_pcb_design_ever

While you will often see hacks on this site that feature high voltage, fire, and metal, that doesn’t mean that hackers, makers, and electronics geeks don’t have a soft side. In fact, we find the opposite to be true the vast majority of the time.

Take for instance [Bill Porter].

You may have seen his projects and tutorials featured here a time or two, and though I have never met him, he seems like a great guy whose heart is in the right place.

He recently decided that his college sweetheart was “the one” and had to think of a clever and surprising way to pop the question to a girl who is always one step ahead of the curve. [Mara (soon to be) Porter] was working on a project that required a custom PCB, and having never ordered one before, [Bill] was happy to help her get things in order. After sending the schematics off to [Laen] at DorkbotPDX, [Bill] fired off another email asking to have his proposal silk screened on the boards. [Laen] said he was happy to help, and so the wait began.

The boards arrived a few weeks later, and the rest, they say, was history.

How did it go? We’re guessing you’ve figured it out by now, but be sure to swing by [Bill’s] site to see how it all went down.

You know you want to…you big softie!