Copper Electroplating The Cheap And Safe Way

[A_Steingrube] has posted a guide to his favorite method of copper electroplating. Plating copper onto other metals is popular with the steampunk crowd, but it does have other uses. Copper plate is often used as a prep step for plating other metals, such as nickel and silver. It also (usually) increases the conductivity of the metal to be plated. [A_Steingrube] is using the copper acetate method of plating. What is somewhat novel about his method is that he chose to make his own electrolyte solution from household chemicals. The copper acetate is created by mixing distilled vinegar and household hydrogen peroxide in a 50/50 ratio. The mixture is heated and then a piece of copper scouring pad is placed in. The scouring pad is partially dissolved, providing copper ions, and turning the solution blue.

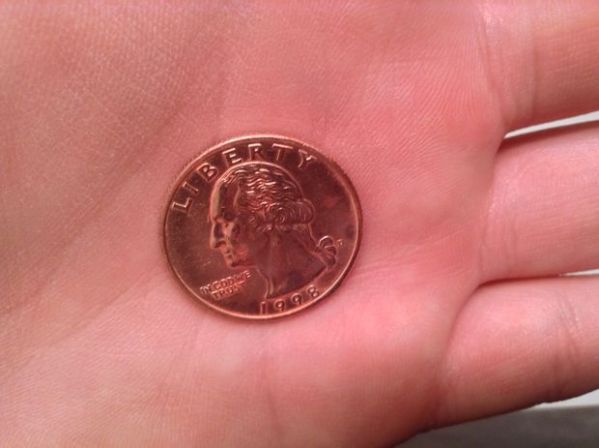
The next step is to clean the material to be plated. [A_Steingrube] uses Cameo Aluminum and Stainless cleaner for this, though we think any good degreaser will work. The actual electroplating process consists of connecting a piece of copper to the positive terminal of a 6 volt battery. Copper scouring pad is again used for its high surface area. The material to be plated is connected to the negative side of the battery. He warns to keep the solution and the material being plated in constant motion to avoid heavy “burn spots”, which can flake off after the plating process. The results speak for themselves. As with any bare copper material, the electroplated layer will quickly oxidize if not protected.

Hackerspacing In Europe: Hack42 In Arnhem!

IMG_1357 (Custom)

Wow.

That 3-letter word does not even begin to describe the awesomeness that is Hack42. Located in a decommissioned German military base in Arnhem, Hack42 is one of the largest, and as far as we’ve seen, the most awesome hackerspace yet.

Continue reading “Hackerspacing In Europe: Hack42 In Arnhem!”

Low Cost Filament Extruder

Here’s a great low cost filament extruder solution. It uses basic parts available from any hardware store, and a few 3D printed ones — estimated cost is well under $100.

It’s very similar to the Lyman Filament Extruder, but can be built for even less money. By using 200C set-point heaters, his setup requires absolutely no electronics — although a cheap PID controller from China could give him more extrusion capabilities with temperature control… Regardless, the system appears to make good filament and he uses it exclusively for his personal filament consumption in his Delta printer. He’s even hacked up the ABS casing of a refrigerator, ground it down, and turned it into filament using this machine! If you’re hungry for more details, the full build log and discussion can be found on the RepRap forums.

He also has a guide on making your own ABS color masterbatch to make your own filament colors!

[Thanks Liam!]

Making A Solid-state Relay With I2C Interface

As [Mic] often got requests to make high-power switching boards, he recently finally gave in and designed the one shown above based around a solid-state relay. Some of our readers that already play with mains power know that switching should normally occur when the voltage crosses zero volts. The ‘TRIAC BLOC’ is able to do so, which also allows mains frequency measurement. [Mic] then tuned to the internal oscillator of his ATtiny microcontroller with this 50Hz by adjusting its OSCCAL register value, so the switching command can be sent at the ideal moment. Zero crossing detection is implemented by feeding the mains into an AC optocoupler. [Mic] discovered that the optocoupler diodes are not identical, so he had to adjust his firmware to account for the time differences.

All the resources are available on github, we would be interested to hear your detailed analysis of the circuit implemented with the passives R3/C1/L1/R8/C3.