Logic Noise is all about using logic circuits to make sounds. Preferably sound that will be enjoyable to hear and useful for making music. This week, we’ll be scratching the surface of one of my favorite chips to use and abuse for, well, nearly anything: the 4051 8-way analog switch. As the name suggests, you can hook up eight inputs and select one from among them to be connected up to the output. (Alternatively, you can send a single input to one of eight destinations, but we won’t be doing that here.)
Why is this cool? Well, imagine that you wanted to make our oscillator play eight notes. If you worked through our first installment, you built an abrasive-sounding but versatile oscillator. I had you tapping manually on eight different resistors or turning a potentiometer to eight different positions. This week, we’ll be letting the 4051 take over some of the controls, leaving us to do the more advanced knob twiddling.
Why is the 4051 awesome? Because this week’s projects are the tip of a large iceberg. There’s nothing stopping you from hooking up eight CD players or radios to the inputs and switching rhythmically between them. Or applying eight arbitrary voltages to each input and stepping through them at audio frequencies, creating an eight-step arbitrary wavetable synthesizer. And the 4051 pairs fantastically well with a microcontroller, if you’re the type who’d like to add computer control to your square-wave noise synths. These applications are above and beyond what we’re doing today, but it’s good to see the forest and the trees.
Sequenced Pitches: The 4051 Switch
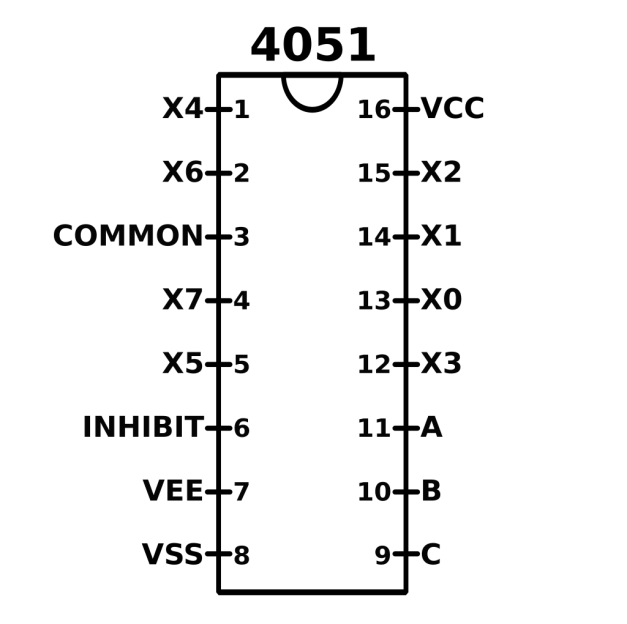
Up to now, we’ve been changing the resistance in the feedback loop of our relaxation oscillator circuit to control the pitch. But what if we don’t want to have to control the pitch by hand anymore? We can pass off resistor-selection duties to a switch, for instance. So without further ado, I introduce to you the 4051 analog switch.

On the bottom right (pins 9, 10, and 11) are the three digital inputs that select which way the switch will be active. Depending on the value of these three bits, the common pin will be connected to any one of the various X pins. A is the least-significant bit, and C is the most-significant. So when A=B=C=0, common is connected to X0 and when A=B=1 and C=0, common is connected to X3.
The power supply for this chip is a little bit complicated, because it aims to support both negative and positive (analog) voltages through the switch. In “normal” use, you’d connect VCC to +5V, VSS to -5V, and VEE to 0V, or the signal ground. What’s important here is that the VCC to VSS voltages span the input range, and VEE to VCC is in the relevant range for our logic signals. Since we’re passing single-sided (0V to 5V or 9V) square waves through the feedback path, and using the same voltage range for our logic signalling, we can connect both VSS and VEE to ground.
The Circuit
The circuit here builds on everything we’ve done so far, so dig out the 40106 chip for oscillators, the 4040 binary counter from last week to convert the clock stream into a binary count, and of course, your 4051 analog switch.
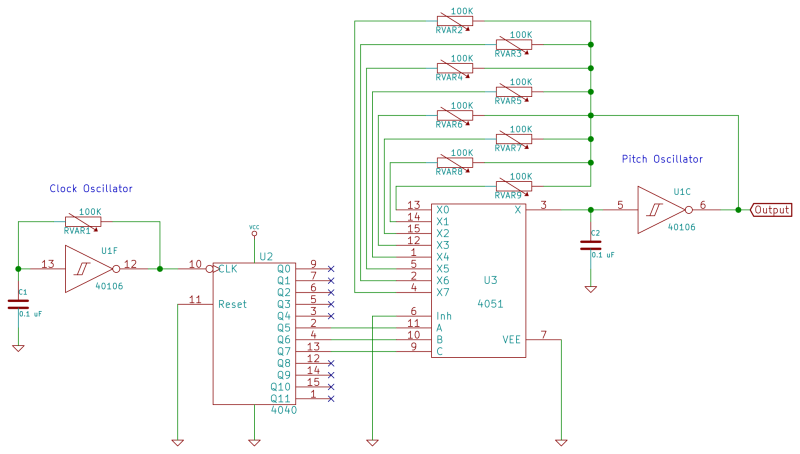
For this circuit, we’ll need two oscillators set up on the 40106 like before. We’ll call these two oscillators the “clock” and “pitch” oscillators. The clock oscillator will control the tempo and feed it’s output into the 4040 counter’s input. The pitch oscillator will have a number of options for its feedback resistor, selected by the 4051 chip, and the counter’s output determines which resistor is picked. This means that our circuit looks something like this:

OK, that’s a lot to take in at once, but it breaks down into familiar parts. On the left, we’ve got the circuit from the stacked oscillator example: a variable oscillator driving our binary counter that acts as a clock divider. On the far right, we’ve got a simple relaxation oscillator again, but where the feedback resistor would leave the inverter’s output the circuit splits up into eight individual resistors, passes through the switch, and returns back to the inverter’s output to charge up the capacitor. And there’s the secret. The switch is selecting which of the resistors are used to determine the pitch.
Actually building this circuit as written requires a lot of wiring, and it’s easy to get lost. Instead, I recommend starting off with just one of the feedback resistors and working your way up. With a single resistor in place, the pitch oscillator will only sound for 1/8th of the cycle. Start off by adjusting the timing oscillator fairly slow, and then get a reasonable pitch set up on the audio oscillator. Now you’re ready to add in another resistor into the sequence. And as a practical layout tip, notice that you’re eventually going to hook up five to eight resistors from the switch all into the same point. Make sure that you leave yourself a bit of space on your breadboard to make these connections.
What resistors should you use? If you have an endless supply of 100K potentiometers on hand, that’s ideal. But who among us does? Instead, it’s actually an interesting challenge to just grab a handful of different resistor values between 10K and 100K at random and try to make something musical out of them. In practice, it also makes sense to leave a couple positions on the switch empty. This breaks the feedback loop and gives you musical rests in the sequence.
Things really get fun when you mess around with the inputs to the selection bits A, B, and C. As drawn, we’ve hooked up the least-significant bit from our counter to the least-significant bit position on the switch and so on. This gives us a predictable counting-upwards-to-eight pattern. That is, we’re using the counter chip as a counter. (Yawn!)
Once you’ve got three or four resistors hooked up, try picking off other clock divisions as inputs. For instance, if you use a relatively fast clock input for selection bit A, you’ll get a rapid trill between two notes (even and odd values of X) and a slower progression through four of these pairs. There are so many patterns here that you’ve just got to experiment around.
With eight variable resistors to tune the pitches and multiple ways to control the rhythm patterns, this setup really isn’t too shabby. Prepare to spend at least a half hour just playing around after you’ve built it.
Sequenced Sync
So far, we’ve gotten a lot of mileage out of hard-syncing one oscillator to another and varying the timbre of the output by varying the (relatively higher) frequency of one oscillator by hand. Let’s automate that.
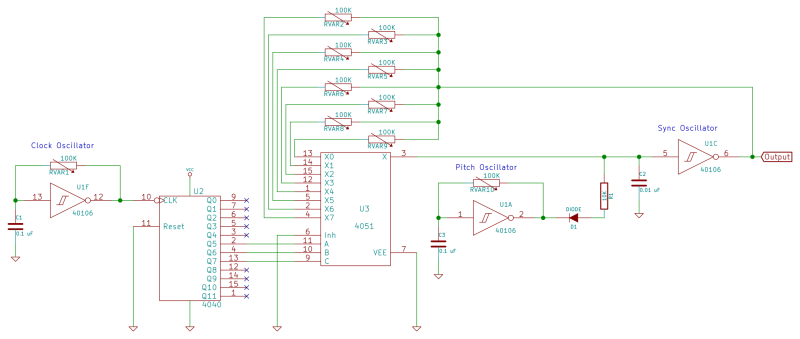
We’ll need one more oscillator for the sync function. (Good thing the 40106 has six inverters, right?) Now the circuit will consist of a clock oscillator to drive the counter and switch, a sync oscillator controlled by the switch, and a pitch oscillator that we can control directly to play music. Note that now we’re controlling the sync oscillator from the switch and the pitch oscillator by hand.
Before you go ripping up stuff off your breadboard, notice that you can set up the previous circuit’s pitch oscillator as this circuit’s (higher-frequency) sync oscillator very easily by changing out a lower-value capacitor and leaving the rest of the circuit in place. Swap in a 0.01 uF cap for the sync oscillator and then take the 0.1 uF cap that you just pulled out and build up your pitch oscillator with it. Connect the pitch oscillator’s output up to the sync oscillator’s input with a diode and current-limiting resistor just as we did last time. Hook up your amp setup to the sync oscillator’s output and bask in the awesomeness.

Make sure that you explore the whole range of sync-rate modulation frequencies by tweaking the clock oscillator. It’s fairly obvious to run the sync-switching frequency around 2 Hz (120BPM), but really strange things happen as the switching frequency of the sync approaches the audio frequencies. I like this circuit a lot.
Extensions
There are too many ways to go with this circuit setup.
If you want to play with bizarre rhythms, you can use non-synchronized cycles to drive the A, B, and C pins. Instead of the single-oscillator-plus-counter setup we used here, build three random oscillators on the 40106 and use them as inputs to the 4051. You’ll get some really far-out patterns depending on the relative periods of the various clock oscillators.
Or you could keep the counter in the circuit but feed it an irregular clock source so that the steps it takes are wonky. You can build a strange clock by using diodes to combine the outputs of several oscillators that have different periods. Using Mickey Mouse logic you can AND or OR multiple oscillators together before the counter. Unless you’re very lucky or clever, it may not be “musical” but that’s in the ear of the beholder.
In either of the above two examples, substituting light-dependent resistors (LDRs) for the feedback resistors in the clocks will give you dynamically varying madness as the amount of light in the room changes. This can actually be very cool over the period of a day if you have the attention span for it and run the clocks fast enough that the sound is an evolving texture rather than a manic musicbox.
But you don’t even need the counter to have fun with the 4051. Putting two of them back-to-back (common pin to common pin) gives you an 8×8 switch: one of eight inputs can route to any one of eight outputs. And you can repeat the circuit as many times over as you need simultaneous signal paths. Similarly, two 4051s in parallel with a bipolar power supply make a workable eight-way input selector for your stereo.
Next Session
In the next installment, we’ll work on some amplifier and filter circuits using CMOS chips. For these, we’ll need a different inverter chip, the 4069UBE, that doesn’t have the built-in hysteresis of the 40106. (Note that the UB part is important — it’s an unbuffered output that we’re looking for.) Until then, have fun and post up your results in the comments.


yay! love it!!
I rebuild those circuits in a PSoC and generate the Clocks with PWMs, they get their input from and ADC which is hooked up to a Poti. Sounds strange first but this way I can play “songs” automatically.
Already curious about next session ;)
I like these series of blogs a lot and to see hackaday.com created content!
I like this series too. Gret to see this kind of articles.
Yay!
The eight pots should be ten turn pots if possible. They can be tuned and retuned as easy as possible.
This is the heart of the sound of the Berlin Schule, the likes of Tangerine Dream and others for over 40 plus years.
This is the original use of the term sequencer, before MIDI.
anyone else think that https://www.youtube.com/watch?v=v56zL0c_08Q#t=164 sounds a lot like https://www.youtube.com/watch?v=gKMW7E8tbGU ?
Whoah! Entirely unintentional, but uncanny. Nice catch.
Post should be tagged with “logic noise” so it can be found with the rest of the series.
This is definitely my favorite HaD series! Please keep ’em coming :D
You must make sure that you hire the best web hosting company India to get the best deals and offers for web server hosting. Figure out what it is you need and want and from there shop around to see what web hosts matches these expectations. Japanese Gardens – Although the gardens are technically in Fort Worth, Texas, it is only a short drive.
Im proud of you
It’s still tiny at only 145″ long, nevertheless the interior will hold 4 average adults in reasonable comfort, if still close proximity. Have you ever seen a Ford Ranger All Electric pick-up truck. Angle cuts are produced easily with the miter gauge.
I was wondering why my sequences are so fast on my 4029 and just saw that you are using Q5-Q7. I had to switch the potentiometer with a 1M Ohm resistor to get near an interesting speed. I guess I’ll have to change the capacitor value making it bigger to work with the 100k Ohm again.
I was wondering what would have to change in this circuit so we can connect an external audio device (say a number of CD players or radios as you mention) to the 4051 in order to switch between them? Could you simply connect the audio output of each device to each of the chip’s input and leave the 40106/4040 as its clock?
any idea how to use the 4051 to trigger different circuit bent kids toys?
Transistors on IO0-IO7 to control the various sounds and if there are any dancing light you could wire them to control the ABC pin
Playing around with easyeda and designed this schematic on pcb wish I could show it just need to buy it
I built a patchable sequencer based on this idea and called it “Logical Steps”. Thanks a lot for the inspiration!
https://electro-music.com/forum/viewtopic.php?t=72807
I would happily pay textbook prices in a subscription model for content like this; if it was regularly produced. Or better yet an Elliot Williams style CMOS+ synth cookbook written in the style of these articles. In the sea of “information” online, there’s a true craving for functional learning content like this.