ISD1700 Based Lo-Fi Sampler

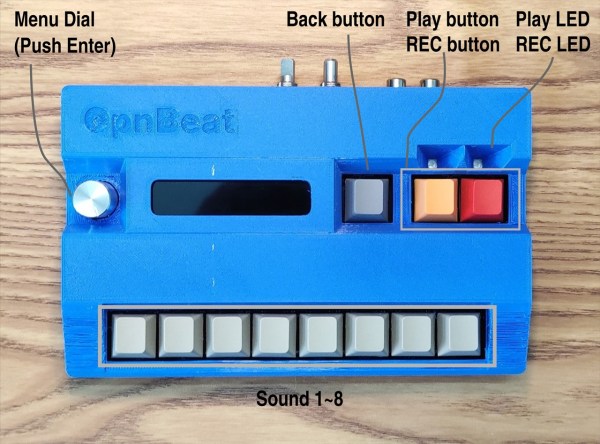
Custom music instruments here at Hackaday range from wacky to poignant. OpnBeat by [Hiro Akihabara] focuses on something different: simplicity.

There are few buttons, the design and code are optimized to be straightforward and easy to modify, and the interface is slick. Eight musical keys complement three interface keys and a knob. An Arduino Nano powers the main brains of the system but the music generation comes from eight Nuvoton ISD1700s controlled over SPI by the Nano. The beautifully laid-out PCB is 110mm by 180mm (4.33″ by 7″), so cases can easily be printed on smaller FDM printers. All the switches are Cherry MX switches for the beautiful tactile feedback.

The code, PCB, and 3D case files are all available on GitHub. We love the thought that went into the design and the focus on making it easy to recreate. It might be quite as cute and simplified as this twelve-button musical macro pad, but the two together could make quite the band.

Continue reading “ISD1700 Based Lo-Fi Sampler”

Sequencing The Vintage Way

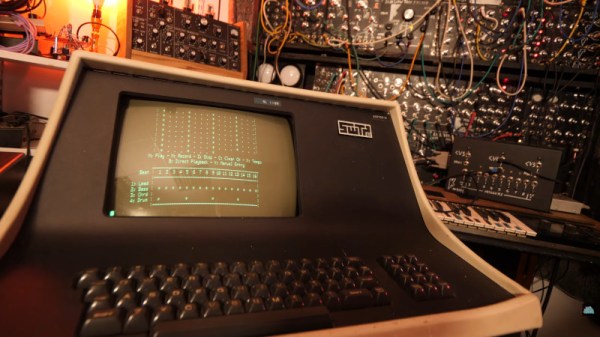
For most of us, an 8-bit microcomputer means one of the home computers which set so many of us on our way back in the 1980s. But this ignores an entire generation of 1970s 8-bit machines which filled the market for affordable office and industrial desktop computing before we were seduced by Pac-Man or Frogger. It’s one of these, an SWTPC 6809, that’s found its way into the hands of [Look Mum No Computer], and in direct contradiction to his branding, he’s used it to control a synthesizer.

As you’d expect from the name, the computer hides a 6809 processor, and comes from the end of the 1970s when that chip had been released in an effort to stave off the market threat from the likes of Zilog and MOS Technologies. It has an SS-50 bus motherboard, and the saga in the video below the break is as much about the production of a custom DAC and trigger port for it to drive the synth as it is about troubleshooting a four-decade-old computer. It’s a credit to SWTPC that the machine is largely working after all this time, however it succumbs to some damage during the development of the interface.

At the end though, there’s a fully functional sequencer on a 1970s computer, playing some pretty good electronic music from an analogue synth. This is EXACTLY the future we were promised, back in 1979!

Long-time readers will know this isn’t the first SWTPC that has graced these pages.

Continue reading “Sequencing The Vintage Way”

Rope Core Drum Machine

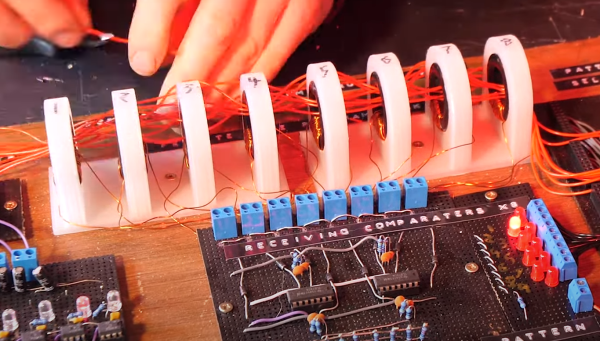
One of our favorite musical hackers, [Look Mum No Computer] is getting dangerously close to building a computer. His quest was to create a unique drum machine, inspired by a Soviet auto-dialer that used rope core memory for number storage. Rope memory is the read-only sibling to magnetic core memory, the memory technology used to build some beloved computers back in the 60s and early 70s. Rope core isn’t programmed by magnetizing the ceramic donuts, but by weaving a wire through them. And when [Look Mum] saw the auto-dialer using the technology for a user-programmable interface, naturally, he just had to build a synth sequencer.
Continue reading “Rope Core Drum Machine”

Sight And Sound Combine In This Engaging Synthesizer Sculpture

We’ll always have a soft spot for circuit sculpture projects; anything with components supported on nice tidy rows of brass wires always captures our imagination. But add to that a little bit of light and a lot of sound, and you get something like this hybrid synthesizer sculpture that really commands attention.

[Eirik Brandal] calls his creation “corwin point,” and describes it as “a generative dual voice analog synthesizer.” It’s built with a wide-open architecture that invites exploration and serves to pull the eyes — and ears — into the piece. The lowest level of the sculpture has all the “boring” digital stuff — an ESP32, the LED drivers, and the digital-to-analog converters. The next level up has the more visually interesting analog circuits, built mainly “dead-bug” style on a framework of brass wires. The user interface, mainly a series of pots and switches, lives on this level, as does a SeeedStudio WIO terminal, which is used to display a spectrum analyzer of the sounds generated.

Moving up a bit, there’s a seemingly incongruous vacuum tube overdrive along with a power amp and speaker in an acrylic enclosure. A vertical element of thick acrylic towers over all and houses the synth’s delay line, and the light pipes that snake through the sculpture pulse in time with sequencer events. The video below shows the synth in action — the music that it generates never really sounds the same twice, and sounds like nothing we’ve heard before, except perhaps briefly when we heard something like the background music from Logan’s Run.

Hats off to [Eirik] for another great-looking and great-sounding build; you may remember that his “cwymriad” caught our attention earlier this year.

Continue reading “Sight And Sound Combine In This Engaging Synthesizer Sculpture”

LMN-3: Putting The ‘OP’ In Open Source Synthesizers

Some projects you come across simply leave you in awe when you look at the thought and the resulting amount of work that went into it, not only for the actual implementation, but everything around it. Even more so when it’s a single-developer open source project. [Stone Preston]’s synth / sampler / sequencer / DAW-in-a-box LMN-3 absolutely fits the description here, and it seems like he has set his heart on making sure everyone can built one for themselves, by providing all the design files from case down to the keycaps.

The LMN-3 (LMN as in “lemon”, not “comes before the OP“) is intended as a standalone, portable digital audio workstation, and is built around a Raspberry Pi 4 with a HyperPixel display for the user interface. The UI itself, and with it the core part of the software, was created using the Tracktion Engine, which itself uses the JUCE framework and combines your typical synthesizer, sequencer, and sampler features with the DAW part to handle recording, editing, and mixing. The remaining hardware is a custom-designed PCB with a set of function and keyboard buttons, along with a pitch bend joystick and four rotary encoders with push buttons that serve as main input handlers. Oh yes, and a Teensy board.

The UI is actually entirely controlled via MIDI commands, and custom firmware on the Teensy is translating the input events from buttons, encoders, and joystick accordingly. This essentially decouples the hardware from the software, and using a cross-platform framework underneath, you can also run the UI standalone on your computer and use any 3rd-party MIDI controller you like. Or then, as [Stone] thought really about everything, use a hardware emulator he created in addition. You could even leave out the Raspberry Pi and software altogether and turn this into a pure MIDI controller. If that sounds tempting, but you’re looking for something with more knobs and sliders instead of buttons, check out the Traktorino. And if you actually prefer a mouse as input device, there’s always something running in a browser.

Continue reading “LMN-3: Putting The ‘OP’ In Open Source Synthesizers”

Jukebox Electromechanical Automation Explained

If you ever been curious how old-school jukeboxes work, it’s all electromechanical and no computers. In a pair of videos, [Technology Connections] takes us through a detailed dive into the operation of a 1970 Wurlitzer Statesman model 3400 that he bought with his allowance when he was in middle school. This box can play records at either 33-1/3 or 45 RPM from a carousel of 100 discs, therefore having a selection of 200 songs. This would have been one of the later models, as Wurlitzer’s jukebox business was in decline and they sold the business in 1973.

This may be the ugliest jukebox ever produced.

This jukebox is actually what turned me into the weirdo that I am today.

External appearances aside, it’s the innards of this mechanical wonder that steal the show. The mechanism is known as the Wurlamatic, invented by Frank B. Lumney and Ronald P. Eberhardt in 1967. Check out the patent US3690680A document for some wonderful diagrams and schematics that are artwork unto themselves. Continue reading “Jukebox Electromechanical Automation Explained”

Customisable Micro-Coded Controller Helps With In-Circuit Debugging

Over on Hackaday.io, [Zoltan Pekic] has been busy building a stack of tools for assisting with verifying and debugging retro computing applications. He presents his take on using Intel hex files for customised in-circuit testing, which is based upon simple microcoded sequencers, which are generated automatically from a high level description.

The idea is that it is very useful to be able to use an FPGA development board to emulate the memory bus component of the CPU, allowing direct memory access for design validation purposes. This approach will also allow the production of a test rig to perform board level verification. The microcode compiler (MCC) generates all the VHDL, and support files needed to target a Xilinx FPGA based dev board, but is generic enough to enable targeting other platforms with a little adaptation.

Another interesting use case enables in-circuit tracing of buggy memory accesses, with the microcode sequencer decoding the accesses and dumping the relevant information out to either a serial port, or even direct to an embedded VGA controller, hardware allowing.

This automated approach to generating customisable microcoded hardware is a very nice trick to have in your bag, and even if it only helps in certain circumstances, [Zoltan] notes that it at least serves as an interesting example of the architecture of computers from history, if not much else.

Source for the example 8085 project can be found on the project GitHub, and the toolchain source can found here also.

For an interesting practical use of microding to implement emulations of historical hardware, checkout this neat switchable reproduction calculator project.