A small disk sander is a useful and cheap addition to the shop. For about $100, you can buy a cheap combination 6″ disk/belt sander that’s extremely useful. The size and cost of power tools does not scale linearly, and if you want a big disk sander you might as well make your own.
The motor for this build is a 1kW single phase motor pulled from a floor polisher found in the trash. That’s enough to push a sanding disk around, but when you get to tools this large, you need a good base, good tilt mechanism, and everything should be extremely heavy.
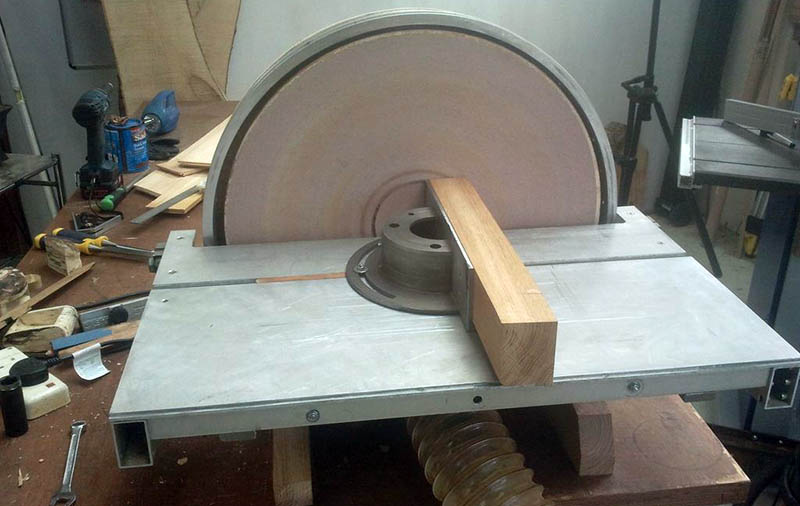
This build meets all those requirements while still using mostly recycled components. The work table is actually made of three pieces of recycled aluminum epoxied together. Yes, you should cringe at this, but it actually makes a little bit of sense: thinner pieces can be cut on a table saw, and if you’re extremely careful during the glue-up, you can cut the mitre slot without a mill. This frame attaches to a frame made from aluminum extrusion and filled with a homebrew epoxy granite mix. Remember, heavy is better here.
In keeping with making a huge disk sander out of stuff pulled out of the trash, the trunnions and motor hub were cast out of aluminum melted in an old propane tank furnace. Once these were cleaned up, a disk was mounted on the hub and trued up in the most unsafe manner possible.
With a few additions including a machined mitre gauge, dust collector, and legs made out of wood that’s far too pretty for a simple shop tool, this huge assemblage of trash turned out to be a great sander. You can see a few videos of it below.


Why would anyone cringe at epoxied aluminum? If the aluminum is etched with chromic acid and bonded with the right epoxy you can expect more than a 10,000 psi tensile strength bond. Peel strength will be less but you can design around that limitation.
Nice build, its always nice to get free things from the trash.
Exactly. Epoxy-aluminium composite is strong and used for demanding applications like airplanes.
The body cab of the military HMMWV Humvee is constructed of riveted and epoxy-bonded aluminum panels, so it is certainly nothing to cringe about.
That’s a gross generalization. I doubt this guy is using armor plate in his hobby build. I’m sure his is rigid enough for a shop tool but to compare thin generic alloy to armor plate as if they were somehow equal is an error.
Well, are we talking 1100 vs 7075 or 6061 vs 7075? And what temper?
Where did I mention armor plate? As I said, the thin aluminum panels that comprise the softskin cab of the standard Humvee are epoxied for strength, as well as riveted. Nothing to do with the armor.
Yeah, and the Humvee is absolutely useless against molten copper IEDs. It’s shameful how little protection it gives our troops, and Hummer should go get a real engineering team.
http://www.anothersource.org/nightmare_1.html
I think the main failing of laminating the sheets is actually creating a straight even surface, because the layers may be wedged one way or the other depending on how the epoxy sets, how much the epoxy shrinks, what sort of voids you leave behind, etc. etc.
How do you clamp it down evenly across the surface so that you don’t get dimples or bumps, or waves and wiggles, or have the whole thing thicker at one end, and how to true it up afterwards is a non-trivial problem.
Beautiful work! I’d love to build something like that.
Impressive to se how much work som people are willing to do to save a little cash.
Dude, have you seen the price of a good 20″ disk sander?
Maybe he missed the – 20″ – bit in the description.
Sometimes it’s the only reasonable option. Say I want a $300 dollar tool, and I make $11.00 an hour. 90% of my regular income goes to things like, well, food, shelter, etc.
I can either spend 30ish more hours working (Assuming I can find somewhere else to work for 30 hours at 10-11 dollars per hour, assuming no taxes) For however long that takes, or I can spend say, ten hours making it myself.
Depending on your pay scale and cost of living, direct time investment can make a lot more sense than investing time in someone ELES’s work, then having them pay you. Like most other transfers of energy, this isn’t a loss less transaction.
Or some people just find it fun. I grew up poor, so I find it practical, as well as just fun to say “Yeah, I built that.
I think you are on the wrong website.
£1500 aka $2300 is little cash ??
Love the use of the disc brake for the mitre.
I enjoy finding uses for those large lumps of metal after they retire from car duty.
You are obviously confusing this site with the “here’s the cheap junk I bought from china on my credit card” website.
The experience and knowledge gained while doing a project like this is absolutely invaluable. Used industrial tools are scarce in some locales. Heavy duty 20″ disc sanders are rare most everywhere and they are typically very expensive. This unit looks pretty stout for use with wood, though perhaps not quite up to regular use with metal (that just happens to be my focus).
The use of the floor polisher as the starting point is great because the bearings, and their arrangement, should be up to the significant load. But anyone contemplating a project like this should carefully consider the forces and bearing arrangement. I doubt any ole scrape motor would work.
Why not mount the mains switch at the opposite (left) side of the box which would be the safer side fingers-sucked-into-the-gap-wise?
Good point! Didn’t think of that. Mainly I just thought – I will go for it with my right hand, I’ll put it on the right side… Will consider moving it.
Why not have two e-stops?
Good build, great photos.
The plywood disc seems like a weak point. I would expect some deflection and vibration. Also, a metal disc has the important advantage of conducting heat away. That helps with abrasive longevity and disc retention. I wonder whether grinding metal would burn the plywood? Would heat over time compromise the adhesive that holds the plywood layers together?
The RPM and forces in this application, with that 20″ diameter, are very substantial. I wonder if that plywood disk is a matter of ‘when not if’ in regard to failure? And such a failure would likely be extremely violent. Maybe explosive?
A metal disc at this rpm would also be a challenge. If cracks were to develop, etc, it could be a very dangerous situation. In the case of aluminum, there are fatigue issues.
But again, nice build. For some tasks having that Huge abrasive surface available is really nice.
Following your practice with 3D printing, shouldn’t this article be entitled “Disk Sandering”?
I second this. HaD’s articles on disk sandering, Arduino flashering, PCB etchering, and laser cuttering are all top-notch! Really like the epoxy-aluminum construction and impressed with the resourcefulness of this build, and the quality of said Instructable. Custom aluminum castering in a homebuilt propane oven, too! Nice work.
I prefer a stationary belt to a disc sander any time. The flat surface picks up more stuff and can’t shed it the way the ends of a belt do. A wire brush used on one end does even more, keeping the belt in use for years.
I have a jig to hold small things cubic square to the belt.
An object sanded on the disc is subjected to a whole slew of forces, the most important is high difference in sanding velocity. It’s zero in the middle, and tapers radically. Replacing the belt is easy. One task I do needs the fine belt.
Disc…scraper…solvent…one use spray can of glue that will clog…bubbles…
This is a dynamite Instructable. Broadly ranging in the tools used for fabrication. And a kind of “recursive” construction — where the tool is used to make itself. Brilliant range of skills employed.
For the love of god keep the distance from the deck to the sanding face as small as possible or this happens (graphic injury picture following) http://imgur.com/ZnV5ATd and a fair 20″ disk sander costs around $800. they had to replace it after my injury due to the deck being worn out to a little over 1/2″ from the sanding face.