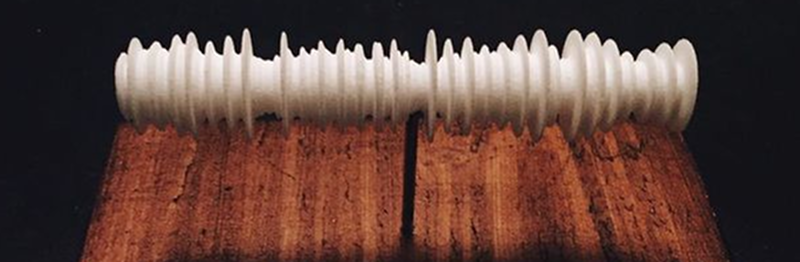
People like music, but they are also visual creatures. Perhaps that’s why music visualization is such a common project. Usually, you think of music visualization as using LEDs or a computer screen. However, [Gieeel] did his music visualization using a 3D printer.
Sure, the visualization is a little static compared to LEDs, but it does make an interesting conversation piece. The actual process isn’t very difficult, once you have the idea. [Gieeel] captured the waveform in Audacity, did a screen capture, and then converts the image to an SVG file using Inkscape.
From there, you can use many different CAD tools to convert the image into a 3D object. [Gieeel] used Autodesk Fusion 360 and had the resulting object professionally 3D printed.
We’ve seen other kinds of sound sculptures before. Of course, we’ve also seen a lot of traditional visualizations, as well.


There’s also the 3D printed “record”.
https://www.youtube.com/watch?v=NM7hwAuXqCE
Cartesian printing a spiral – how to maximize quantizing error 101.
i feel like you can kinda hear the sound of the servos getting etched into it… lol
That was great! And most printers are in 3D. My 3D printer only prints grayscale on paper.
I’m so glad that someone else did this. I’ve been thinking about this idea for years and now I don’t have to go through the pain and suffering of making it work. :-) It makes it all the easier to focus on my projects. :-) This is SO COOL!!, especially for those who are old enough to remember when LPs reigned supreme. Its a beautiful interaction of beloved ancient technology with the modern. (Almost the definition of real Steam-punk, not just slapping gears on stuff)
That’s great! I don’t believe it though.
The real question is – what sounds did the 3D printer make when it was printing it and what does it look like when you 3D print those sounds?
And: if you repeat the process, does it converge to a fixpoint?
This code would not take a lot of work to output a more realistic “sound landscape”. https://github.com/plredmond-archive/spectrogram3d_hs
I saw this in Polish Radio action “Touch the Sound” few years ago: https://www.youtube.com/watch?v=nzzewDJJgT8
Also tried something like that on FDM: https://web.facebook.com/FrozenPC/posts/727683390586051 – same process steps (Audacity->Inkscape->3D revolution).
I must be losing it. I heard a faint sound of something music like but it was drowned out by a wooshing sinusoidal loop.
I would love to see a visualization of the EQ frequencies changing (EQ visualization). This could perhaps be done by rotation. Instead of the waveform being on the X axis, it would be on the Z axis. The X axis would display the frequencies from Low (left) to high (right). The Y axis would be the level on that particular frequency. Something would have to account for the higher levels obscuring the lower levels as the rotation occurs. Surely someone has an idea.
I did something similar for burning man last year
http://www.thingiverse.com/thing:387896
Printed 100 of them for handouts, did the ‘mountain’ part in glow-in-the-dark blue.
Now create an app that will take in a 3D waveform via the camera and play it back.
+1
It has already been done, multiple times, here is one http://www.warmplace.ru/soft/ans/
http://www.gillesazzaro.com/pages/en/printing3D.htm
Yes, that is exactly what I was thinking about. There is a program called ARSS or a newer fork called Asperes that will convert wav files to BMP images, then you just use those to displace a mesh and you are good to go. You could displace a flat plane, or a cylinder surface depending on what you need as a final form.