Last fall, I grabbed a robot arm from Robot Geeks when they were on sale at Thanksgiving. The arm uses servos to rotate the base and move the joints and gripper. These work well enough but I found one aspect of the arm frustrating. When you apply power, the software commands the servos to move to home position. The movement is sufficiently violent it can cause the entire arm to jump.
This jump occurs because there is no position feedback to the Arduino controller leaving it unable to know the positions of the arm’s servos and move them slowly to home. I pondered how to add this feedback using sensors, imposing the limitation that they couldn’t be large or require replacing existing parts. I decided to try adding accelerometers on each arm section.
Accelerometers, being affected by gravity when on a planet, provide an absolute reference because they always report the direction of down. With an accelerometer I can calculate the angle of an arm section with respect to the direction of gravitational acceleration.
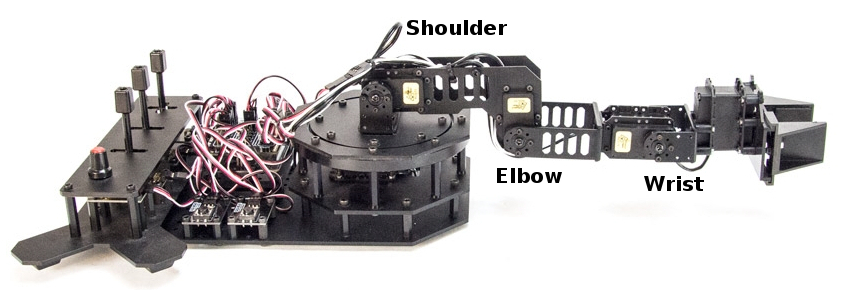
Before discussing the accelerometers, take a look at the picture of the arm. An accelerometer would be added to each section of the arm between the controlling servos.
Accelerometers
Gravity tugs everything toward the center of the mass of the Earth. It is a force that creates an acceleration exactly just like what you feel when a vehicle begins to move or stop. The force of gravity creates an acceleration of 1 g which is 9.8 m/s2 or 32.15 ft/s2. An accelerometer measures this force.
Integrated circuit accelerometers are inexpensive and small devices readily usable by hackers. One reason they are inexpensive is the high demand for them in smart phones. These small devices are based on etching mechanical structures within the integrated circuit using a technology called MEMS (Microelectromechanical systems).
One design for a MEMS accelerometer is basically a variable capacitor. One plate is fixed and the other mounted some distance away on a spring suspension. When the device is accelerated the suspended plate moves closer or further away from the fixed plate, changing the capacitance. Another uses piezo-resistive material to measure the stress on an arm caused by acceleration.
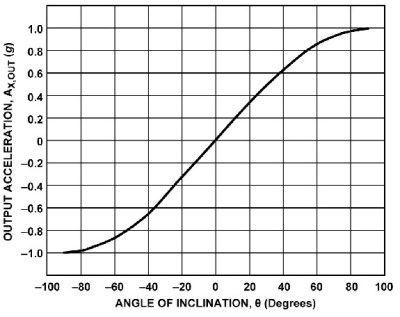
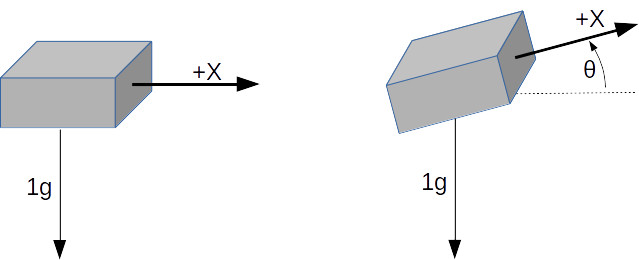 A single axis accelerometer measures acceleration in only one direction. If positioned so the direction is up and down it will measure the force of gravity but will not detect horizontal acceleration. When the device is tilted between horizontal and vertical the force of gravity is only partially affecting the measurement. This provides the ability to measure the angle of the device with the direction of gravity. The acceleration felt along the tilted axis, for a tilt angle can be calculated by:
Knowing the output of the accelerometer we can determine the angle by taking the inverse sine, the arc sine, of the output:
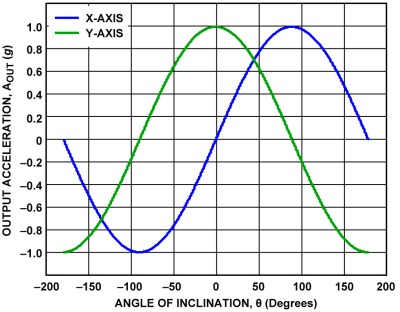
If you rotate a single axis device through 360° the output is a sine wave. Start with the device outputting zero and consider that 0°. As it rotates, the output is 1 when the angle is 90° and back to zero at 180°. Continuing the rotation, the output becomes -1 at 270°, or -90°, degrees and back to zero at 360°, or 0°.
Notice on the chart that between -60° and 60° the output is nearly linear. This is the best orientation for measuring inclination. Increases in inclination are not as accurate on the other portions of the curve. Also notice that the same output is generated for 45° and 135° (90° + 45°) creating an ambiguity. With a single axis you cannot determine which of those angles is measured.
Putting two accelerometers at a right angle to one another creates a 2-axis device which solves the ambiguity problem. As the device is rotated through 360° the outputs are 90° out of phase, the same relationship as the sine and cosine. By combining the measurements there is a unique solution for every angle throughout 360°. The acceleration due to gravity at each angle is given by:
which leads to calculating the angle by:
Actually, one more step is needed to determine the sign of the angle. This requires examining the sign of the values for the X and Y axis. It isn’t necessary to go into this here because a standard programming function handles this automatically.
The orientation of a quadcopter requires a 3-axis accelerometer. The calculations for the three spherical angles combine all three inputs for their results. You’ll need to study this carefully because the standard trigonometric equations can cause anomalies when the quadcopter flips.
First Pass Solution
Accelerometers are easily obtained and relatively cheap. You can find them mounted on breakout boards with voltage regulators and all the supporting circuits from the usual vendors. They are available for 1 to 3 axis, various amounts of g force, and providing either analog or digital outputs. Analog devices need an analog input for each axis being measured. Digital outputs use I2C or SPI buses for communications. I decided to use analog devices because digital units typically only allow two addresses and the arm needs three devices, one for each section.
The robot arm uses an Arduino board so there are at least 6 analog inputs. The original board was a Robot Geek Geekduino, their version of the Arduino Duemilanove, with 8 analog inputs. Unfortunately, when working with the arm I broke the USB connector so switched to a Uno equivalent having only 6 inputs.
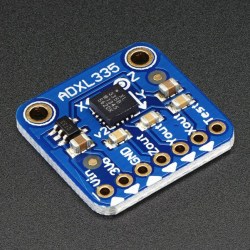 My choice for accelerometer is a 3-axis, ±3 g accelerometer breakout from Adafruit, their ADXL335. It has one analog output for each axis. Since I’m measuring three joints that means three boards which adds up to 9 analog outputs.
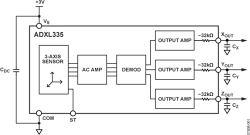
Because of the geometry of the arm, however, I only need 5 inputs for these three joints. The shoulder joint only moves from 0° to 180°. This can be handled by a single axis accelerometer by mounting it to read acceleration of 1 g for 0° and -1g for 180°. That provides a unique output for the necessary angles. The elbow and wrist joints each require two inputs. The third input is not needed because their motion is constrained to moving within the vertical plane of the arm.
Frame of Reference
The next issue is the frame of reference. This is a standard problem in robotics work. Early in a project, a global frame of reference is decided upon. This sets the origin for the coordinate system that the robot will follow and the direction of the three axes, usually specified as X, Y, and Z. For the arm, X is straight forward, Y is to the left, and Z is straight up. The zero point is the base of the shoulder. This also defines a global frame for rotation of the arms limbs with zero degrees also toward the front.
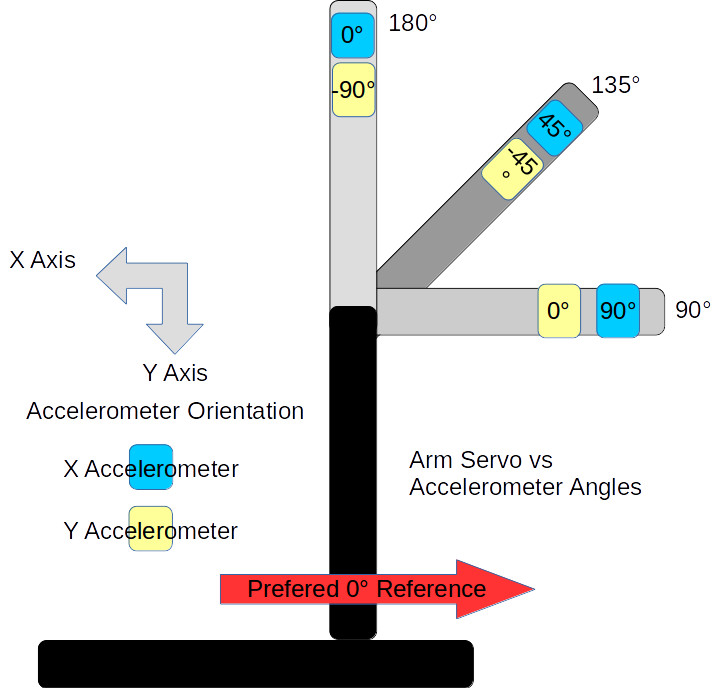
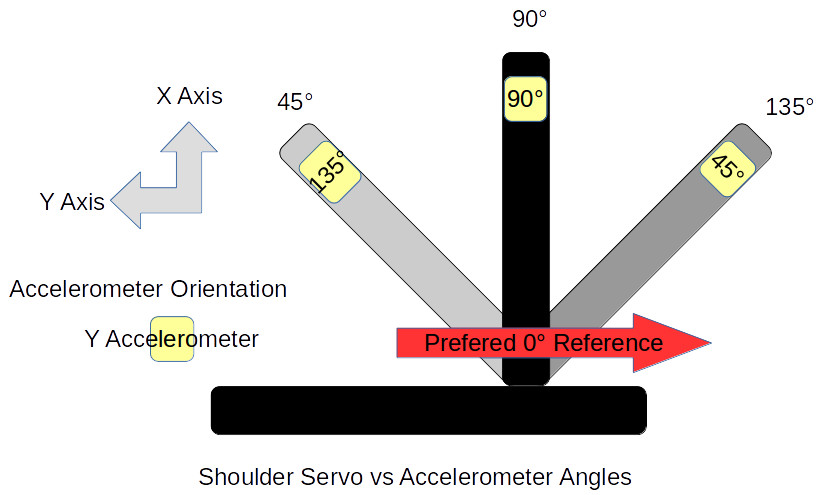
Sensors and controllers each have their own frame of reference. Any differences among these devices and the global frame need to be resolved in software. The shoulder servo’s frame of reference is 0° at the back of the arm and 180° at the front, a clockwise rotation. This is the reverse of the global frame. The elbow servo worked the opposite with a counter-clockwise rotation putting 180° straight up and 90° straight out when the shoulder was vertical. It is 90° off from the global frame of reference.
Sensors also have their own frame of reference. The Y-axis accelerometer measuring the shoulder orientation worked counter-clockwise. Both axis on the accelerometers measuring the elbow worked in the clock-wise direction. This may seem strange but it’s because of the different mounting orientations of the sensors.
Software
The actual code is straightforward once the frame of references are sorted out. A single axis is read from the analog input and its angle calculated with:
const int shouldery = shoulderAnalogY.read();
float shoulder_angle = degrees(asin(shouldery_value / 100.0));
The read() method scales the raw analog input values so ±1g is represented as ±100. The input to asin() is divided by 100.0 to convert to the actual g value. That suffices for the shoulder angle.
The elbow and wrist angles use values from two axis and the calculation is:
const int elbowx = elbowAnalogX.read();
const int elbowy = elbowAnalogY.read();
float elbow_angle = degrees(atan2(-elbowy, elbowx));
The atan2() function is a special version of the arc tangent calculation. It examines the signs of the input value to determine the quadrant of the angle to set the appropriate sign on its result. The negative sign on the elbowy is needed to set the appropriate quadrant. There’s the frame of reference issue, again.
Wrap Up
Adding the accelerometers solved the startup lurching problem well enough. Whether the accelerometers can be used for other purposes remains to be seen.
The accuracy of the angle measurements is not good. In part this is due to using a device that with a +/- 3 g range to measure 1/3 of the devices range, 1 g. The device outputs 0 to 3.3 volts while the Arduino is sampling for 5 volts, again losing accuracy. This might be improved by using an Arduino based on 3.3 volts. I have a couple Dues on hand so might try them. The Uno also provides for adjusting the reference voltage for analog inputs so setting it to 3.3 volts might help.
The analog values need to be calibrated with some care. Each accelerometer outputs slightly different values. Calibration requires measuring the outputs for 1 and -1 g for each axis, recording the values, and using them to scale the voltage input to acceleration. This calibration is not accurate given the other problems with the analog inputs.
Another problem is the mounting of the accelerometers on the arm’s sections. The alignment of the boards with the sections of the arm is not perfect. When the servo is positioned at 90° the accelerometer doesn’t necessarily sit at 90° with respect to the center of the earth. Of course, the servos are not that precise, either. They do not always arrive at the same position, especially when approaching from different directions. Another goal for this project was to use the accelerometer information to more precisely position the servos.
I guess I have to think about this project a bit more, including deciding what I actually want to accomplish with the arm. But then, just saying you have a robotic arm is a terrific hacking cred.




You could always integrate once on the acceleration values to use in reducing the jerk value.
Great article! I highly recommend moving away from analog output sensors. The last few times I’ve done a direct comparison between the analog and digital model of the same component I’ve found the digital one to be fantastically more precise. It wasn’t just the set-up of the ADC either. Even when tuned with precision resistors on top of using the reference circuit on the data sheet to be perfectly in the range of my chip the digital one still out performed. I think they may be doing way more signal processing, calibration, etc on the digital ones; assuming that the user will do some of that for the analog output.
That isn’t to say you can’t get some special case increased sensitivity from a properly set-up analog sensor, but for something like an accelerometer, pressure sensor, etc. I just don’t think it’s worth it anymore to trouble with it.
Totally, I2C / SPI accel+gyros are the only way to go nowadays
“This jump occurs because there is no position feedback to the Arduino controller leaving it unable to know the positions of the arm’s servos and move them slowly to home. ”
The easier solution is to implement a soft-start for the servos by gradually increasing the pulse frequency, or by not sending every pulse. Since the servo control mechanism basically derives a PWM signal out of what you send to it, that has the effect of lowering the duty cycle the servo applies to the motor.
That makes the servos pull up gradually to their home positions. You don’t actually need feedback unless you want to make it so the arm doesn’t home at all on powerup but stays where it is.
Also, if you want to be extra clever, you could deduce the pulse-width that the servo is trying to apply by monitoring the input current to the servo, and from that you can figure out what the angle of the servo is.
The servo goes limp when there’s no input signal or the signal happens to be where the servo already is. Therefore, by sending a pulse and monitoring whether the servo current draw increases, you can figure out how close you are to center. One pulse won’t move the servo much at all.
You’d essentially be playing marco-polo with the servo’s controller.
For a hardware implementation, you need a small value shunt resistor in the servo’s power feed, and a differential amplifier (op-amp) configured as a peak detector to measure/integrate the current through the resistor during the switching event.
To estimate where the servo is, you send two pulses, one long, one short. The difference in the peak current values you get indicates which pulse was closer to where the servo actually is. You can then start to iterate by bringing the two points closer together. Within less than 10 cycles (<200 ms) you should be having a pretty good idea where the servo is, and because you're alternating left to right between the pulses all the servo really does is buzz.
But.. Don’t servos already know where they are? They may not relay that information back by default, but wouldn’t the ideal solution be to either 1: get servos that do, or 2: interface the internal encoder for direct positional feedback?
The accelerometers are nice either way, they can be used for more than just arm positioning detection.
Greetings,
For our capstone project, we tried a similar approach. We opened the servos driving our robotic arm and broke out a connector from the internal potentiometer. We added a unity gain amplifier to our connector and a voltage divider to step down the voltage to a safe level for our microcontroller (we were using an MSP430 at 3.3V) with the servo’s supply being 6V. We ran into a horrible issue with noise though:
https://i.imgur.com/62RKM9G.jpg
[Blue channel is the PWM wave and the yellow channel was the internal potentiometer’s output.]
Even with filtering, analog ground isolation and selectively reading the output of the potentiometer at intervals, we were unable to obtain useful readings out of it. We were going to utilize this data to implement a closed loop controller when driving the arm. Unfortunately, we had to kill this feature since we were unable to solve the noise problem.
That’s why I thought about integrating the pulse in analog with the amplifier itself instead of trying to measure its edges or levels in software. The noise is random so it more or less averages out of the sample. In the end you’ll have a capacitor charged up to some voltage that is proportional to the area of the pulse you get out of the servo.
An differential connection to the output of the pot and the ground terminal at the pot might help a bit as there is I*R drop on the ground wire when the motor is drawing hundreds of mA pulses. I won’t be surprise if you are seeing hundred of millivoltages of noise caused by ground bounce because of the long and thin wires coming out of the servo.
The servo doesn’t exactly “know” where it is. It’s quite a lot like a PID controller without the ID part. It sets off an one-shot oscillator on recieving the signal, and the period of that oscillator is adjusted by the potentiometer. Then the motor driver compares the lenght of the incoming signal to the one-shot pulse and with some simple boolean logic generates a driving pulse as a difference of the two.
That’s why reading the potentiometer itself is tricky. You don’t get a steady voltage to read because it’s part of the oscillator circuit.
And the accelerometers are a bit of an overkill for this problem, and not very useful otherwise because the forces and vibrations caused by the movement of the arm itself puts your direction of gravity off. You basically have to already know how the arm is actually moving before you can tell true down, and trying to loop the accelerometer output back into the control signal without that knowledge results in runaway oscillation and lock-ups.
Dax pretty much has my point but I’m going to yellow highlight it anyway.
“Accelerometers, being affected by gravity when on a planet, provide an absolute reference because they always report the direction of down.”
Is false. It’s only when they are not accelerating relative to the ground (unless they happen to be accelerating exactly perpendicular and not so much as they reverse the magnitude and this answer is far too long for the point I was trying to make bah).
The accelerometer is still reporting down. It’s just combined with the other forces acting on the carrier.
“It’s only when they are not accelerating relative to the ground”
Even when they’re not accelerating, due to coriolis forces. After all, using the ground as an absolute reference is ignoring the fact that the earth spins.
But more importantly, since MEMS accelerometers are based on some sort of oscillating something, they drift over time and temperature as well. Cheaper ones do many degrees per minute.
I think you may be confusing accelerometers with MEMS gyroscopes, the latter use vibrating structures. You are right about the rotation of the earth but I’d be surprised if that’s ever important practically with these sensors. This is a really tough subject to get into because so much is counter intuitive.
“The accelerometer is still reporting down. It’s just combined with the other forces acting on the carrier.”
Which are unknown because you don’t know how the carrier is moving, which you are trying to determine by the accelerometer.
It’s like flying a light airplane by the seat of your pants in a dense cloud. You could be banking, but because the centripetal force from the turn combines with gravity in a way that makes the resulting force vector point “down”, the result is a death spiral.
Very nice article. :)
“The orientation of a quadcopter requires a 3-axis accelerometer. The calculations for the three spherical angles combine all three inputs for their results.”
This is at best misleading and at worst totally wrong except for when the quadcopter is sitting on a table.
Please read and quote the entire paragraph:
The orientation of a quadcopter requires a 3-axis accelerometer. The calculations for the three spherical angles combine all three inputs for their results. You’ll need to study this carefully because the standard trigonometric equations can cause anomalies when the quadcopter flips.
Also, rather than just taking a pot shot why not explain why it is misleading?
Accelerometers say nothing about the orientation of a flying device. That’s entirely the job of the gyros. The reason is highly counter intuitive but I’m in a chair and ‘feel heavy’ but that isn’t because gravity is pushing me down, in truth gravity is *not* pushing me down – it’s because the chair is pushing me up. I’m aware how this sounds, bear with me.
Say you have a man in a spacesuit and a man sunbathing, ignoring air resistance for a moment if the man in a spacesuit lets go of a high altitude balloon and starts to free fall he will fall toward the ground. We have two people, one accelerating and the other not. The problem with growing up on a planet is that we think the sunbather is not accelerating and the spaceman is. In absolute terms, the ‘truth’ as far as physics goes and what an accelerometer will report, it’s the spaceman that is not accelerating and the sunbather who is. This is relativity. Not Einstein, it’s Newton, though the weirdness does resolve quite nicely in GR.
To take another example, if you have a helicopter with rotors producing enough draft to produce 1G acceleration and arrange it correctly then it flies. If the pilot shuts his eyes he feels the chair push with the same force it would on earth. You would think you could use that the stay level. The problem is if we then magically invert the helicopter so the pilot does not notice, it would immediately start to accelerate relative to the earth at 2G. But the pilot would feel exactly the same. The seat still pushing ‘upward’ into his bottom at 1G like it does on earth or in level flight, it’s entirely due to the thrust from the rotors there is no component due to ‘gravity’. If the helicopter is sideways exactly the same thing happens, at any orientation the pilot with his eyes shut experiences normal flight and a normal sense of ‘down’ towards his seat until the helicopter hits something.
Air resistance complicates things, but by the point that is a significant clue to the sum of forces relative to the thrust the craft thinks it’s producing the aircraft isn’t flying, it’s falling.
This ties in with https://en.wikipedia.org/wiki/Pendulum_rocket_fallacy
Now I’ve been a little sloppy equating G with force, but since these forces are proportional to the mass of the object this makes for a simpler explanation. You can also rework the explanation with a ‘planet centric’ point of view, in terms of relative forces where the force due to gravity in a classical mechanics calculation cancels out. That is also more complicated and although you can show the ‘force due to gravity’ is not measured it looks like a fault of the method instead of a fundamental result.
Ok, this is fairly short but it’s taken me 2 hours and I’ve reached the point of decreasing returns improving it, I simply didn’t have enough time last night and this isn’t something I felt I could cover in a few lines.
It’s a bit of a challenge tow write about this stuff, huh?
“Accelerometers say nothing about the orientation of a flying device. That’s entirely the job of the gyros. The reason is highly counterintuitive but I’m in a chair and ‘feel heavy’ but that isn’t because gravity is pushing me down, in truth gravity is *not* pushing me down – it’s because the chair is pushing me up. I’m aware how this sounds, bear with me.”
Ah, but they do. If the quadcopter is hovering it knows whether it is right side up or upside down. Even when it starts to move horizontally it still knows up and down. Just as with my arm, the accelerometer provides an absolute reference under certain circumstances. Speaking overly generally, the use of a gyroscope, in part, is to tell you when you’re in those circumstances.
C’mon guys, while its good to get comments, these are dissertations about everything on a topic. The’re just meant to get a “That’s neat. Maybe I could use that with…” reaction and off you go to do more research.
The absolute reference is only to the accelerometer’s own inertial frame of reference. There is no ‘right side up’ based on an accelerometer reading. One has to supply a velocity and an orientation component between the accelerometer inertial reference frame and the external reference frame to make any other determination.
There is no way for an inverted quadcopter to know it is upside down based on accelerometers alone.
Ah, yes there is. In one state the accelerometer reads +1g and in the flipped state it -1g. I specifically see that result when the shoulder accelerometer moves from 0 to 180 degrees.
I’ve commented for several years under the nick “Marvin” which is now being used by someone else. I appreciate how hard it is to write and I really try to add instead of criticise but provably impossible things I feel the need to point out and I’d hope it to be taken in the same spirit. Two types of perpetual motion, a true brushless DC motor without a magnetic monopole, making a monopole from dipoles and accelerometer orientation of a flying machine just to pick some examples of things that often come up all over the net. A tiny exception is that as an object in free-fall approaches terminal velocity in still air an acceleration component approaching 1G appears in the vector sum, but you can’t use this for stable flight.
Your robot arm can orient because it’s stability connected to the ground. Objects resting on the ground (anything touching that isn’t falling over) gain a force exactly opposite and equal to gravity (or they’d fall through the table or fly off it or slide from side to side) that objects in the air don’t have and must emulate to maintain a stable position. This is the force sensed by the accelerometer, not gravity. Your arm is sensing an absolute external force through the table that exactly balances gravity, and you can use that as a reference to locate it in space, the same sensor on a flying machine only senses the machines own attempt to balance gravity by thrust, and all the up/down clues, hanging threads, dripping sweat, force on necks, and *all physics* we’d naturally expect appear present but no longer relate at all to the position of the ground. So there is nothing that can be used to correct the guess. It needs a gyro that would ‘remember’ the orientation of the ground or a camera looking externally, some way of correcting the guess.
There appear to be 3 people that agree with this, three_d_dave, Dax and myself, I’m certainly not sock puppeting, and I’m 100% sure on the physics. I really think you should at least check this with someone qualified and when you are happy strike out the quadcopter stuff. I mean well both for your excellent contributions and Hackaday as I climb off my soap box.
I suggest you read http://diydrones.com/profiles/blogs/accelerometer-question-for-imu. Ut clearly states multiple times that the accelerometer does measure the 1g vector, i.e. the combination of the XYZ axis measurement. I think what you are not taking into consideration is the proof mass in the accelerometer. It moves independent of the ‘copter to provide the reading.
Just to be clear I only meant to refer to the XYZ angles, not XYZ direction, i.e. not a rotation around the Z axis.
“the proof mass in the accelerometer. It moves independent of the ‘copter to provide the reading. ”
No it doesn’t. The proof mass is connected with a lever to the chip, and gets pushed around by the movement of the copter.
When your accelerometer reads -1G you can’t tell the difference between being upside down, or being pushed downwards by a gust of wind that causes negative acceleration. Likewise, from a +1G reading, you can’t tell whether you’re right side up, or upside down and barreling towards the earth at 2G. The sensor cannot tell the difference between earth’s gravity and the forces caused by the acceleration of the copter by itself.
There’s no magical “1g vector” that stands out of the data because the output is a sum of all the forces that apply on the sensor. If your props stop spinning and the copter starts to freefall, the sensor will read approximately 0G and be unable to tell any direction for the same reason why passengers in the vomit comet start to float around when the plane goes into a nosedive.
The accelerometer measures the motion of the proof mass relative to the copter by observing the deflection of a damped spring between the two. The inertia of the proof mass causes the spring to bend when the copter around it moves.
When the copter is in a freefall, gravity is acting equally on the copter and the proof mass, so they accelerate in unison at the same rate and there’s no deflection in the spring between the two, and therefore the accelerometer reads zero. It does not know where “up” is until the copter spins its props and generates a second force, and it’s the direction of that force that the accelerometer actually feels.
So for example, suppose the copter is freefalling tilted on its side and suddenly turns on its props. Earths’ gravity is still zeroed out in the accelerometer reading because the copter is still freefalling in the direction of gravity, and the thrust from the prop is accelerating the copter perpendicular to it, so the accelerometer reads that as “up”.
So the copter can be accelerating at 1G in the vertical and 1G in the horizontal direction, taking a very fast and steep nosedive at the ground while the computer thinks it’s straight and level. This is what happens in a death spiral when an airplane flips on its side and the pilot pulls the stick, causing centrifugal forces to pull the pilot “down” against his seat which feels like they’re going straight and level, when in reality they’re in a freefall drop towards the ground.
You can’t even feel that you’re spinning because the fluids in your inner ear catch up with the spin and stop moving relative to your head, although a clever pilot could check that out by turning their head around rapidly, because if you are spinning then the coriolis forces cause a very nauseating anomaly in the flow of the fluids in your ear.
Rud, that drone blog post is asking a question and the first reply points out that accelerometers do not measure gravity and that the 1G measured sitting on a table is the force from the table, not gravity.
If you accept that a sensor on a table will measure 1G, and a sensor in free-fall will measure 0G in all directions then consider a quadcopter turning it’s motors off. It is in free-fall and the sensor would measure 0G in every direction. Turning it’s motors back on (in whatever direction they are pointing) adds a reaction force from the thrust they produce but nothing else. This action can’t turn gravity off and on, so with motors off or on, hovering or not, accelerating relative to it’s free-fall position in any direction, there is no component from gravity measured by the accelerometer.
I hope this helps.
I just re-read the thread. You’ll find other comments where that writer (Tom) seems to contradict that statement. I think they, and we, are getting hung up on the “measuring gravity”. I think there are a few things we can agree upon. Let’s use NAR for neglect air resistance, A for accelerometer, Q for quadcopter. In general, saying A means that the XYZ readings combined provide the reading.
My assertion is that when Q is not moving A will read 1. Similarly, when Q is in horizontal steady state motion A is 1.
Any issues so far?
Issue?
I’m happy with every step.
Good. Now I would say the A is reporting gravity throughout those steps. I think you disagree but I don’t understand why.
In situations the force(s) on the copter exactly balance gravity you have a true gravity reading. The problem is when they don’t.
Take a perfectly balanced quadcopter, of say 1kg (I need kilograms, newtons and degrees to be comfortable). You can calibrate the accelerometer in G or in Newtons for the whole craft. The forces measured by the accelerometer are the reaction from thrust which exactly balance gravity and nothing else. It reads 1G or 10N acting along Z through it’s centre of mass.
Say a gust of wind tips it 1 degree in the XZ plane. We can resolve forces, vertically 10*cos 1 = 9.998blah, about 1.5mN lower or 0.15mG acceleration down. It also gets some horizontal acceleration 10*sin 1 = 0.17 N or 17mG acceleration in X. Gentle if corrected.
Calculating the forces measured by the accelerometer, the thrust has tipped by 1 degree, but so has the sensor and in the same direction. The thrust is exactly 10N still through Z and no other measurable forces act on the craft, so it’s 10N/1G along Z. It’s tipped by 1 degree and descending but the sensor still reports exactly the same value and in exactly the same direction. So it can’t correct, it doesn’t know anything is wrong.
While the wind is accelerating the Q you’re analysis is correct. But once the Q is moving fully with the wind and entered steady state the A now provides via X and Z the tilt measurement. This would be like sliding the table across the floor with the Q on an inclined plane.
No to all of that. I didn’t add any wind acceleration or I’d need a force to account for it.
The situation is similar to the copter sliding off a frictionless table tilted by 1 degree but the force from the table is not 10N, so this is not exactly the same. It also doesn’t help our discussion because the bone of contention becomes the same.
Between sensor reads the quadcopter is left statically tilted by 1 degree. If the system is going to stabilise it needs to register that. From the ground POV there are 2 forces acting on the copter, mg down = 10N and the thrust reaction force that almost balances it, up, but tilted by 1 degree exactly through Z, 10N. The copter is blind to the force due to gravity (it’s a law of physics) so it’s accelerometer only has 1 force to observe the vector sum of, and it acts through Z, it reads Z=10N (or 1G), X=0, Y=0 exactly as before. If you expect a detectable acceleration in X, then you need a force I’ve missed with a component in the X direction. It would also have to be a very small force so the total magnitude is still 10N/1G.
I know this force does not exist. What you are really expecting, despite everything I’ve said, is mg resolved in the tilted sensor. Unfortunately this isn’t even self consistent, as an object in free fall still has this force and yet we know the sensor reads 0. I’m sure you also agree when the fans, sideways, up, whatever direction, apply thrust the sensor would detect it, yet the sensor cannot be measuring the sum of these forces, because they sum to zero in a hovering or static copter. So the copter hovering or on a table should not read 1G, and it does.
The maths on a table work when nothing is accelerating, but because it is a reaction force measurement it doesn’t work for systems that don’t self balance.
Just cannot accept that statement. Got a reference?
>> “The copter is blind to the force due to gravity (it’s a law of physics)…”
>”Just cannot accept that statement. Got a reference?”
It’s a very simple thing to explain. The Accelerometer does -not- measure the force of gravity. It measures the deflection of a spring between two masses.
Gravity acts on the two masses very much equally at all times regardless of what they are doing, so in the absence of external forces both masses move the same – just like Galileo’s cannonballs or the hammer and the feather dropped on the moon.
That means the accelerometer actualy measures any external force applied on one mass but not on the other – it does not measure gravity. That is the reason for all the anomalies.
Let’s go for a ride in a full blown helicopter. From the ceiling we dangle a spring scale with a 10 lb weight from it. You’re telling me that when the helicopter is hovering or moving at a steady velocity the scale is not going to read somewhere around 10 lbs? Last time I road in a helicopter I didn’t float around inside it. My butt felt the pull of gravity against the seat.
No.
I’m saying that we can put the helicopter in various situations where it is not hovering upright, and still the spring scale will appear to be pointing at the floor and read 10 lbs.
>”Last time I road in a helicopter I didn’t float around inside it. My butt felt the pull of gravity against the seat.”
It didn’t. It felt the force generated by the props, transmitted to you via the copter’s body. Had there not been this force generated by the props, you would have been in freefall and indeed started floating around in the cabin.
You cannot feel the force of gravity without the external force acting against it because gravity is force that acts uniformly on all your atoms and the atoms of the copter and they move in unison. That’s why you are not sensing gravity pushing you against your seat, but the seat pushing you up against gravity.
If we drop the helicopter sideways and spin it, the centrifugal action of the spin pushes your tush against the seat, while gravity makes no difference because no force is acting against it. In that case you would feel yourself upright and hovering, when in reality you’re sideways and falling.
Point in case:
http://i.stack.imgur.com/1f2HZ.jpg
Basically, and airplane that is doing a steady continuous loop through the air fast enough will always feel “gravity” pointing “down” or towards the floor of the airplane.
It is perfectly possible to fly upside down for a bit and feel 1G of “gravity” pointing skywards. Even with a helicopter.
That’s the reason why quadcopters and airplane pilots can’t rely on accelerometer reading alone to tell up from down.
You are right Dax, but we have that reason in the thread already.
Rud,
Your butt betrays you. The force on it from the seat depends on the thrust from the rotors, not g. Draw the forces to see. When the helicopter is not accelerating (Newtonian sense) this is equal in magnitude to mg, but at all other times it is not equal, so it is not the same force. The same is true for the 10lb mass.
There is a version of this law at pretty much every level of physics. The longer my explanations the more my point seems lost, so I’ll try the simplest, which is part of General Relativity. Accelerometers report the sum of the forces acting on them. However big, however small, this includes for example; reaction from thrust, air resistance, resistance from surfaces to impingement, electrostatic effects, momentum changes of solar radiation, black body emission, radio waves bouncing off and interaction of magnetism and eddy currents because these are all forces. Gravity is not included because it isn’t.
Now before you object to one of the simplest explanations in the universe I’ve pointed out that including a force due to gravity in the maths produces the wrong answers for the output of the accelerometer. Ignoring mg and summing everything else produces the right answers. I would like you to explain how to get the right answers with your method for a copter in free-fall and hovering. Until the numbers add up with an alternative method objecting to theory behind one that works is moot.
Besides – a curious but true fact is that everywhere on earth except exactly on the equator and precisely at the poles, no pendulum can point down.
That’s because the centrifugal force from the earth’s spin and the earth’s gravitational pull act in different directions. The centrifugal force aligns with gravity at the equator, and cancels itself out at the poles.
Which is exactly an example that “gravity” or what is felt and measured by masses such as accelerometers, does not actually point down towards the “source” of gravity. It’s not a compass needle for mass. Where it points depends on all the other forces except gravity. The fact that you’re walking on the ground and feel heavy is thanks to electromagnetic forces that keep matter from collapsing into a singularity – it’s not gravity pushing you down, it’s the ground pushing you up.
Geekmom had a great series of posts on the math theory and implementation of accelerometers:
http://www.geekmomprojects.com/mpu-6050-redux-dmp-data-fusion-vs-complementary-filter/
Geekmom from what I have seen has the same wrong assumption. Since she is doing it the smart way, gyro for orientation and only correcting drift with a long term average it probably works fine on a scooter. It may have some quirks, but the direction of acceleration is largely separate from the direction needed to balance. The same code on an aircraft would behave in a complicated way but neglecting air resistance it would be less stable than a gyro only solution.
AMA – “It’s tipped by 1 degree and descending but the sensor still reports exactly the same value and in exactly the same direction.”
If it’s descending, why would would it still be reading 1g?
The axis of the sensor and the only force it can measure are both tipped the same way. Gravity is not detected – weird but annoyingly true.
If you can grasp this – https://en.wikipedia.org/wiki/Pendulum_rocket_fallacy
Then you’ll get 2 of the 3 major points, and maybe the other stuff Dax and I wrote will make more sense. If you’ve not taken mechanics at school then the concept tables ‘push upwards’ may weird you out by itself and all I can suggest is do take mechanics – it’s awesome.