A lot of us make circuit boards at home. I find it a useful skill to have in my bag of tricks for intermediate steps along the way to a finished project, even if the finished version is going to be sent out to a PCB fab. When I need a breakout board that meshes with other development tools, for instance, there’s nothing like being able to whip something up that plugs right in. Doing it quickly, and getting on with the rest of the project instead of placing an order and waiting for delivery, helps keep me in the flow.
Toner transfer is by far the fastest way to make a circuit board at home — simply print the circuit out on a laser printer, iron it onto the copper, and etch. When it works, it’s awesome. When it doesn’t, it can be a hair-pulling exercise in figuring out which of myriad factors are misaligned.
For a long time now, I’ve been using a method that’s very reliable and repeatable. Recently, I’ve been tweaking a bit on the performance of the system, and I thought I’d share what I’ve got. At the moment, I’m able to very reliably produce boards with 6 mil (0.15 mm) traces and 8 mil (0.20 mm) spacing. With a little care in post-production, 4 mil / 6 mil is entirely plausible.
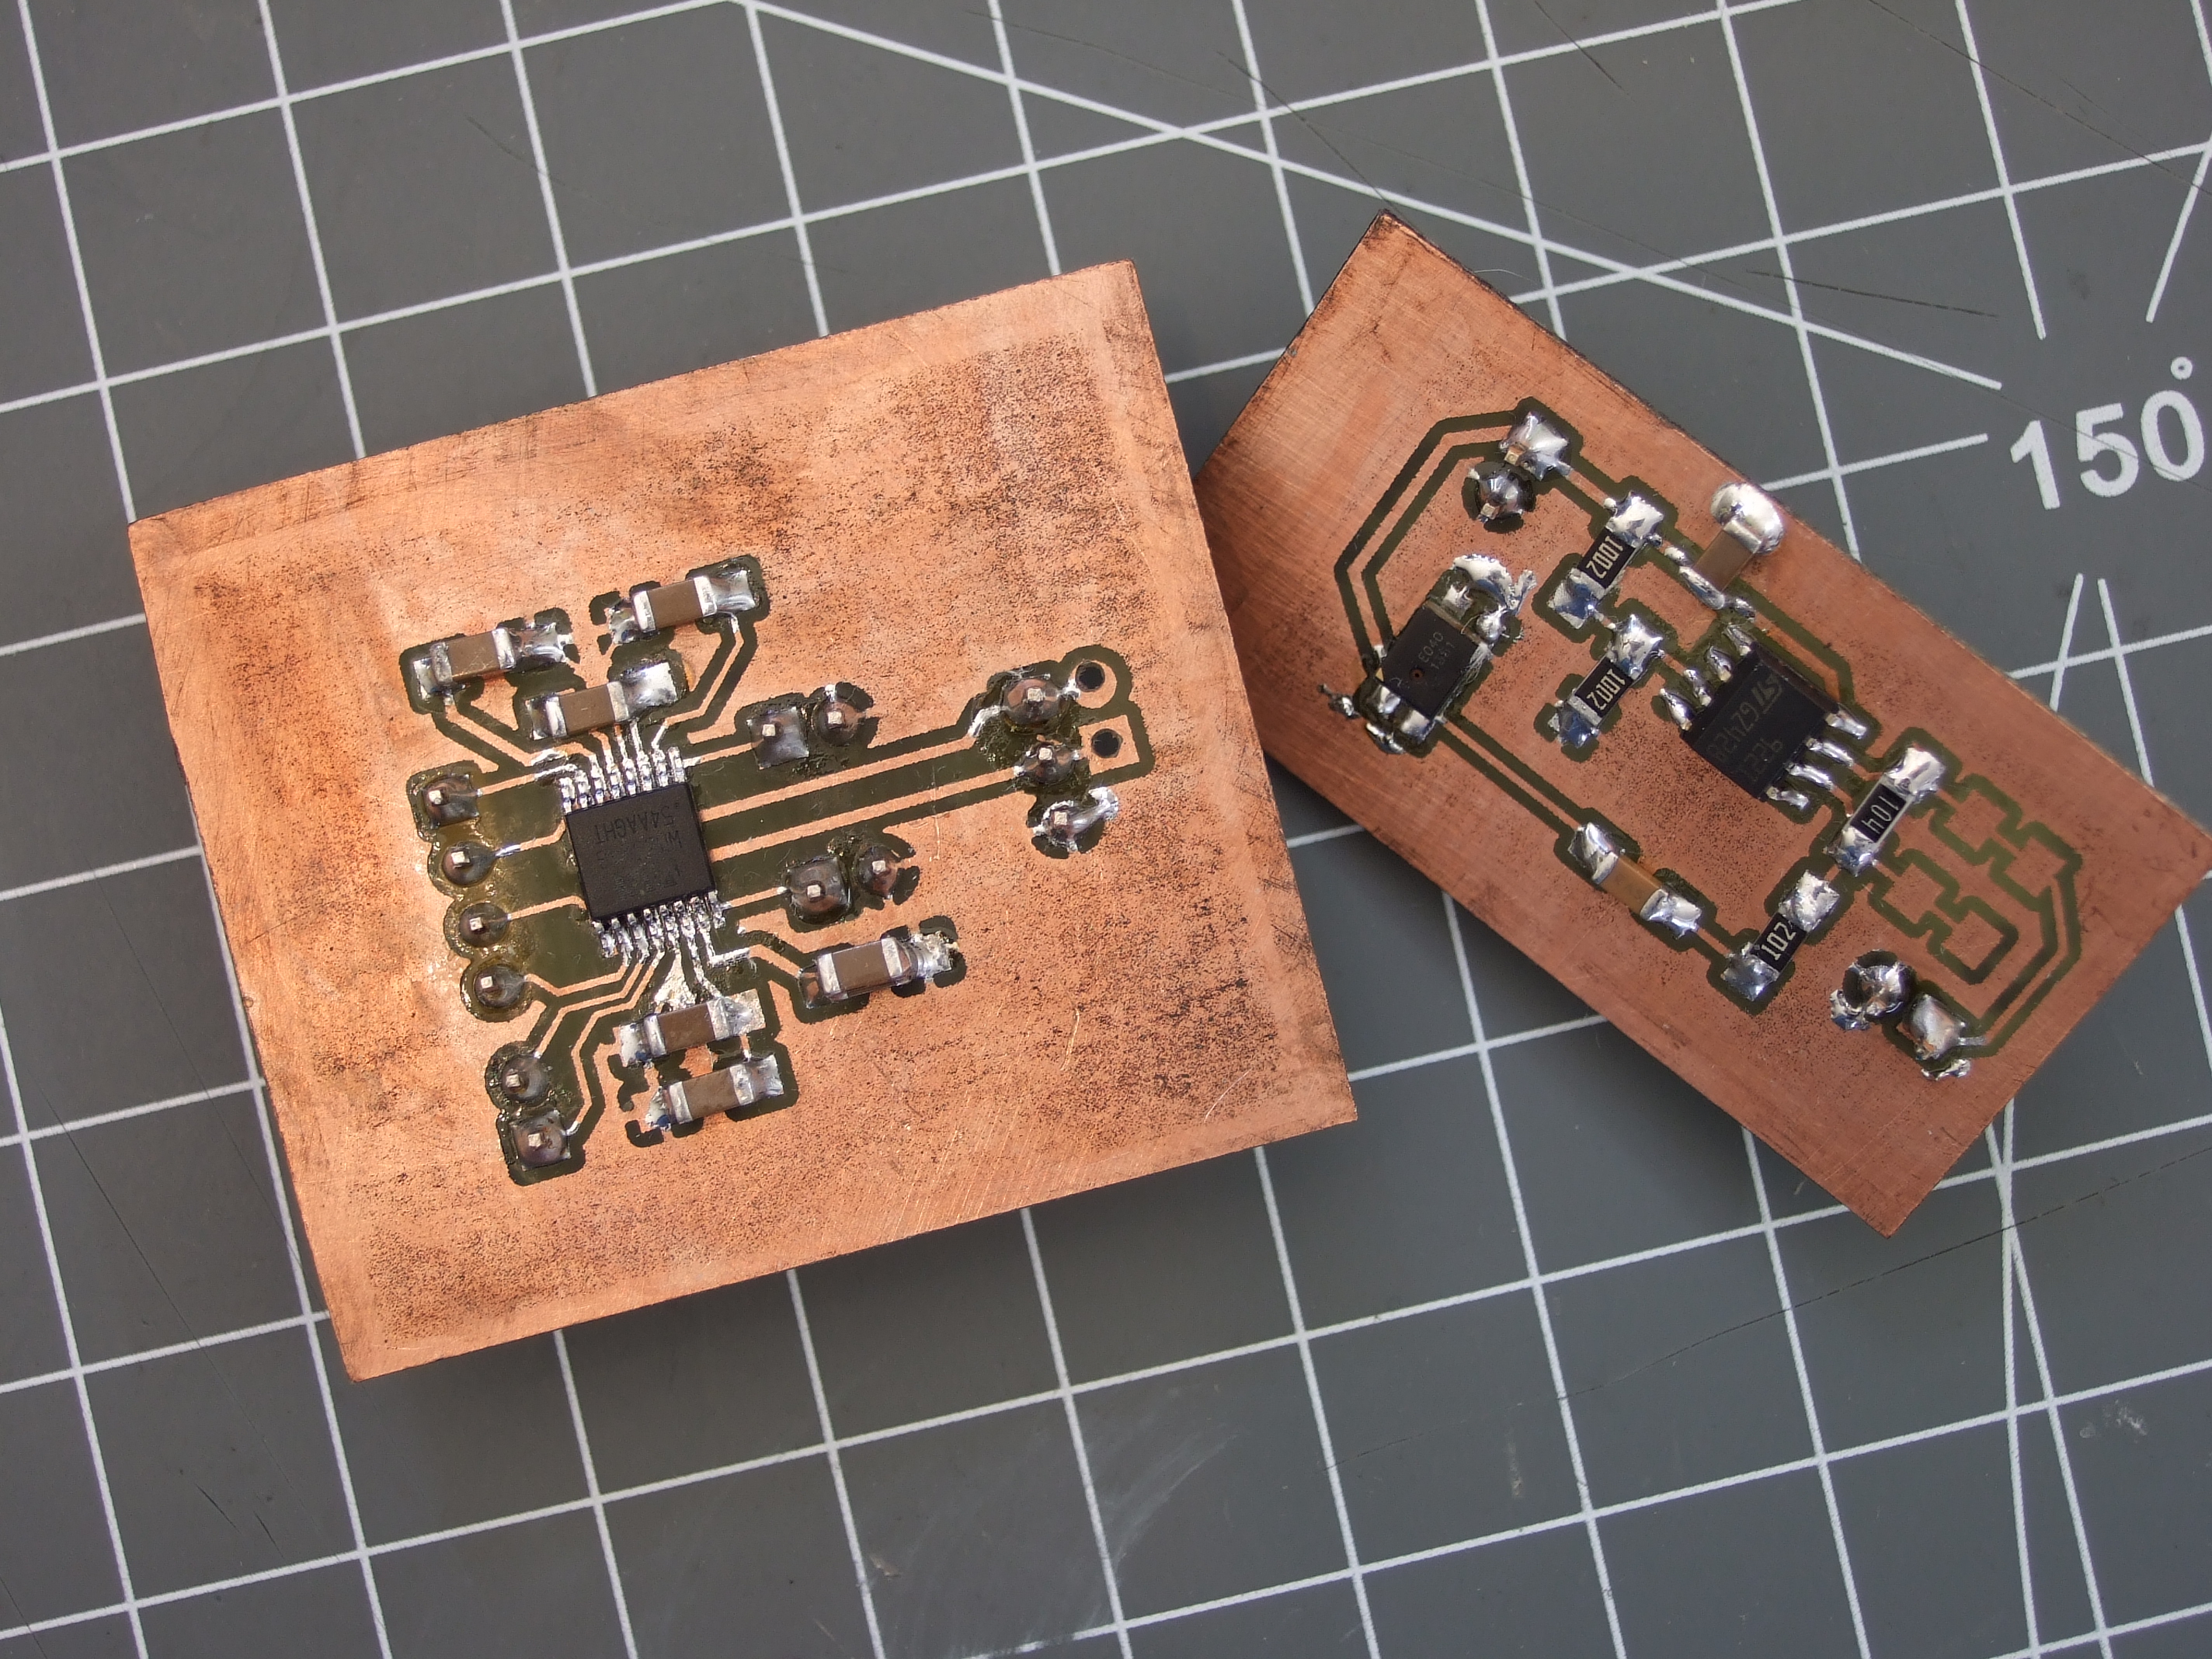
That’s good enough for most of my prototyping needs, covering TSSOP parts down to 0.65 mm pin pitch and allowing me to feed two traces through an 0805 surface-mount resistor or capacitor. It’s on par with the cheapest of professional manufacturing houses, but I can turn around a board in about fifteen minutes. Beats the heck out of ordering and waiting, in my book. When I need luxuries like silkscreen and through-hole plating there are workarounds, but mostly I’ll skimp on those until the final version is made.
The secret? Science! Or at least taking what can be an overwhelming number of variables and secret techniques, reducing them to experiments that change one variable at a time, and then optimizing along that one dimension. There are a dizzying array of techniques out there, and a good number of them only work when you have exactly the right brand of toner, the right paper, or the right touch in wielding a hot clothes iron. In short, they’re not reproducible. When your setup doesn’t exactly match someone else’s, all bets are off. Here, I’ll lay out a reproducible method and show you how to calibrate it.
Things That Don’t Matter
A lot of Internet toner-transfer guides focus on details that don’t really matter, like the type of paper used for the transfer medium or the method of cleaning the copper before ironing. That’s not to say that you don’t need to clean the copper first — you absolutely do — but just that it doesn’t matter really how you do it. I’ve used fine-grit sandpaper, green pot scrubbies, and these days I use some sponges that I got in the hardware store for shining up pipe joints before brazing. I follow with a wipe-down of acetone. The point is that you remove the oxidation and grease from the surface. I don’t care how.

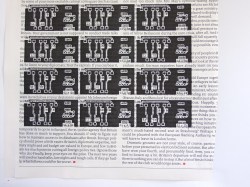
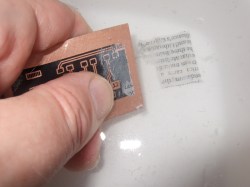
Similarly, the choice of transfer paper is pretty open. I alternate between glossy magazine pages (the Economist is my favorite at the moment) and the plastic-coated backing papers that peel-off stickers come on. These two surfaces work entirely differently; the sticker backing paper peels off directly, while the magazine paper dissolves off in cold water when rubbed with a thumb. There is fancier stuff out there. The point of the transfer paper is that it’s glossy so that it doesn’t deform the image, and that releases easily leaving the toner on the copper. The rest is convenience.
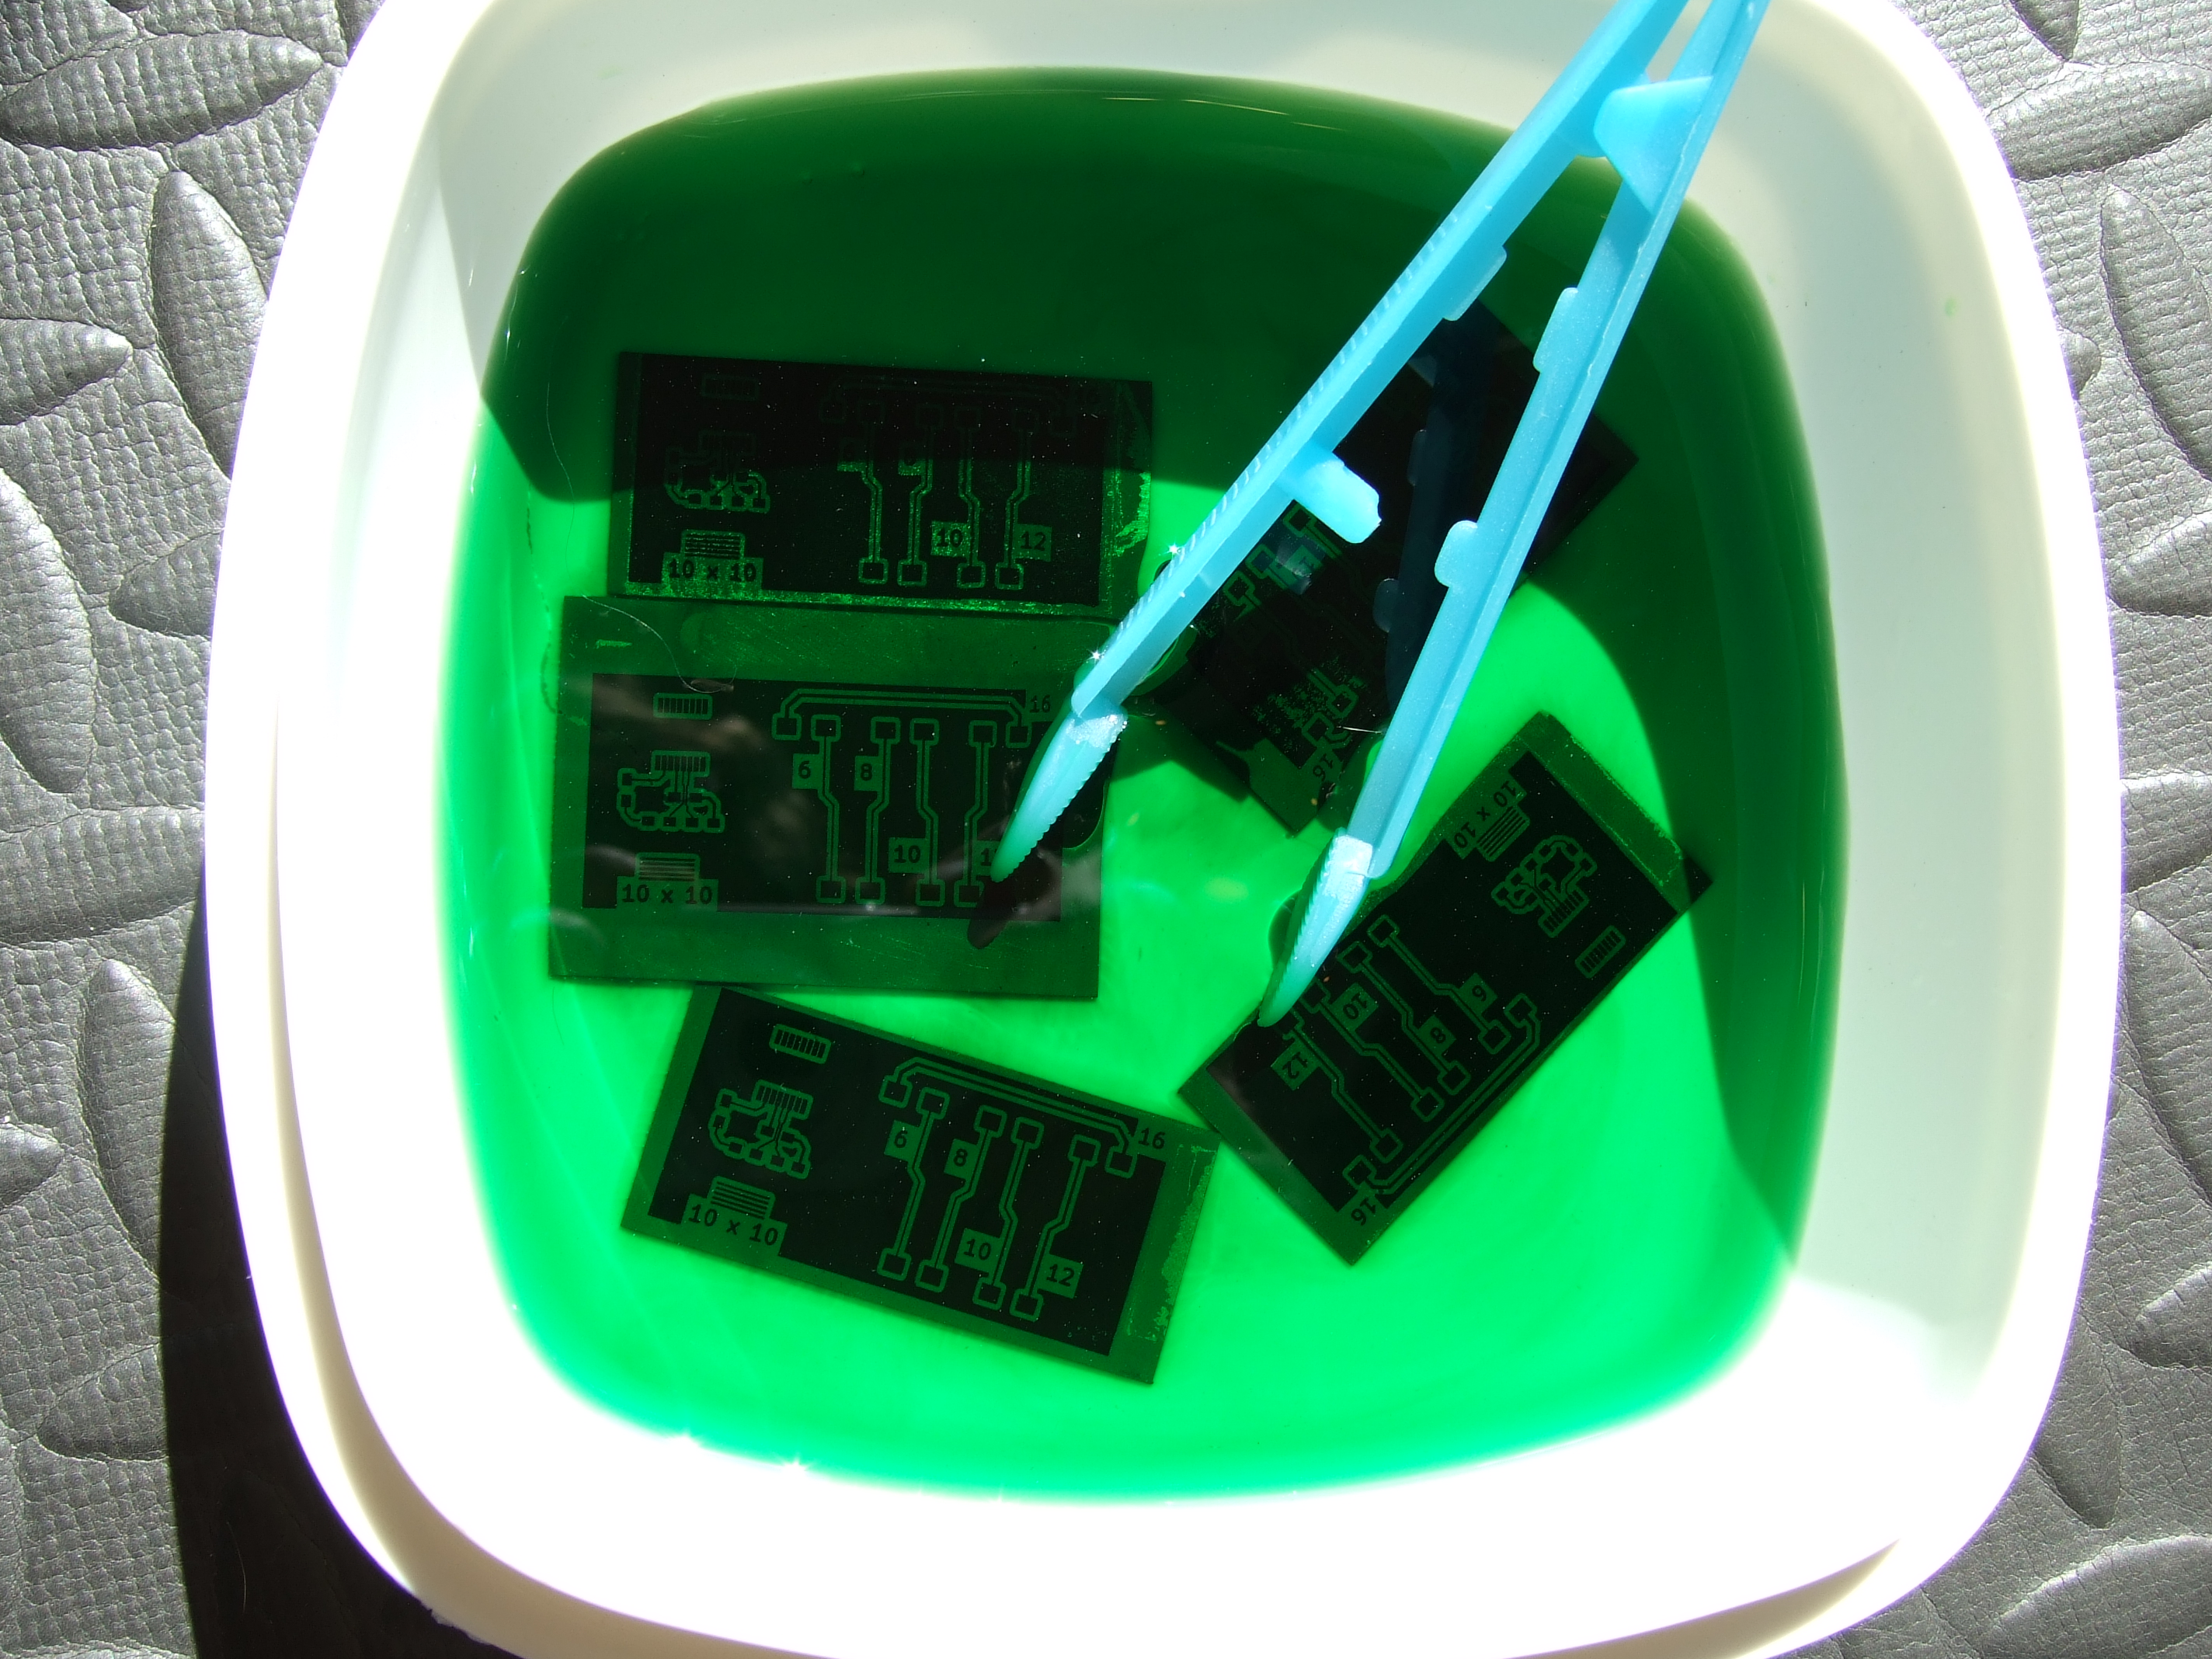 Finally, the choice of etchant doesn’t matter. I use oxygen-refreshed copper chloride in acid because it’s essentially infinitely recyclable and I hate the hassle of disposing of toxic chemicals. People use ferric chloride or ammonium persulfate. Other folks use vinegar and salt, or dragon spit and accountants’ tears. Some people agitate liquids in a tank, others spray, and still others sponge. Whatever works.
These things are all absolutely vital to getting a good toner-transfer PCB made, of course, but none of them are uniquely irreplaceable.
Physics
On the other hand, there are three fundamental factors that matter for the adhesion of the toner to copper, and it’s down to physics: time, temperature, and pressure. It’s a huge step towards reliability and repeatability to reduce these three down to one, and that’s our first step.
Fixing Pressure and Time First
As far as pressure goes, more is almost always better. In fact, there are some laser copiers that work without heated rollers at all. They squish the plastic toner particles so hard that they adhere to the paper at room temperature or thereabouts. We’re not going to be able to apply that much pressure, but we’re going to fix the pressure variable at “as much as possible”.
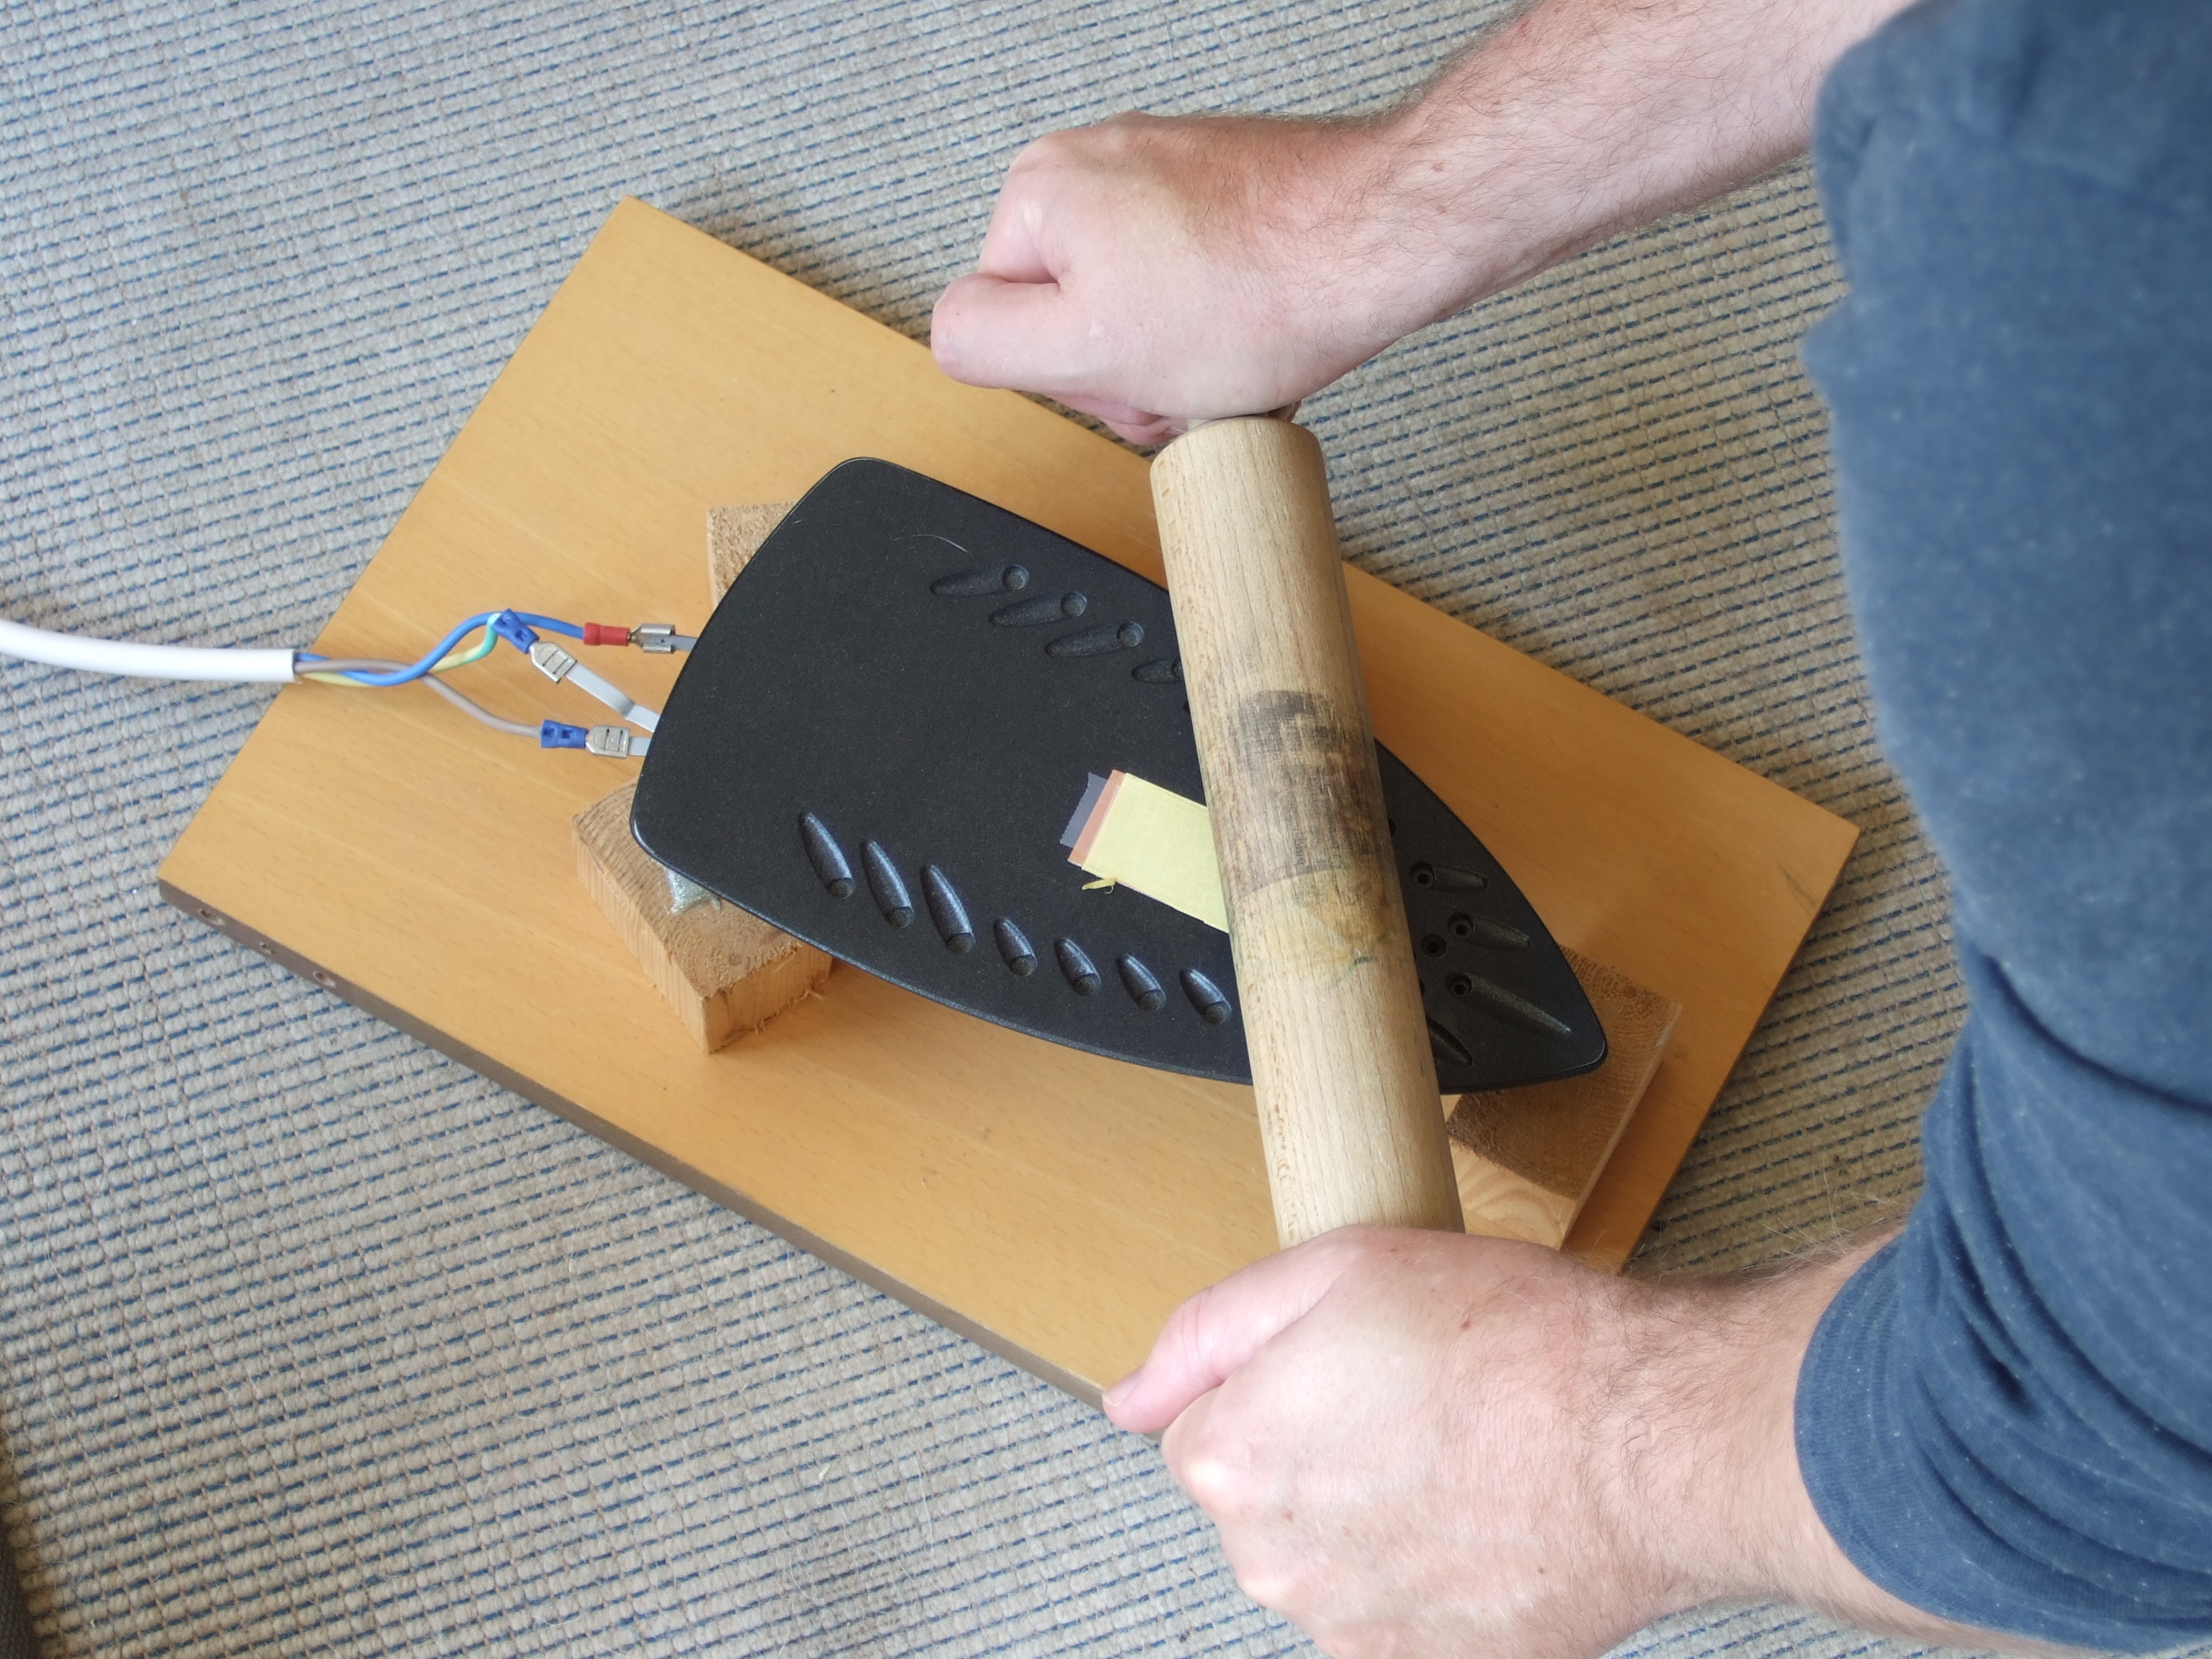
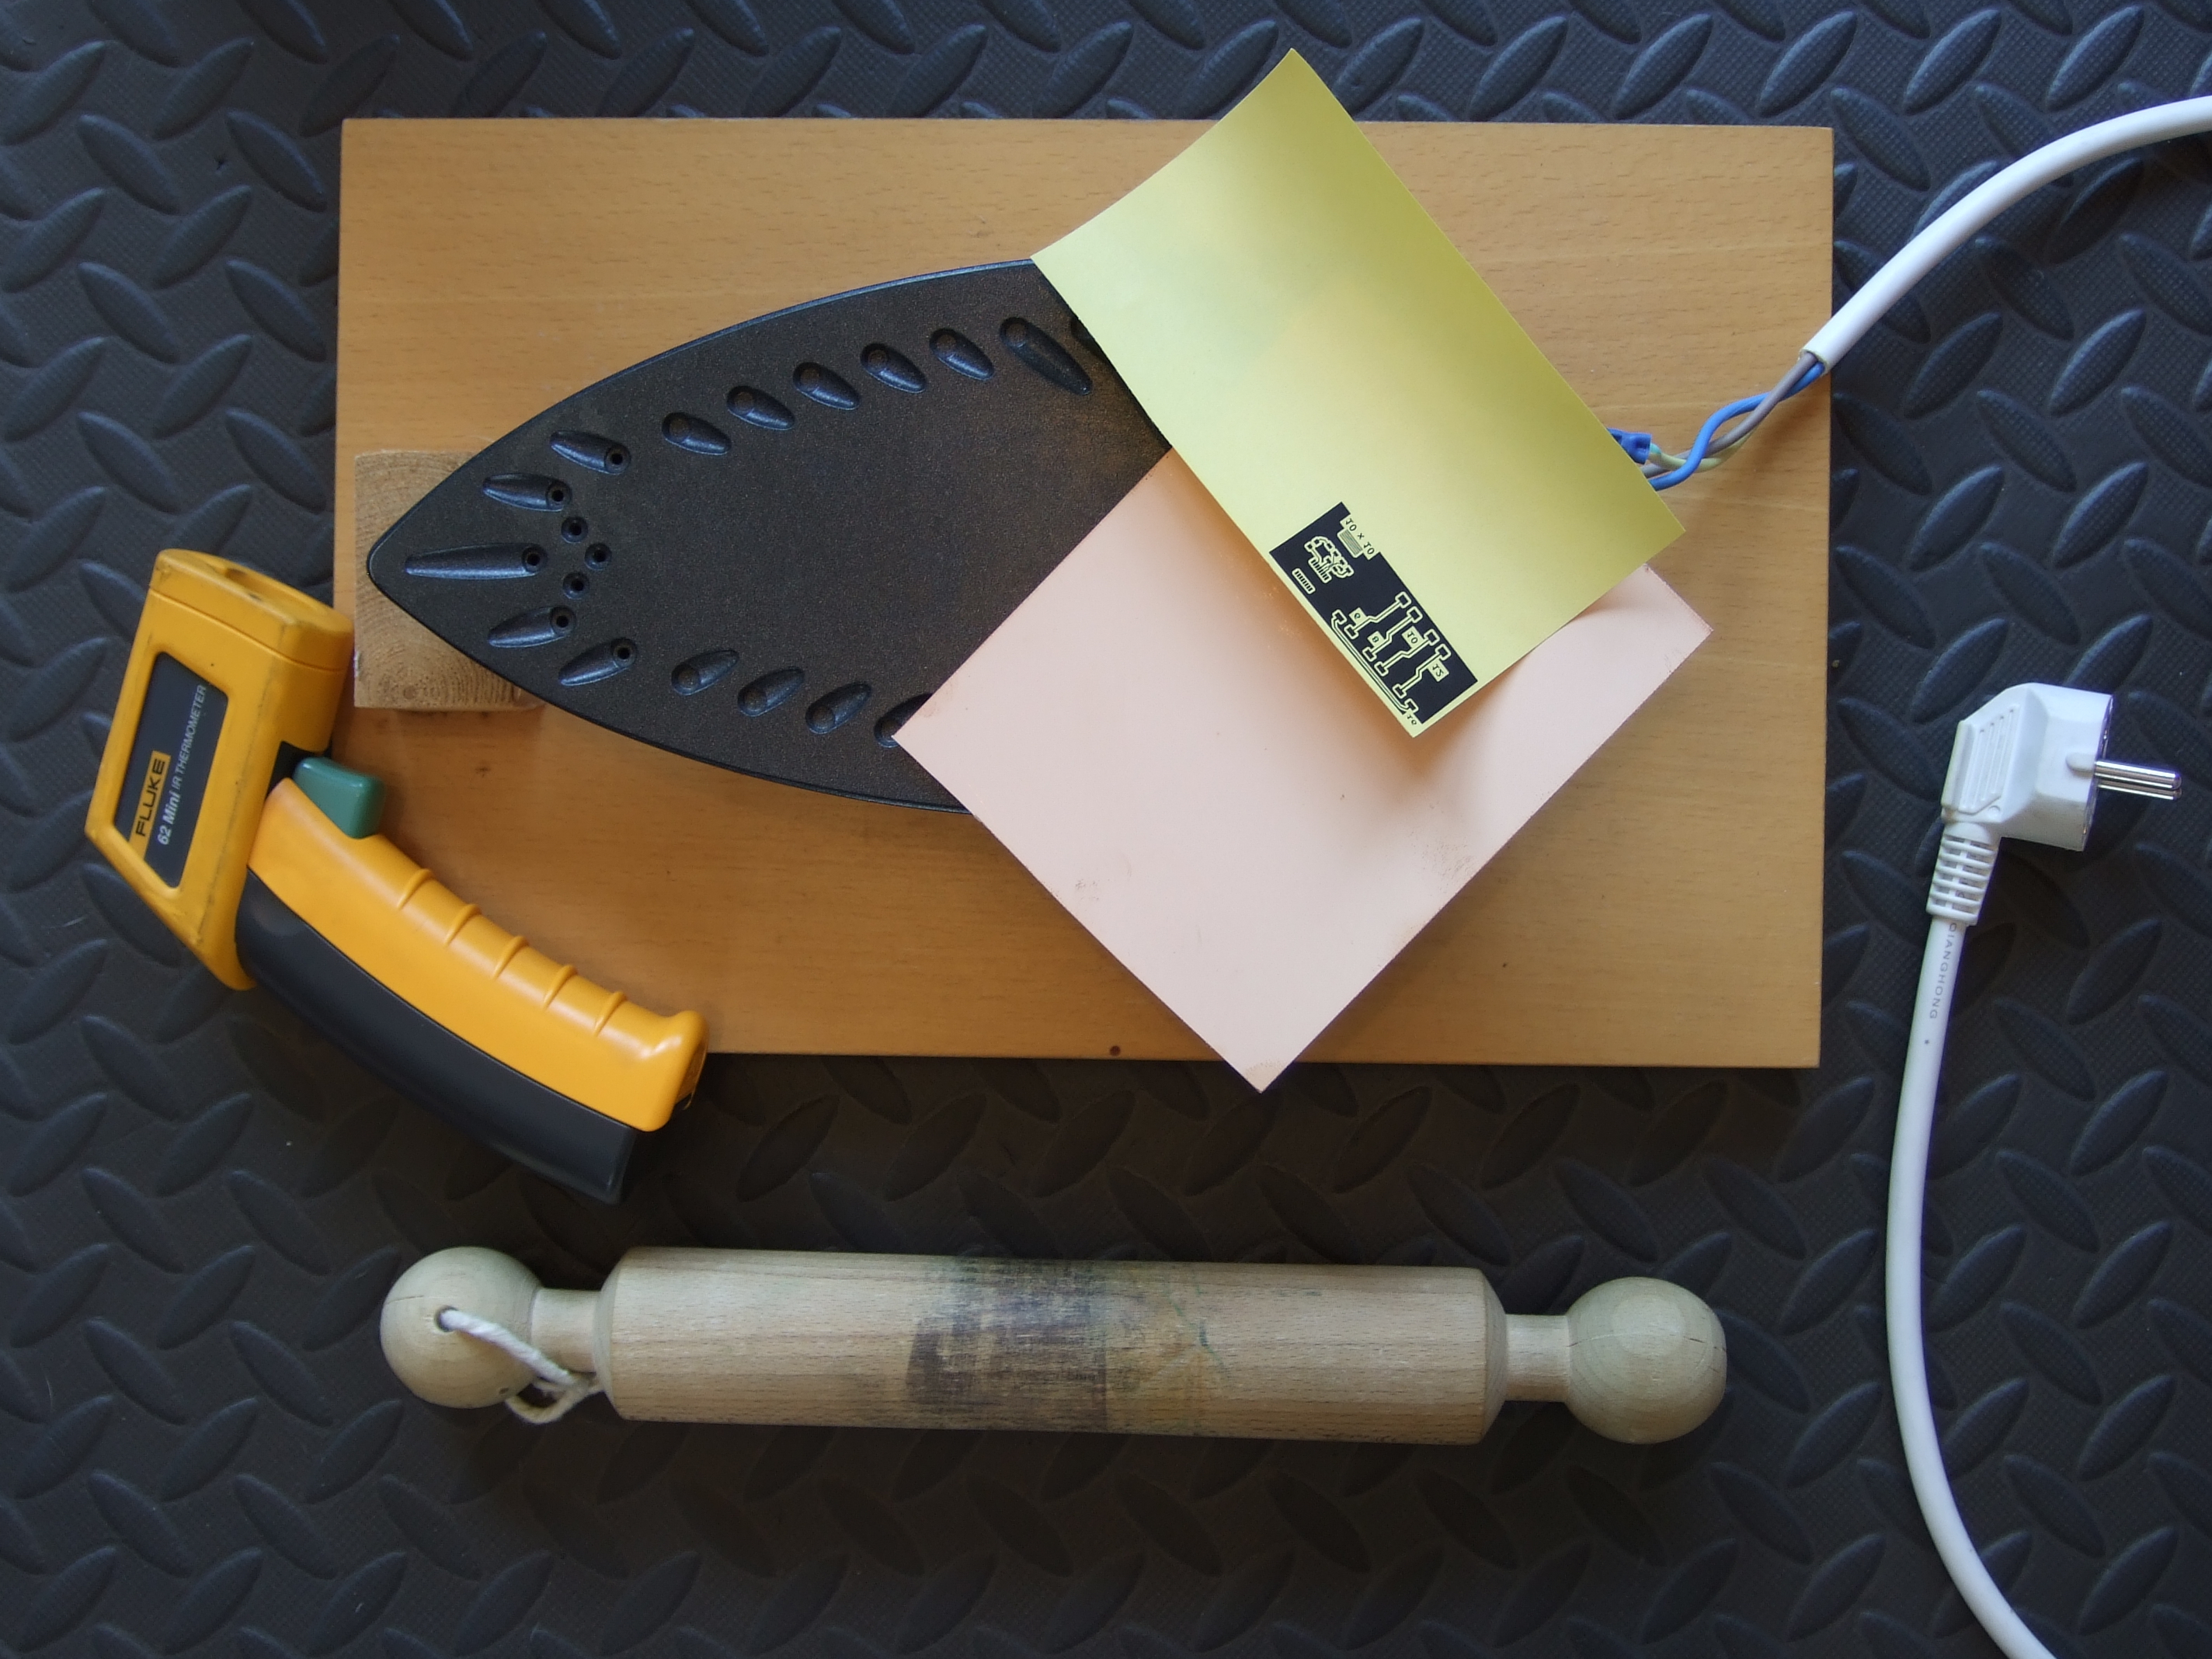
I put the PCB on my inverted iron and press down with all of my weight on a rolling pin. The resulting pressure is fairly high because the rolling pin has a small contact patch with the board, and it’s fairly constant because I only weigh so much.
I took my inspiration from this method which does essentially the same thing upside-down. My experience is that the board never rolls evenly across the dowel using this procedure, but I can understand if you don’t want the exposed electrical horror that is my setup in your house. Any strong hot surface should work, and an improved setup would have better temperature control. If you have a modified laminator that puts out enough pressure, that’s probably even better. I have a scrap clothes iron.
Unlike pressure where more is better, the effect of longer dwell times drops off rapidly. In laser printers, where the number of pages per minute is a critical selling point, they try to get this dwell time down to the minimum. If you roll too quickly over the board, adhesion can be uneven, so the solution is to simply go slowly and roll back and forth. You can remove time from the equation by simply rolling so slowly that any decrease in rolling speed doesn’t substantively change anything. A minute or two should do.
All of this is relative, of course. You don’t use the same toner as I do, weigh the same as I do, or even have the same idea of “slow” that I do. But as long as you keep your own practice consistent, these variables won’t affect the outcome very much, and we’re free to tackle the variable that will: temperature is the secret sauce. Here comes science!
Temperature: Plastic, But Not Molten
When toner is heated up, it goes through a few distinct phases. At first it’s a hard plastic, then it gets sticky and slightly malleable as it passes through the glass transition, and then as the temperature increases even further it melts and becomes a liquid.
I have no idea how the Internet rumor that you should turn up your iron “as hot as possible” came about. But I do know what the result of doing so is — smeary transfers that are extremely sensitive to the amount of pressure applied. That’s the exact opposite of what we’re looking for here. Instead, the goal is to keep the toner in the glass transition, with the temperature as low as possible so that it will fuse with the copper at our roughly constant maximum pressure.
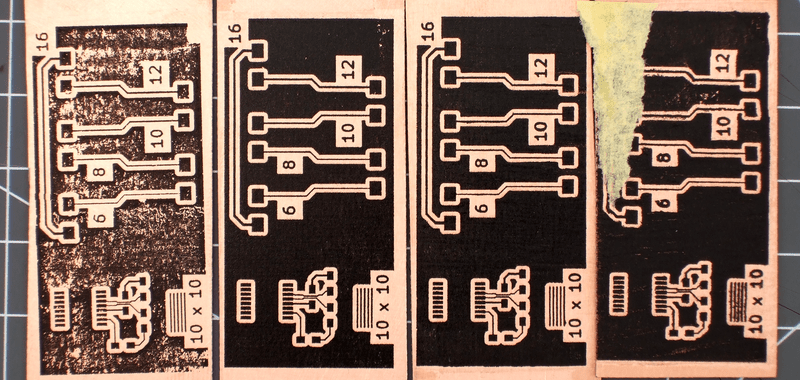
The first step of calibrating the procedure, then, is to run a series of transfers at increasing temperature. Your temperatures won’t be the same as mine, but that’s fine because you’re not using my toner or making PCBs over at my house. The trick is being consistent.


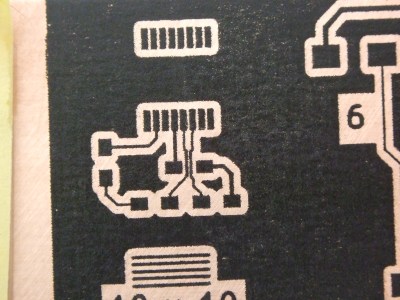
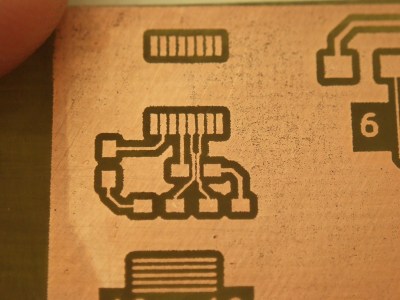
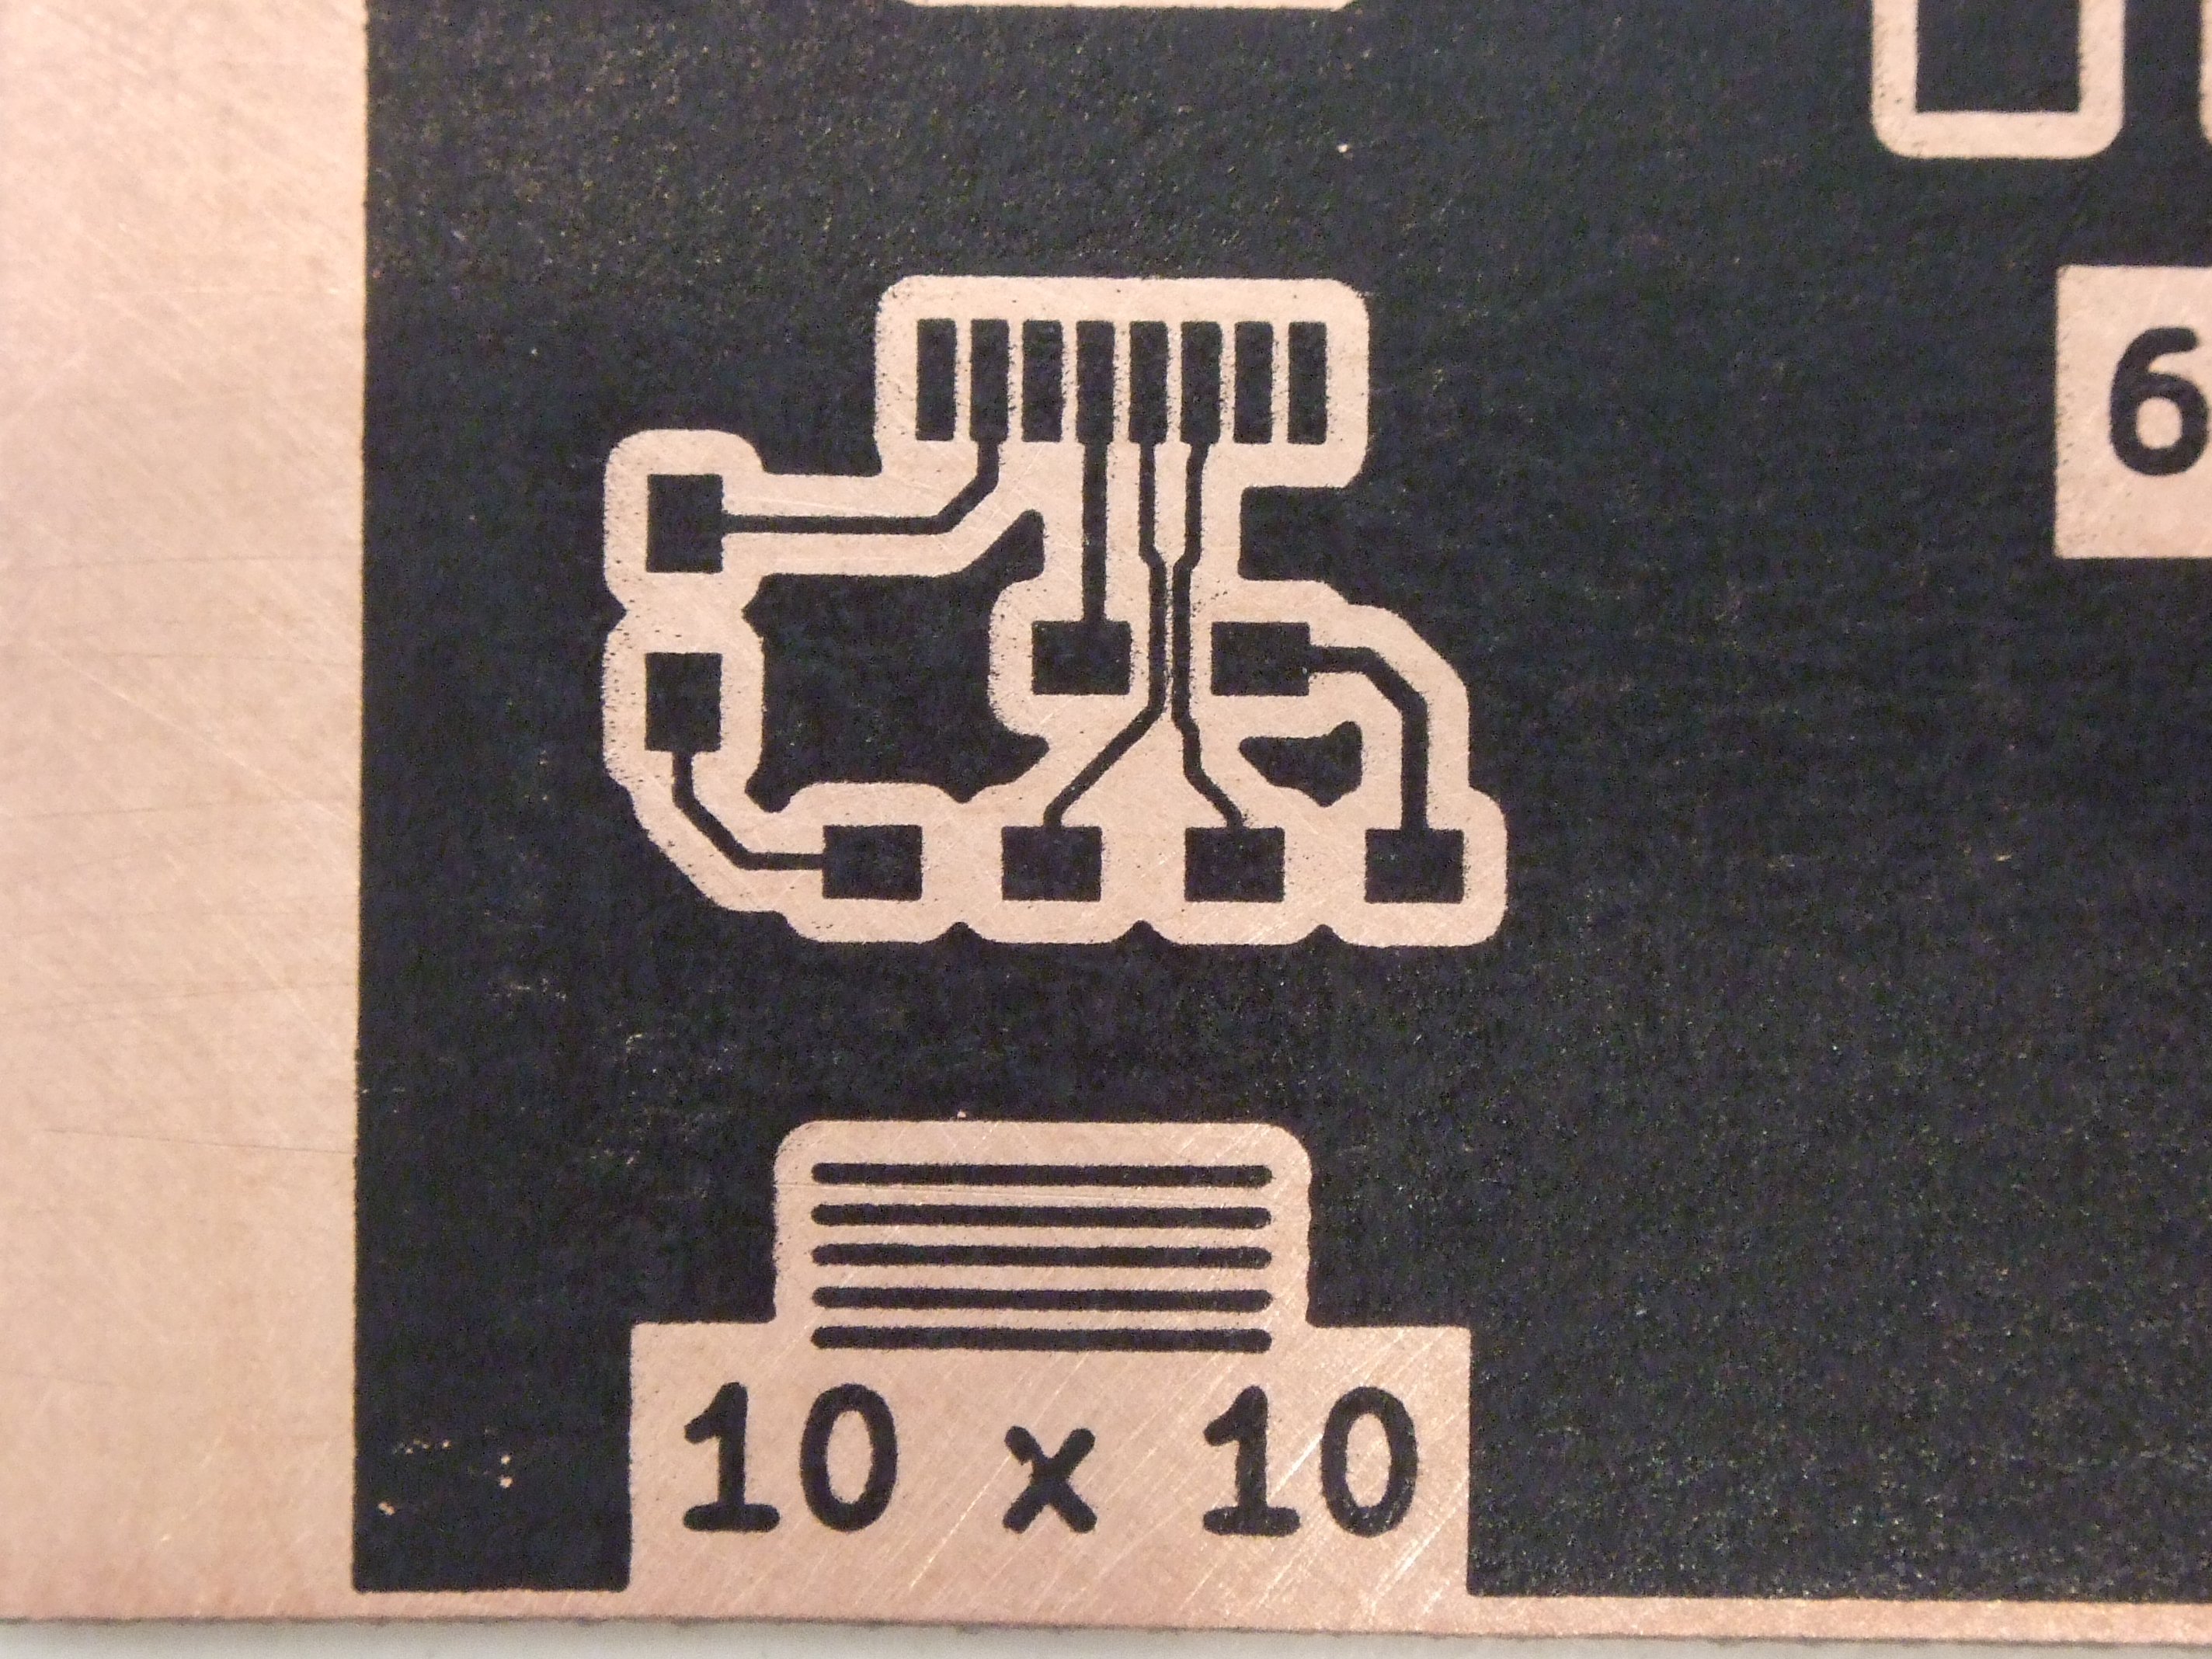
The four examples here were transferred at 98 °C, 125 °C, 142 °C, and 166 °C. The first clearly doesn’t adhere well at all, and in fact none of the traces except the 16 mil trace are actually continuous after etching. The highest temperature board has short-circuits all over, despite using 20 mil clearance on the ground pour. Surprisingly, the TSSOP footprint worked out basically OK, even though the two traces at 6 mil spacing are shorted.
The problem with the extreme temperatures are also obvious from looking at the transfer sheets. In the case of the low-temperature board, there is a lot of toner left on the paper. It simply hasn’t stuck well enough to the copper. The high temperature sheet ripped when pulling it off, probably because its plastic layer melted into the toner.
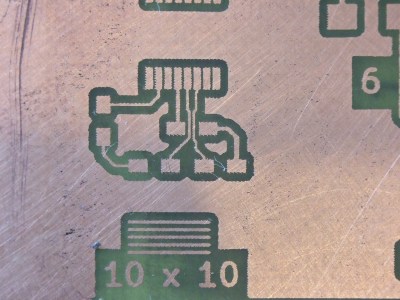
The two middle boards look pretty good, but looks can be deceiving so it’s probably worth etching them. There’s actually a minor defect in the 125 °C board — the 6 mil trace sample is broken just at the bottom where it connects to the pad. On the 142 °C board, the two close traces passing through the 0805 part are shorted although all of the other traces are continuous. A temperature somewhere between these two is probably going to be the sweet spot.
I re-did a run of this test board at 132 °C, printed onto magazine paper, and it came out perfectly. Except for the minor hassle of cutting out the magazine stock and taping it to a sheet of regular paper so that it can feed correctly through the printer, magazine paper is probably the ideal substrate. When it dissolves in water, there’s very little stress on the toner and a much lower risk of pulling up a spot here or there.
Not coincidentally, I’ve been using a temperature around 130 °C since I last did this calibration myself after buying my current laser printer. Getting a consistent procedure with a dialed-in temperature is much more than half the battle.
The Printer and Its Software
At this point, with the toner transfer process itself pretty much dialed in, the limiting factor in how reliably and at what resolution you can print is going to be the printer itself and the software that drives it. I found surprisingly large differences between different printer drivers (PCL and Postscript) as well as between different file formats used to save the artwork, and the programs that read them.

In particular, both of the drivers on my system seem to be interpreting the Postscript and PDF output of KiCad as being color files, and applying dithering to the result. With the Postscript driver, this results in jagged edges, an effect that other people have noticed before. With the transfer working well, these jaggies end up in the PCB’s copper.
With the PCL driver that I had been using, it seems to be applying a much higher-resolution dithering algorithm, with the result that the lines appear thinner to the point that they have discontinuities. It turns out that the problems I was having with thin lines printing was caused by the driver.
Finally, when I save the file as an SVG graphic and print it out from within Inkscape, all of the color-dithering artifacts go away, but the result is nice smooth dark traces that are a tiny bit too thick once transferred. Perhaps with these improved traces I can lower the temperature a little bit? There’s also some dust in the transfer on the sticky-backed paper that doesn’t occur with magazine paper, so maybe paper type does matter a little bit after all.
It’s important to note that you can’t really diagnose fine details like these until you’ve gotten the main variables of temperature and pressure under control. But once you do, and the smallest glitches that arise from the software stage of the chain are visible and reproducible, you’ve got a new limiting factor, and it’s time to tune up the software.
Unfortunately, everyone has a different software and printer setup, and not all the tweaks that work for me will work for you. At this point, you’re on your own. Just know that the printer’s resolution, printer configuration options, and even the drivers and file types can matter. That’s a lot to experiment with, so take them one variable at a time.
Rinse, Repeat, Refine
So everything interacts: temperature, pressure, paper type, and even the file format and printer drivers. I gave up experimenting for today because I’m content with reliable 6/8 traces, and when I need to push it even further for some project I’ll probably start by decreasing the temperature further to see if that solves the thickening lines. If I really need 6 mil clearances, I’ll either double-check those locations before etching and clean them up with a scalpel blade, or I’ll experiment with 4 mil trace widths. After all, with the SVG output and Inkscape doing the printing, I’ve not had a single discontinuous trace at 6 mil.
One thing I absolutely won’t change, however, is the basic technique. I first started applying a consistent maximum pressure through a roller and tweaking the temperature about ten years ago, and it’s been a very reliable method of making PCBs since. This recent quest for maximum resolution has been a fun diversion and I’m both happy to know that I can do small features when I need to, and saddened that the paths to further improvement seem to lead through tweaking software and drivers because there are just so many options.
At some point, it does become easier to let the pros do the work for you. But for me, toner transfer works for almost all of the initial stages of prototyping, and with turnaround times that absolutely can’t be beat.


If you WANT TO MAKE PCBs as a DIY thing, good. If you WANT PCBs, please order them, there’s no point. The only reason would be needing something right now!!!
Why are you so passionate about ordering PCBs? Do you stand to gain?
“The only reason would be needing something right now!!!”
Yup, that’s the one. If you don’t DIY, and you want it right now, you don’t get what you want. This article is about making the process of getting what you want faster, better, and less error-prone.
There are a lot more reasons to etch your own PCBs. Home-made PCBs are cost-effective starting at quantity one, and that scales well even for small batches. Naturally, everything home-made has its limitations, but it’s a perfectly justifiable way of building electronics.
I print my own pcb at less than 10c/square inch. 10c, and if I make a mistake, the fact I only did one, means correct and redo(from a cold tank it takes me 20 mins for a board, 4 mins if its up to temp). if I had a hundred to be made, yea, AFTER checking the deisgn by having made my own boards and confirmed they work, I’d send off for them.
But for the rest of you, there is always a scaple and wire-wrap-wire. unless you have $50 and a week to get another run done, if so, I’m jellous.
In contrast, many of my boards are SO 1-off that its OK to use protoboard.
Just because something might not be the *best* way to do something, does not mean that there isn’t value in knowing *how*.
I’m lazy, and will generally order my boards from one of those places that do small batches for cheap. But this is still interesting, and useful knowledge, especially considering that the same procedure can be used to create my stencils …
So thanks for the incredibly useful write-up!
Um… that’s basically what it says in the article… AND it’s about systematic skill-building. Additionally, the above method can be applied to etching/marking of other NF metals like scales, labels or front plates…
Yep and if you live in South Africa you get nothing,you must make it or leave it. Dan from S Africa
Yeah – this is what the internet needs. Yet another article about the worst way to make PCBs. If you value to time at more than a few pennies an hour or you’re making something other than a through hole Arduino shield, do it another way.
Actually I do think the Internet needs this article. Elliot is right in that most of whats out there about toner transfer includes some level of cross-your-fingers-and-hope-it-works type of guidance. I enjoyed his testing method. I had not thought much about temperature versus pressure (I use both in high amounts without quantifying why).
Agreed Mike.
Nurd Rage has a great demonstration of varying PCB etchants.
Agreed Mike, a good method well implemented gets you a PCB in hours not a fortnight from China.
If that is important to you then it’s a good idea,also it’s a part of the craft so your project can be even more DIY than a shipped out board…All depends on what you are after.
Exactly. If time is so precious that it can’t be wasted making a PCB, it is far too precious to waste designing a PCB that might have a mistake and having to wait weeks ordering until you finally have something useful. I’m not sure why non-diy types are even reading articles like this. What a bunch of negative asses.
Hours?!?! It takes me ~15-20 minutes, including cleanup. (Drilling holes, add another 5-10 min.)
I absolutely order boards when I need them professionally done, like everyone else. But when I just need a quick lash-up, there’s no substitute. In my mind, professional PCBs and DIY PCBs are apples and oranges.
I just want our readers to make better apples. :)
Keep up the good work, Elliot. Enjoyed your article. Thank you!
I use toner transfer to make PCBs down to 0.5mm pitch SMT parts routinely. It’s a huge time saver, I can go from printer to finished PCB ready to solder in <30 minutes. Even if I pay through the nose for expedited service sending out for boards takes at least a few days. If I need several boards I absolutely send out for them but for a one-off that I want now? I'll etch it myself. Recently I was in the middle of a project and realized my TFT display needed a separate boost converter for the backlight. I whipped up a board going from idea to finished working driver in less than 2 hours. Otherwise I'd have had to wait days or weeks, and ended up with 10 boards when I only needed 1.
What i’ve found out to close those tiny little defects in the print is to treat the copper with the transfered layout like a PLA 3D Print. Put it in some Acetone bath ! The toner get slightly dissolved and closes the tiny holes in the print itself. Also from my experience the print gets fixed/binded to the copper much better. But you shouldn’t leave the PCB for too long in the vapour (only couple of seconds) or the toner runs where it doesn’t should be.
Greetings from Germany…
You mean ABS 3D print right?
Yes, Acetone works only with ABS and doesn’t with PLA.
Direct contact with Acetone makes PLA sticky (as it desolves it a little bit). I use it all the time to glue parts together. It fuses them and often the connected site is stronger than the rest of the print if you try to break it apart.
We did have a machine in our in house prototype pcb production to treat laser printed layouts on transparency foils. We used photosensitive coaated boards and UV-light to transfer the design on the board. The idea of the machine was to smooth out the toner and make it a cleaner “true black”. It basically worked by applying a thin coat of white spirit (Terpentinersatz in german) with a roller to the laser printouts and then dryed it again with hot air. Aparently that solvent was enough to smooth out the toner particles, without loosing any of the details and resolution on the print. I could imagine that white spirit is a less agressive solvent than acetone, so maybe give that a try.
Terpentinersatz in German, probably it is “turpentine” in English (and Terembitina in Portuguese). My mother uses this spirit to dissolve paintings to porcelain painting. Nice tip, I’ll give it a try.
“Turpentine substitute” FWIW. I have no idea why you can’t buy regular old terps here: probably b/c carcinogenic or spontaneous combustion risk. Whatevers. Works just the same.
Thanks for the article. I enjoyed learning about a non-ferric-chloride method as well as the intricacies of even the printing drivers that can make a huge difference in quality.
I admit i didn’t check it (too late here), but i think HCL is a little bit (read: much) more dangerous than sodium persulfate. Iirc the fumes (from HCL) can provoke a pulmonary oedema if inhaled and skin contact will result in nasty chemical burns. Personnally i don’t make my own PCBs, but if i really would prefer sodium persulfate, even i would have to find a way to dispose it correctly. I don’t say you should not use HCL+H2O2, but as always, you should know what you are doing and use appropriate PPE.
The HCl is quite diluted in this method.
200ml HCl conc., 30ml of H2O2 and 770ml of water. Of course a ventilated area is good, but sometimes I even took the finished PCB out of the solution with bare fingers – of course rinsing fingers and PCB immediately afterwards with water. This gave no sting or burn or other visible effect.
This does not mean, you should do this, but the mix is not really dangerous. Just don’t cap the bottle tightly after use, it develops gas (oxygen) under pressure and the bottle can burst.
>The HCl is quite diluted in this method.
Yes, but to make the mixture you have to handle the concentrated stuff….
I’ve fired off a lot of model rockets, started gas engine model airplanes with my finger, etched PCBs, regularly handle a hot soldering iron, and drive a car.
Thanks for the formula! I’m just trying to the cupric chloride thing!
For most projects that I need a board, I am only going to build one. Since i can usually have a single or double sided board etched, drilled and tinned in less than an hour DIY toner transfer’ boards are my preferred method. If I need multiple copies or plated through holes, I will order one and wait the week or two it takes to get them. I have been using toner transfer of one method or another for several years, and it works quite well. Using the hot method the most important factor is the type of toner. I have several printers, and with the OEM cartridge I have very good results. I have tried several of the generic replacement cartridges, and find them very difficult or impossible to use. Many types of paper work well, but the results can be inconsistent. The most consistent results have been with Glossy Color Laser paper. Using the hot method with an unmodified laminator, I found I got the best results if I ran the blank board through several times to preheat before applying the paper, Then ran it through several more times to fuse. I have recently switched over to using the Cold method with a solvent mixture and then running the board and paper through the laminator without having it warm up first. A couple passes through and I get much more consistent results than I was able to get with the Hot method.
I’m in the same boat. I often prototype with a home-spun board to prove out my design, usually with the minimum of features knowing I can add that into a full board design when I order something more complex. I make boards less than I used to (and order them more often) but I still enjoy having that little trick in my shop when needed.
I haven’t heard of the cold method. Where did you learn about it?
First I saw was from
http://www.instructables.com/id/Heatless-cold-Toner-Transfer-for-PCB-Making/
and gave it a try. I did not have any acetone at the time so used some Xylene I had left over from some painting I was doing. A little adjusting of the ratio of Xylene to Denatured Alcohol and I got more consistent results than I had with the Hot Method.
I have some information on my blog about doing cold method toner transfer. I have modified the method a little recently to run the board and paper through my laminator without pre-heating first. Works very well for some of the double sided smt boards I have done. Just a few holes to drill and can get by without plated through holes. Some of the other posts have pictures of double sided SMD boards I have made with that method
http://kv4qb.blogspot.com/2016/01/double-sided-cold-toner-transfer.html
LOL, @Mike. You should read Hackaday. :)
http://hackaday.com/2016/01/12/even-easier-toner-transfer-pcbs/
But seriously, any method where you melt the toner leads to potential inaccuracy / blobbiness. Whether this matters is a function of the feature scale you’re working with.
Silicon fab shops have a trick where they apply an “inverted blobbyiness” factor to the geometry so that the blob ends up close to what they were after. I guess this is the point of the article, it is about fully understanding and controlling the process so that it is predictable?
Hi, [Elliot Williams]
You’ve obviously mastered this process and get it just how you want each time but I suspect that wasn’t the case when you first tried. You have obviously figured out how to control the most significant variables.
I am using a process that is similar and yet quite a lot different in some regards. It is a process with far better constrained variables. I can easily go down to 5 mill and I get a perfect image in copper without any retouching.
Perhaps what’s significant about the process I use is that a first time PCB maker is highly likely to get it right or even spot on on the first try. The method you described is probably better once they have learnt the skill. Having said that I am still doing PCB’s the way described below.
I will describe the differences only.
I print onto a product called Pulsar Toner Transfer Paper from http://www.pcbfx.com. I have no affiliation with this company.
Now compared to the back cover of your favorite magazine this product is more expensive but that’s not the criteria here.
What makes this product different is that it’s made of detxrin which is a water soluble glucose that can handle the temperatures that toners melt at.
Because it’s water soluble you just drop PCB’s with fused toner into a sink and you get a very very clean result. For the price conscious you can buy dextrin and make your own.
I use a A3 laminator (about twice the size of the US letter) to fuse the toner. It has much larger rollers and therefore – thermal mass. It is not ideal but it easily gets me down to 5 mill so I am not concerned that I have to pass the PCB/TTP through several times.
Toner is porous and it pits even when you get 100% transfer. On fine trace widths this can be a huge problem.
I have one extra step where I use a product from the same company called (Green) Toner Reactive Foil.
It bonds to the toner and fills the very small holes or pits to give a near perfect coverage of masked areas. You just put it over the fused toner, send it through the laminator again and then peal it off.
I then etch in Ammonium Persulfate at 70 degrees Celsius (or centigrade).
I suggest you try these products not because it would be easier for you, but because you will see that it works well on the first time and that the result is a high quality.
I will repeat that I have nothing to do with the company mentioned. It’s a US company and I just stumbled onto their products on ebay one day.
Thanks for the writeup! I’ve always wanted to try the Pulsar paper, but never have. It should be really good for getting the image off in one piece. Their after-process foil is also supposed to be good stuff. I’ve heard rumors that it’s the same as some scrapbookers’ iron-on foil, which costs a bunch less.
I should absolutely give that method a try.
As for heat-sealing machines, there’s considerable variation there. We had one at my old hackerspace that worked great. I’ve bought two since, and neither has worked as well. Unfortunately, the specific model that European hackers swear by is discontinued, and better options cost like $100. My wife was throwing the iron away anyway…
With the magazine paper, I count on the paper dissolving away in a similar manner to the dextrin layer. I totally agree that removing the backing in the gentlest manner possible is a big help.
Good comments. Anyone else tried the Pulsar paper? Compare/contrast with magazine paper?
You mention all but the most crucial thing – type of toner binder (yes, there is more to toner then just pigment). Toner transfer reliably works only with thermoplastic ones (the particular type defines the temperature at which to transfer), expoxy based binders don’t seem to transfer well at all…
This is the first thing you should focus on, some toners just won’t transfer at all, while other will work flawlessly the first and every other time again.
Is there a way to tell which toner you have?
Yes, Make a PCB. If it doesn’t work then you have the wrong toner!
I’ve only encountered thermoplastic toner. But that sounds like good advice. I can imagine a binder messing things all up!
I’ve used everything from HP-brand to eBay-special toner, though, and haven’t found it to matter much, which some people claims it does. I’ve even used color laser toner, which is supposed to be a no-go. Works fine, but needed an even lower temperature. (The resolution of the printer, however, was awful.)
Different toners melt and glass-transition at different temperatures, which surely matters. But if you’re controlling / varying temperature, it shouldn’t effect things all that much.
Don’t forget about the wax-based toners, used in Xerox and some Dell printers and marketed as environmentally friendly low-melt “EA toner”. These are separate from the “solid ink” soy wax blocks used in the Xerox ColorQube printers.
As a side note, only OEM Xerox supplies have the lower melt point, and using non-OEM in those printers will often clog the printer with a sticky half-melted mess.
Have you tried to transfer using the wax based toner? If so, what were your results?
Have you tried Simpletronic’s method using acetone/alcohol for the transfer?
http://www.instructables.com/id/Heatless-cold-Toner-Transfer-for-PCB-Making/
Ha karat reported on that back in January of this year.
Hackaday
(Was autocorrupted )
I have. I’d rate it better than a hot-as-you-can-make-it iron, which is a lot of people’s baseline for toner transfer, but because you actually melt the toner with the acetone, it’s bound to be smudgy / inaccurate to some extent. If you use large trace separations, it should work just fine.
The cold toner transfer method uses a mix of acetone an isopropyl alcohol to avoid complete chemical melting of the plastic.
I haven’t personally tried this method yet but I have bought the chemicals to try it next time.
I expect that it will work well given that it’s easy to repeat the exact composition.
The mix is (per volume) 8 parts isopropyl alcohol plus 3 parts acetone.
I have also heard of people sealing the PCB and toner sheet in a container with some pure acetone that is NOT in contact and just the acetone vapors do the work.
I tried that cold method using a mixture of roughly 60% blue methylated spirit from my local grocery shop and 40% acetone and to my surprise the first attempt worked really well. It was not a spotless transfer but I was able to etch a decent working PCB with this method.
Hmmm if alcohol/acetone mix works, then maybe the dirt cheap dollar store nail polish remover my wife gets works…..
I keep hearing that acetone doesn’t work at removing the toner once etched, but that dollar store nail polish remover seems to work effortlessly for me. I’m not sure what I’m doing diffetently, but it works really well.
You’re hearing wrong! :) Acetone is _the_ chemical to use to remove toner or sharpie traces. (And some glue residues.)
My nail polish remover is 70% acetone
Yeah, I hear the beauty store supply outlets can have high acetone content polish remover, and also some have the pure acetone.
People often recomend nail polish remover, which is what I’d use as a source of acetone if I were stranded in a world with no hardware stores but plentiful nail salons. Fortunately, I am not in that world.
We pay around $5 for 100 ml of nail polish remover, which is acetone plus something else that may help your nails recover after being stripped of all their fat. I’m not sure I want that on my PCBs.
We pay around $4 for 1000 ml of acetone at the hardware store, and it’s 100% acetone. Dries up absolutely clean, leaving a grease-free PCB surface. It’s pure, and ten times cheaper. The only downside is that it doesn’t come in a shapely pink bottle.
While I’ve stopped doing home-made PCBs (because my boards are mostly double sided and I haven’t found a reliable way to quickly make double-sided PCBs at home), I think the method and tips described here are quite valuable for making solder paste stencils at home.
Agreed, This is what I use the toner transfer method for as well.
i just gave up and got the blue transfer sheets. they work perfectly every time, and im doing 2 sided boards. it involves drilling a few alignment holes (using a printed template), then using sewing pins to align the layers, which are then taped down with painters tape. then i remove the pins, sandwich the whole thing between a couple sheets of printer paper and iron it like you would a pair of pants (if i were the type to wear pants that need ironing). flip and repeat. the alignment is close enough for through hole parts (and irrelevant for surface mount, which ive been using increasingly more).
making vias is what bites me in the balls. been doing this thing where you hammer in a thick copper wire so it forms a nice cap at both ends, but results can be mixed. im using an aluminum brick with a dimple dremeled into it to receive one end of the wire, and the hammer does the rest. boards also last longer if their through holes are plated, which i still dont have a process for. thinking of using rivets and am currently trying to figure out what tools i need for that.
I used to agonize over registration of double-sided boards. Then I realized I could print a single transfer with both top and bottom layers and just fold it in half, sandwich the board inside the folded paper, and iron. If I’m careful to keep the paper and board from moving during ironing, registration ranges from usable to great.
To create the transfer in Eagle, I make a copy of the .brd file to break back-annotation and prevent the schematic module from complaining about all the new components. I turn on all layers, group select the board and duplicate the group. Then I mirror the duplicate. I trim the edges of the printout for alignment when folding.
For vias, I use brass “head pins” intended for jewelry-making:
http://www.joann.com/brass-head-pin-gold/7708282.html
I’m not sure what the gold finish consists of, but it seems to wet OK for soldering. Head pins also come in nickel and silver finishes, which should be easy to solder.
good idea about folding the page, im gonna try that next time. i have a printer that is really old, so it cant take graphics very well, printer also has limited memory so images over a certain resolution just can not be printed. so i usually have to print to file, and get out photoshop for the final processing. i have to take it down to 1 bit color most of the time, 4 color images kind of come out better and give cleaner edges and if i can print those i do, larger boards need to be 1-bit. editing in photoshop is also useful to save paper, those blue sheets are $2 a page. so i set up the page to get maximum usage. i tried doing a bunch of boards all at once, but the results were less desirable. next time i think i will try splitting the sheets in half and try to convince the printer its an envelope. also good tip on the head pins, i will try those.
Both excellent ideas! Especially on the copper rivets to connect sides! Thanks!!
I etch one side of the PCB at a time with toner transfer as it can be fuzzy even at the best of times, After getting the more complex side of the PCB done, I drill some of thew holes that are far apart and them for alignment. I poke holes on the new transfer paper and use mapping pins to line it up before tapping it down with scotch tape.
As for vias, I used to use a pier, but the drill size I had was too large, (I have recent bought some 0.5mm twist bits from China as they matches the copper wire size I have.)
Haven’t done double side boards for a while as PCB from China is reasonable and I have been pushing against the design rules. Having vias and solder mask makes life easier when I am doing 0.5mm or finer pitch parts. On the few simpler smaller boards that I really need it quick, I’ll do a toner transfer.
Hi, I like your idea of doing double sided boards, Just a question here what is the minimum track thickness allowed using the blue paper. I have a small mixer project I want to build but I am concerned about the track thickness, and with your designs are you using copper pour so as to reduce time in the acid?
I never understood how toner transfer is supposed to be more reliable or easier than photoresist.
Sure, you need to fiddle a little bit at first…
But once you’ve determined the exposure time depending on your UV lights and the transparent paper you’re using, this method is much more repeatable than toner transfer.
I would not say it is more reliable. But is once you get your method down,it is probably easier, and the results are very reliable. I started because I had everything on hand to try toner transfer. After a few attempts at getting everything figured out, I could get consistent results, that are more than adequate for anything I am building. This includes single and double sided boards. Mostly surface mount with 1206 or 805 component and SOP8 – SOP16 ICs., Some times I have to mix in a few through hole components. With careful layout you can minimize the number of through holes or vias you need, I hate drilling. Using the cold method I can usually get a double sided board etched, tinned and drilled in less than an hour. Add a little more time and I have had fairly good luck adding a solder mask.
Photoresist all the way. But I am a bit biased, coming from an offset lithography background.
I avoided photoresist in the article, because it’s a distraction, but now that you bring it up… :)
I’m getting the same resolution in toner as I would in photoresist, and with proper temperature control it’s just slightly less reliable. I’m coming right up on the resolution of my printer (at 1200 DPI) and whether I print out the toner onto a magazine page or a transparency sheet for exposure, it won’t matter.
The advantages for toner are that it’s significantly cheaper and a little bit faster, because there are fewer steps and an entire chemical bath left out.
Photo-etching shines (tee-hee) if you’ve got an enlarger/reducer and can print at 2x (or more!) the resolution, but that’s a whole different setup.
Right, if you’re going to print transparencies for photo resist, then all the criticisms about fine feature definition and pinholes in the toner still apply.
Main problem for photoresist: you need a good, transparent master. The exposure and development is not the problem.
I use tracing paper, with excellent results. A simple CFL “black” light for exposure with the board and transparency clamped between two plates of glass.
the only reason i dont do it is where i live. its very expensive to get the chemicals shipped up here.
…experiments that change one variable at a time, and then optimizing along that one dimension.
Sadly that is a very common misconception about how optimization should be performed to get the fastest convergence to the optimum point with the minimum of iteratrions and more importantly without getting trapped in a local minimum.
There is an excellent and easy to follow course that I can recommend about Experimentation for Improvement from McMaster University with a minimum of math and an eyecandy practical examples approach where they explain the why and how.
tip: You always should change more than one variable at a time to map the results space and move towards the optimum following the gradient. Only basic high school math needed.
You need the ability to accurately quantify results for this and that’s not an easy thing to achieve for this.
That, sadly is another common misconception. Even if accurate meassurements make things easier, ranking may be enough. You should check the course or read some of the literature about experiment optimization before arriving to such conclusions. ;)
I do etching as well and have found that the best way to have consistent results is using a wall oven or toaster oven to preheat the metal. For me, I etch large sheets at a time 8 1/2 X 11 or larger). I preheat the metal, then barely have to burnish afterward. I work with copper and aluminum which accept heat differently. For copper, I start oven at 325, heat metal for 5-6 minutes, slap on my magazine paper or label paper and it usually sticks down with very little action from me. Even though my metal never gets fully up to 325, I am getting it to toner softening point (for me around 125-150) in just the amount of time it takes me to take off my hotpad and lay the metal down. I do use a rolling pin and iron also for the larger pieces that distribute heat too much. You may also find it quicker to use a small torch on your metal from a slight distance on the backside (face your paper down, then lay metal face down on top). As with anything, you’ll have to play with this method too to make sure you don’t melt toner, but after a few trials, you can get a good transfer without burnishing as hard or as much.
For consistent results using the same process, consistency in the paper used is very important. Trying to stick with, for instance, one magazine publication as I did often doesn’t work well because, as I found out with some on-line research, many magazines will change their paper source from month to month based upon the cheapest source. Along with that change can come changes in paper specs.
After much experience, this is by far the best paper I’ve ever used and its not expensive at all:
HP Premium Presentation 120g (32lb) Laser Paper, Glossy, 8.5×11 250 Sht
https://www.amazon.com/HP-Premium-Presentation-Glossy-8-5×11/dp/B003KU4DSW
8.5 x 11″ HP code is CG988A. There is an A4 size whose HP product code I don’t recall.
Also not sure why you’d want to use a pre-printed page, ink/image transfer from magazines and newspapers using much the same technique as toner transfer was an art thing back in the day.
It isn’t that you want preprinted paper. It is that it is clay coated, and free. There are a number of people on the Homebrew_PCBs list on Yahoogroups who use those free ads dropped off every week for toner transfer.
Full disclosure: I’m listowner of Homebrew_PCBs.
Oh one thing it’s super easy to forget about. Is that printer settings might be defaulted to economy or “NLQ” modes, the setting in between draft and highest quality anyway. At least I forget about it, haven’t had a printer in a decade where that mode didn’t come out looking highly acceptable for just about everything, while saving you ink/toner… anyway, in HQ mode the toner is laid down ultra black, very solid. Just came to mind when I caught a test print my wife did this morn.
In my experience, the 120g/m² glossy photo paper is the best, whether it’s for inkjet or laser doesn’t matter. But you should go with the glossy paper for laser printers, I heard about the coat of inkjet photo paper often contains minerals.
If it’s about printers, I tested the Brother HL-L2340DW, HP Laserjet 1000 and HP Laserjet 1018. Using the Laserjet 1018, I got the best overall results in printing output and toner density.
This might be helpful, too:
http://forums.hackaday.com/viewtopic.php?f=3&t=5728
I didn’t know HaD had a traditional forum.
That was an interesting article. I normally use photo sensitive boards and get good repeatable results in short time but getting hold of OHP film is getting harder (and it’s expensive ) and have been considering toner transfer as an option – I’ve got no excuse to give it a go now.
I am not sure where I got the idea from but I use a transparent vinyl from the dollar store (shelf liner from dollar tree) and it transfers better than anything I have ever used for transfer paper – by far. You can get a 18×54 inch roll for $1 and have enough for quite a few projects. I center my print, trim a piece of vinyl to size, peel the backing off and place it on a piece of ordinary paper, and print the paper normally with a laser printer. The liner is so thin it cannot jam the printer and in my experience I rarely have any transfer problems (I use a laminater).
Surprised no one mentioned using Vinyl as a print medium for transferring.
Thanks.
“Use maximal pressure and calibrate temperature only” – much better than “calibrate temperature, pressure and time”.
Nice remedy for toner transfer phobia and headaches! which I usually get when making pcb.
Hello,
Which side you put the paper on? It sounds obvious that it should be on iron’s side but the pictures suggest it is on the rolling pin side.
Also a note about double sided pcb would be much appreciated.
Thank you for sharing your technique.
Regards
E
Pre-etch.
If you pre-etch the board in your etchant, then rinse it in water, then dry it with a heat gun (or just let it air dry), you do not need to calibrate your temperature. You do not need to worry about getting the board too hot.
The pre-etch causes some very tiny precipitate to form on the surface of the copper. If you wipe the board with a damp cloth, you will remove it. So don’t do that; don’t touch the surface of the board anymore than you have to. Leave the ugly black and while and green and dark red streaks all over the board. Yes, it sounds dumb. When you dunk it and swish it around in water, why does it not clean off the precipitate? Well, I dunno, but it doesn’t.
[Disclaimer: I use acid based etchants. I have not used the persulfates. I don’t know what happens with those.]
When the toner liquefies (and this is a good thing), it absorbs INTO this dust. It does not spread around. (At least if you use a laminator it doesn’t. If you are reckless with an iron, you might smear it around). You cannot fatten your trace. The trace can’t fall off. It’s just locked in place.
Give this a try sometime. I do 8/8 all day, 6/6 when needed. I don’t care what the exact temp is. Every board is different size/thickness/pour. It doesn’t matter. I get it hot enough to where it hurts to pinch the board between my fingers. It can’t get too hot unless the FR-4 burns and bubbles. That’s the only limiting factor.
I used this technique to put a cross-hair pattern on a 1.25″ diameter, 1/16″ thick acrylic disc painted with UV reactive paint. Worked great. I use such a disc to align optics in a machine with a UV laser (very low power where the disc is placed).
I see no reason why it wouldn’t work to put lettering on project boxes. Maybe spray it with a clear coat to protect the toner.
Hi guys, I am unsure if this post is still active.This post may in fact be irrelevant – as it seems a lot of the new printers including HP ones – have wax is their toner. This is a typical breakdown found on HP toner data sheets:
Styrene acrylate copolymer <55
Ferrite < 45
Wax <10
What exactly do we need to look for in a good toner for good toner transfer? It seems we can no longer say HP Laser printers are good. I think it is best to check toner data sheets before buying a printer – but what exactly do we need to look for – to ensure great toner transfer?
.
I have a Yahoogroup that is very active called Homebrew_PCBs, you are welcome to ask there.
http://groups.yahoo.com/group/Homebrew_PCBs
Did you move your group elsewhere? Perhaps groups.io?
Sam
W3OHM
Hi nice article, i ask my self, has anyone tried to print directly over the pcb from a toner printer? Maybe that way doesn’t need to go through all this variables, that the printer allready have.
@thebytespace
Yes, in fact a number of years ago. I’m moderator of Homebrew_PCBs on YahooGroups, several people modified laser printers to do this. Some were successful, some weren’t. One issue is the fuser only has enough heat capacity for a sheet of paper, not copper. Boards have been ironed, heated, suspended over acetone, etc.
https://groups.yahoo.com/neo/groups/Homebrew_PCBs/search/messages?advance=true&sm=DOES_NOT_CONTAINS&st=monthly.txt&cm=CONTAINS&ct=direct%20laser%20print%20toner&dm=IS_ANY&fs=false
There is also printing pigmented ink directly onto a blank PCB. It must be heated to set the ink. I set up a YahooGroup for that, too. The simplest to use are Epson printers with a CD tray. They also take an ID badge tray.
https://groups.yahoo.com/neo/groups/Inkjet_PCB_Construction/info
One of the members saved out a lot of the information and posted it on his website:
http://techref.massmind.org/techref/pcb/etch/directinkjetresist.htm
Did anyone answer your question? If so could you send it in -no one at HP can tell me what is in there toners . I thought people said it had to have at least 35% iron oxide for good transfer images.
Thanks
Your article was key to my finally making a laser image transfer successfully. I found no other article or YouTube video that emphasized what kind of pressure was needed for transferring the pattern. When I pressed as hard as I could with a kitchen rolling-pin, I got great results the first time. I used a Brother laser printer (many articles on the subject describe difficulty with Brother’s toner, but I had great results), and printed on an inkjet transparency sheet. Temperature was 130 C, and the transfer was 100%. Some lighter spots due to printer artefacts were touched in with a Sharpie pen. Used HCl + Hydrogen Peroxide for the etchant. My happiness today is thanks to you. (I had tried for the past 2 weeks unsuccessfully)
I’m going to use this technique to convert art into an etching on a board. As far as I know, I can’t use a design package to produce Gerbers and drilling files which I would need to get a pcb fab to make it for me. In the days of ink on mylar sheet and photo-etching it would have been no problem!
I must say, as usual, I started trying and testing before I read everything and was failing miserably. When I applied pressure as you suggested, it works! That’s the trick guys! Pressure, Pressure !!
On Brother Laser Printers it helps to sand the chinese toner transfer paper (yellow one) with fine steel wool so that the toner sticks. Just sand it slightly for ten seconds. It will lose the gloss, than its good to go into the printer. Sand the pcb copper aswell before you do the transfer. It saved my day in the end when i figued it out. I do not recommend that on press and peel. You will destroy the layer of the paper which is quite sensitive.
I modified the usual method by printing a little text (not where the PCB toner will be) on the back of the paper. The non shiny side. Then print the PCB on the shiny side of the yellow transfer paper. Attach the paper as usual then put a piece of white paper on top of the yellow paper. Iron. When the toner starts to show on the white paper you should be done ironing.