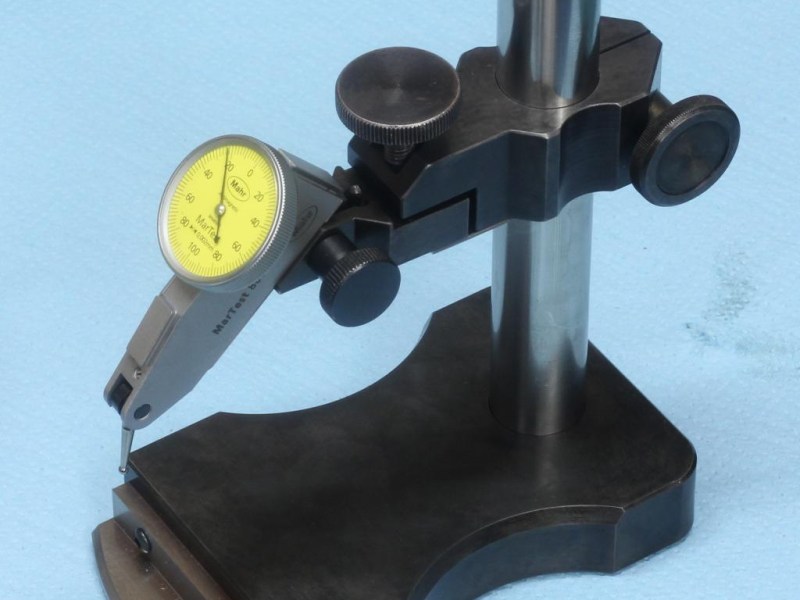
[Stefan Gotteswinter] has a thing for precision. So it was no surprise when he confessed frustration that he was unable to check the squareness of the things he made in his shop to the degree his heart desired.
He was looking enviously at the squareness comparator that [Tom Lipton] had made when somone on Instagram posted a photo of the comparator they use every day. [Stefan] loved the design and set out to build one of his own. He copied it shamelessly, made a set of drawings, and got to work.
[Stefan]’s videos are always a trove of good machine shop habits and skills. He always shows how being careful, patient, and doing things the right way can result in really astoundingly precise work out of a home machine shop. The workmanship is beautiful and his knack for machining is apparent throughout. We chuckled at one section where he informed the viewer that you could break a tap on the mill when tapping under power if you bottom out. To avoid this he stopped at a distance he felt was safe: 0.5 mm away.
The construction and finishing complete, [Stefan] shows how to use the comparator at the end of the video, viewable after the break.


How does he keep the column perpendicular to the base? Or does he just get it close, then rezero with his reference square every time he changes the height?
Yeah, you recal whenever you move it.
0.5mm before the bottom of the quill seems like a reasonable place to stop (corresponds to about a turn and a half), since the only reason to stop early is to avoid jamming the quill. The scary part is set by the relative depth of his tap relative to the drill he used, since it is a blind hole and the relative length difference between the tap and the drill is what determines how close to the bottom of the hole he is tapping.
My personal favorite part is when be breaks off the carbide end mill since he was distracted talking about his fancy carbide end mill, and a new one magically appears.
He is running really slow for a 6mm carbide in tool steel, he should be at 1600 at a minimum up to about 5000 RPM. You gain nothing by running slow, in fact a lot of the new coatings loose their effectiveness when ran slow. Coupled that with his feed being too fast, it should have been about 3 inches per minute for a 3 flute end mill at 1000rpm. Even worse when he ran the smaller end mill for the initial curve of the toe.
This doesn’t seem like the way. I’ll have to ask the old-timers at work tomorrow.
Dont worry, thats pretty much how the oldtimers did it.
Excuse me, but that’s a height comparator. It’s just a transfer standard for repetitive workpiece comparisons. It’s NOT intended to check squareness. It’s also not a very good one from the look of it. The better ones use a small surface plate for the base.
Squareness is generally tested on a surface plate with a square. Squares come in various forms. For very exacting work such as checking ordinary L shaped machinist’s squares they are precision cylinders with one end perpendicular to the axis of the cylinder and the other at a slight angle. You rotate it on the the non-perpendicular face until it matches the edge of the square and then read off the error.
You CAN test for squareness with a comparator mounted on a small surface plate and a dial indicator by checking both ends of a face, rotating the object 90 degrees and checking the ends of the other face. AFTER you have verified that opposite faces are parallel. So VERY slow.
This is basic high school geometry. If you can’t do that you have no business attempting to do precision work until you learn it. And do NOT underestimate how complex the geometry problems become. The difference between a “machinist” and someone like me who “putters about with metal” is the machinist knows a lot more solutions to complex geometry problems from memory. I have to work them out on a case by case basis.
Homework assignment:
The 3 axes of MEMS accelerometer are not perfectly aligned. Design an arrangement to determine the true orientations of the axes to arbitrary accuracy without relying on mythical perfect tooling. Be sure to account for the effects of local gravity variations, tidal effects caused by the moon and earthquakes.
Going to post a solution to your homework assignment? /me is waiting
He’s very clever and his mom is very proud of him. That’s the answer.
Simple, wait for the next eclipse at noon on the equator and do it then.
In fact it, is a squareness COMPARATOR. It is not, however, a squareness gauge. Set a zero on one face, rotate 180, and check. You’re not comparing the squareness of the faces you indicate against but, using them as references. The face that you’re actually inspecting is the one against the surface plate or other known flat datum. Alternatively, you could use a cylinder square as a reference and take a direct reading from the comparator.
You are correct that the comparator method only works when the opposing faces are known to be parallel. However, in practice, there is little use trying to determine how square a part is before it has been machined or, preferably and likely, ground flat, square, and parallel. As a tool and die maker, it becomes second nature to reach for a squareness comparator when you check blocks.
So, you did absolutely not understand how its used and how it works? Armchair-engineer there? :)
I am a machinist, you are obviously not, and simply do not have any idea how this is meant to be used. It is definitely a classic design for a squareness comparator used by hundreds of machinists, toolmakers, and metrologists around the world.
You are hereby NOT excused!