Blinky LED projects: we just can’t get enough of them. But anyone who’s stared a WS2812 straight in the face knows that the secret sauce that takes a good LED project and makes it great is the diffuser. Without a diffuser, colors don’t blend and LEDs are just tiny, blinding points of light. The ideal diffuser scrambles the photons around and spreads them out between LED and your eye, so that you can’t tell exactly where they originated.
We’re going to try to pay the diffuser its due, and hopefully you’ll get some inspiration for your next project from scrolling through what we found. But this is an “Ask Hacakday”, so here’s the question up front: what awesome LED diffusion tricks are we missing, what’s your favorite, and why?
Diffusive Materials, Blending Colors
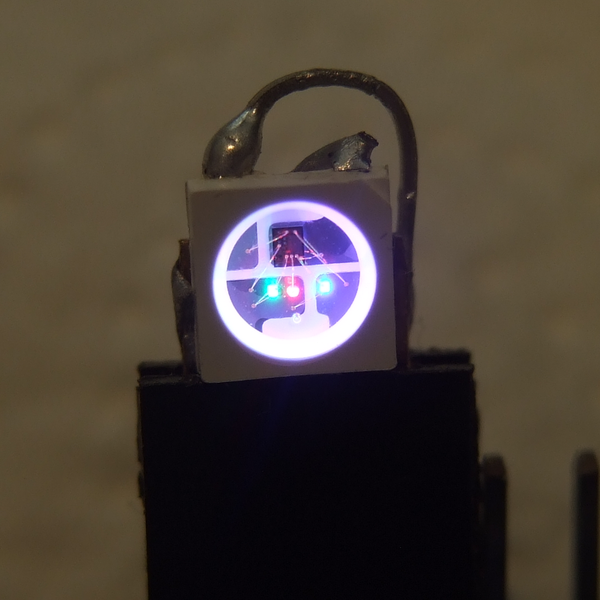 Look closely enough at an RGB LED and you’ll see three individual LED chips, not surprisingly in red, green, and blue. We all know this, and yet it’s still surprising how badly blended the colors can be, even from an LED unit like the WS2812, where the three diodes are ridiculously tiny and less than a millimeter apart. Somehow, even at desk-distance, you still get the feeling that you’re looking at a red LED and a blue LED instead of a blended magenta light source.
One approach is to use a diffusive material that has a rough enough surface that it scatters the light that passes through it. Diffusive materials include something “traditional” like frosted glass or acrylic, as seen in [Mike Szczys]’s 1 Pixel Pacman demo video or this classy linear RGB clock. Something like 50% transparent acrylic seems to be just about right. You can get a similar effect by sanding or tumbling a clear LED.
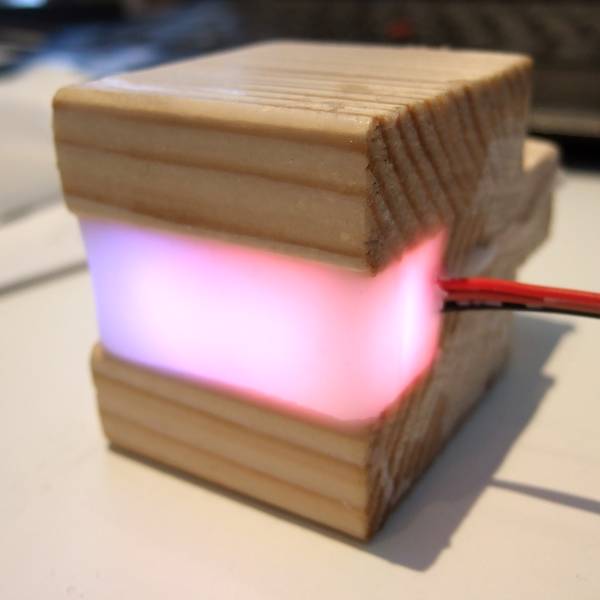 Then there are “oddball” diffusers. A drop of hot glue works pretty well, because it’s rarely crystal clear. Stranger still is polyester pillow stuffing. Lately, I’ve been experimenting with re-melting candles and entombing LEDs in paraffin wax — around 1 cm depth yields very uniform colors. I’ve also seen holes drilled in wooden cases, filled with epoxy, and sanded down.
You could always 3D print the case in a translucent material, so that the case is the diffuser. Or you can just hold up a sheet of paper or a cutout from a milk jug. These low-tech options work surprisingly well.
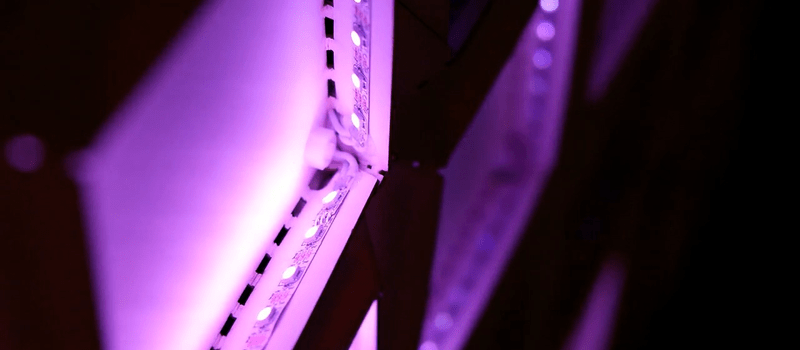
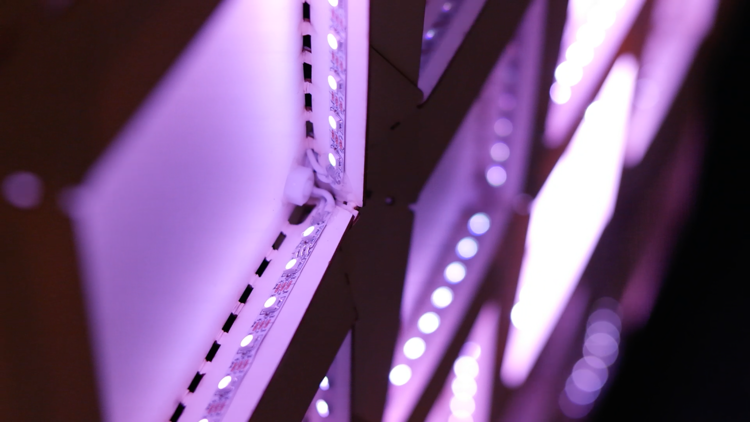
The main variables with diffusive materials is how transmissive the material is and how far away from the LED it’s located. Thicker, less transmissive materials tend to blur better but darken the LED more — sometimes a good thing. Locating the diffuser further away tends to mix colors better, but also blurs the points of light out, and can muddy up the image. Again, sometimes you want this effect, like in this wall panel, and sometimes you don’t, like in [Mike]’s Pacman. But the distance to the diffuser can be critical. Test it out well before designing the case.


Reflective Cavities, Shaping Light
 Reflective cavities serve the same purpose as translucent material, but can be lighter weight if more difficult to construct. You can either add a diffuser sheet to the front of the cavity or not, as you wish. Both can be really nice effects. For instance, “Ecstatic Epiphany” by [Micah Elizabeth Scott] uses folded borders that bounce the LEDs off of a light-colored surface, and spread it around a little bit, to achieve both color mixing and some shaping. It works fine without any front cover.
 “Colossus” uses white foam-core dividers to make many individual reflective cavities, covered with two layers of white bed sheet as a front-surface diffuser. Within each cell, the colors are discrete and well mixed, for the perfect big-pixel effect. You could also use straws, toilet-paper tubes, or even soda bottles.
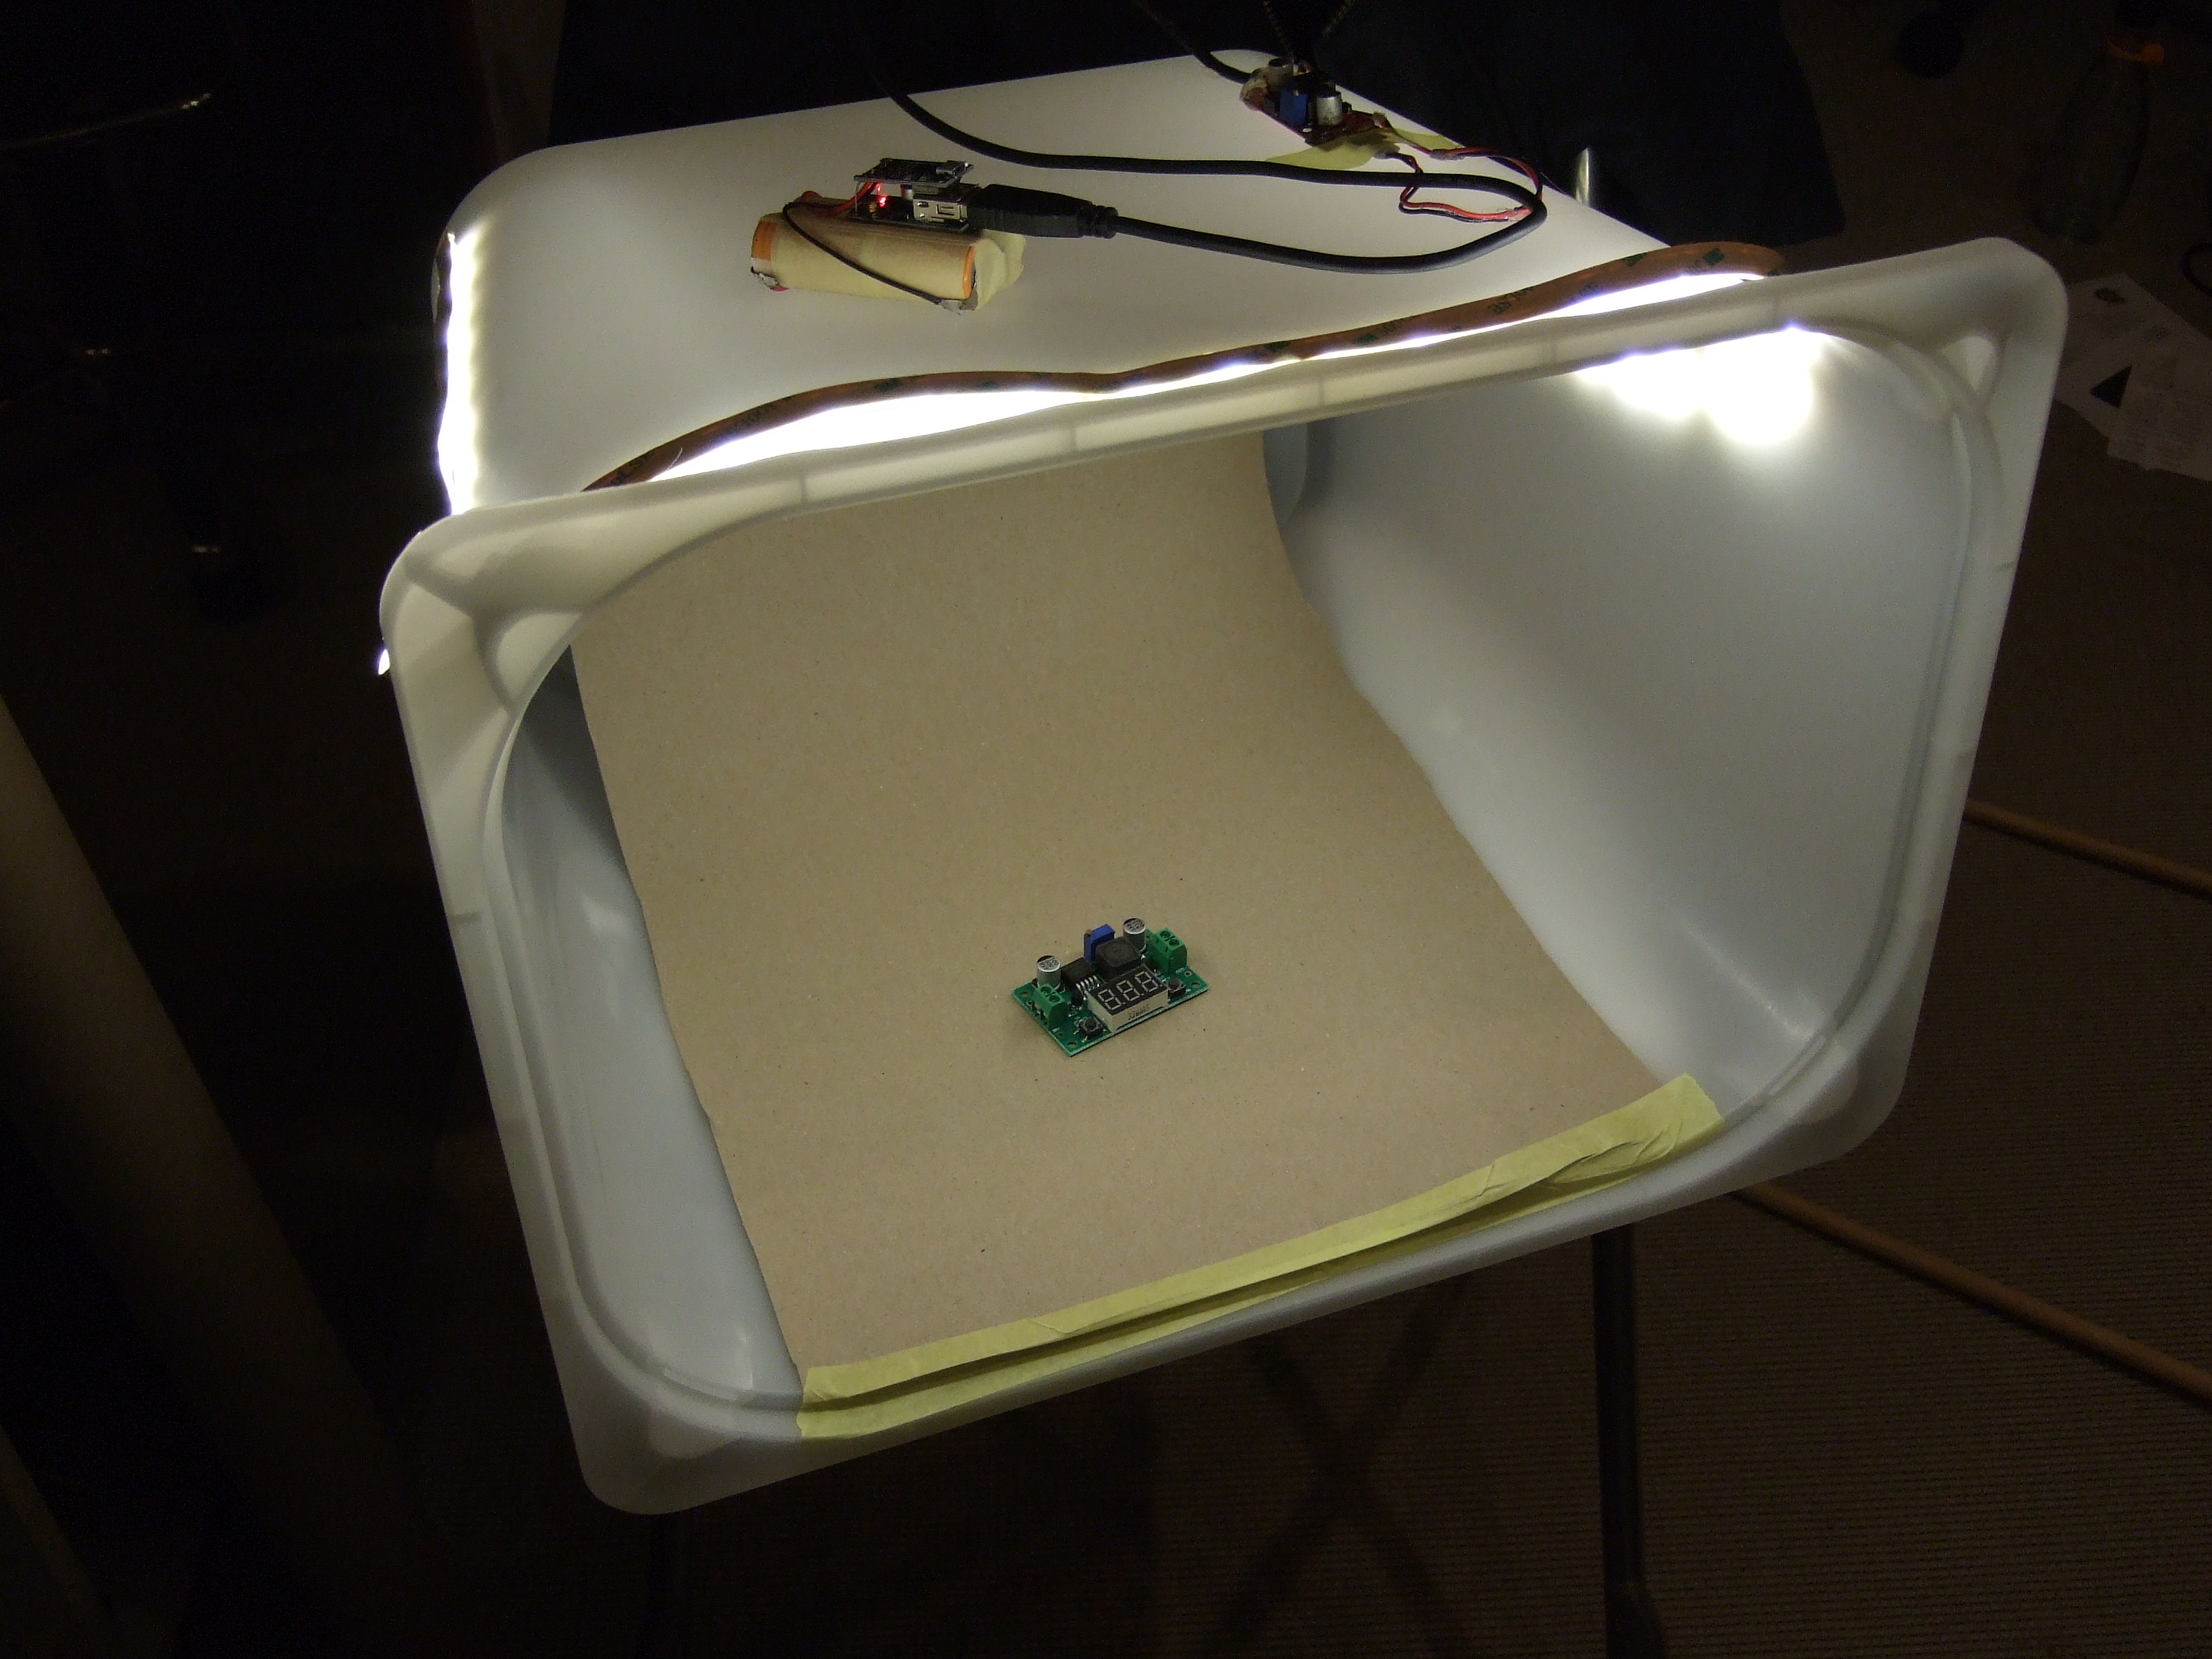 Photographer’s light boxes are also essentially diffuser cavities. We’ve shot many of our closeups in one that’s made of “vellum” art paper surrounding a wooden frame, but we recently upgraded to IKEA Trofast with optional LED lighting for nocturnal photo sessions. Most of the light coming through the translucent plastic ends up bouncing around inside, leaving very soft shadows and even illumination. It works better when driven by daylight. If you want to take this idea to the extreme, check out [Doog]’s model shooting rig. Note the clever use of underlit diffusive acrylic.
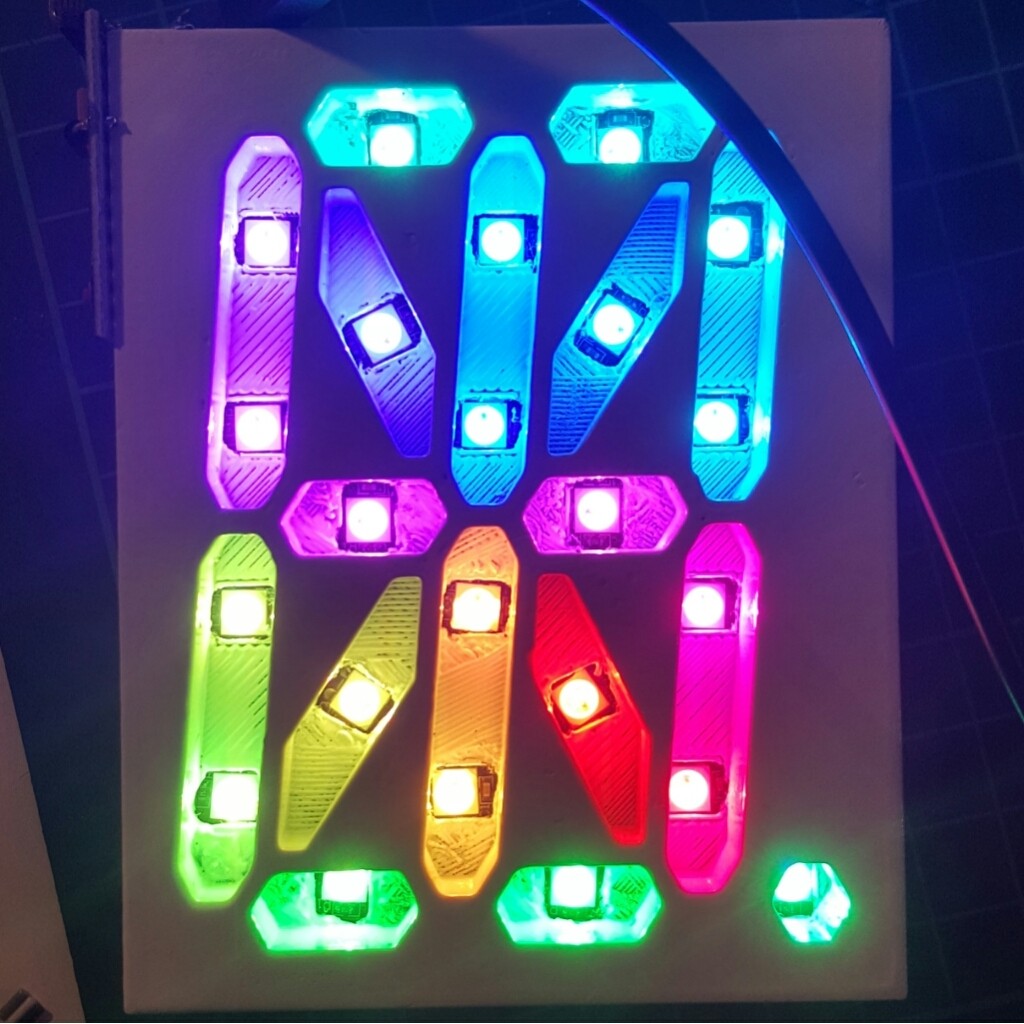 Nothing is stopping you from making interesting shapes out of the reflective cavities. Triangle-shaped reflective cells give [Micah Scott]’s “Triangle Attractor” and [Becky Stern]’s WiFi wall display their style. If triangles aren’t your thing, you can 3D-print the cavities in whatever shape you need, like these 16-segment displays.
Designing the diffusive cavity just right is an art more than a science. Generally speaking, the more reflective the walls, and the more volume they enclose, the better the color mixing is going to be. It’s definitely worth your time to experiment around with indirect illumination, where the light bounces first before leaving the box. Combining cavities with diffusive material front panels can yield some very subtle effects.


The Ask
Pshwew! That was a whirlwind tour of diffusing options, divided arbitrarily into categories of diffusive materials and cavities, with overlap. What did we miss? What’s your favorite LED diffusive effect?


I’ve had a lot of success with sheets of notebook paper being projected upon from about an inch or so away. Basically free too.
I’ve mastered the “hackery” diffusers. You can make pretty good indicator light from 5mm LED if you lop off the dome, sand that cut until it looks frosty, then use a panel-mount LED grommet (a little black plastic ring that these LEDs snap into).
I’ve done the hot-glue thing but that doesn’t look all that great. Ping-pong balls were awesome but I used water-clear LEDs which was a poor choice since they project a spot on the opposite side of the LED.
What I’ve never been great at is diffusers that look spectacular, all of my are just passable. The second half of Elliot’s article is a great collection of advice but I’ll be interested to hear more in the comments.
I’m afraid I don’t have any useful advice(except that LCD displays, whether CCFL or LED backlit, have diffuser optics that are definitely worth scavenging); but based on the LCD backlight units I’ve disassembled(typically a chunk of acrylic functioning as a lightguide, with a pattern of etched dots to direct light forward; smaller dots closer to the CCFL or LED strip, larger ones further away, presumably to keep the illumination level as even as possible; with a number of layers, usually 3+, of plastic sheets with fresnel-lens like surface patterns); I get the impression that the difference between ‘passable’ and ‘great’ involves a nontrivial amount of fiddling.
Especially in laptops, where weight and thickness are critical; manufacturers aren’t building diffuser setups of that complexity just because they like higher BoM and assembly costs. If all the functions could be folded into a single piece of plastic, even if it had to be a custom part exclusively for LCD purposes, it would be so. Since I continue to see relatively complex, multi-layer, diffusers; I can only conclude that even manufacturers who have the luxury of specifying any surface texture that can be achieved by reasonably high-volume methods, and any plastic that isn’t usuriously expensive/hideously toxic/unstable at room temperature/etc. don’t have a really elegant diffuser design stashed away.
Probably some ‘this is definitely black magic’ tricks to be done with metamaterials, visible-band waveguide nanostructures, quantum dots, and similar exotic things; but if you want something you can fabricate out of normal-ish plastic without esoteric techniques, even the professionals seem to require fairly complex diffusers to get results good enough for uniform backlighting.
That’s a really good analysis of the issue. I had a busted backlight, and hunting for the source of the problem led me very deep inside, where I was baffled by the complexity of the diffuser and its five layers or so of different materials. I tried to build a diffuser using SMT LEDs glued to the edge of a clear acrylic sheet with UV glue, wired up with the thinnest soldering I’ve ever done, and then painted with milky white acrylic paint. I failed, and rebuilt the exact same thing but with a sanded back surface.
And still failure.
Diffusion isn’t easy.
Hot Glue Hack “?”: What was it about the ‘hot glue’ hack that you didn’t like? My initial thought would be that it would be difficult to get the % of opacity dialed in to where you want it… Got me thinking… What if you added some baking soda (while the glue was still hot) to increase the amount of opacity once it hardened? Then if wasn’t enough, you could either soften it up with the hot tip or dab a little more glue and add some more powder to get it where you wanted. Just a thought.
This post has a shrouded meaning.
Seriously, I rob/use the light paths from the gear I cannibalize. Ping pong ball is going on the list now though.
Just remember that ping pong balls in high volume pose a potential fire risk, they are incredible flammable: https://www.youtube.com/watch?v=78pF-QBPc-w
We do a lot of LED diffusion at my job – some of my favorite materials have been:
1) Corian, milled to 1/8″ or thinner.
2) wood veneer laminated to glass or acrylic substrate
3) projection paint (screen goo) on glass or acrylic
4) glass that’s acid etched on one side and blasted on the other
5) Acrylite 1/8 – 1/4″ thick, Satin Ice.
All of these work great at varying distances on medium to low res LED (6mm – 30mm). The higher the pitch gets, the more critical the spacing gets.
The sand blasted glass is a good one, you can also do this by hand using a cheap diamond disk for a dremel, by rubbing circles (as if polishing) on the glass with the flat of the disk, it take a while but works well.
I’ve had some success with drafting film if you are looking for something thin. It looks better in person than it shows on the camera.
https://m.youtube.com/watch?v=FkYTBDKixZ4
Really appreciated this article, since I’m confronted with those problems on a regular basis and couldn’t, until now I guess, find any satisfactory way to do it.
My past big project with LEDs was this: http://i.imgur.com/tuqoVGu.jpg
While working on it I independently came upon the hot glue solution, however instead of working freeform like that instructible I’ve mostly used it to create illuminated panels. The v1 solution was embedding waterclear 10mm LEDs in a side-firing orientation in the main panel, however that caused shadow problems ( most visible here http://i.imgur.com/xPYAhMK.jpg )
After that was finished I spent some more time playing around and came up with this version using LED tape: https://chirishmanprojects.tumblr.com/post/81867709398/ive-been-working-lately-on-a-more-simple-method
The main goal for me here was to build something that would read correctly in photographs taken during the day, where most solutions that I had seen (and still see) in costumes only really look their best in a dim environment.
If anyone is interested, this is the build log on that suit which I made with a friend http://m.imgur.com/a/wfemA
Forgot to add the details, here’s the v1 method: http://i.imgur.com/5ubh7Tf.jpg
The v2 is very similar but involves cutting out a recess in the sides leaving a lip on the front and then applying thr LED tape on the inner surface of the hole before filling with hot glue, this way all wires are outside of the light panel and cannot cast shadows.
Home Depot diffusers for fluorescent lights have worked for me. They are large and relatively inexpensive.
There is a spray you can apply to glass that makes it frosty. Works quite nice but it is a bit hard to put homogeneously.
The need for caution should go without saying; but hydrofluoric acid-based etchants are also great for frosting glass, since that is one of the few that can actually attack the stuff well enough to etch it.
The liquid variants are good for relatively homogenous results; the thickened ones are easier to apply selectively(you can also use a resist to control the etching, if you need especially precise control of the pattern).
Chemically nastier than abrasive etching/frosting; but doesn’t require much in the way of equipment, doesn’t produce lovely tiny silica dust(silicosis is a bad, bad, way to go; don’t test your luck); and isn’t just a coating on top of the glass, so relatively impervious to anything except further damage to the glass itself.
Sanding or sandblasting requires the appropriate hardware; and dust protection and control; but doesn’t involve the zesty fluorine compounds.
There are also paints that simply simulate the look of etched glass, without being as nasty.
Sign makers use vinyl frosting for quick glass sandblased look, ask for offcuts for hobbying, they often happy to throw some your way.
Teflon sheets are great diffusers and come in various thickness that you can experiment with.
I use them on indecent lights and are really good, as a bonus you don’t have to worry about them catching melting or on fire!
“indecent lights” that’s a new one on me :-)
Same company that started making ‘X-Ray Specs’ back in the 50’s.
Aren’t they those red ones they have lighting up the shop fronts in Amsterdam?
…so I’ve heard. Ahem.
Isn’t it weird how you can get power resistors in transparent glass packages? It’s nice how those models are usually rated for very high operating temperatures; but why would somebody want to look at a boring passive like a resistor, especially when the normal ceramic ones are more durable?
Indecent lights! Shame on them!
Thank you for covering them up so we don’t have to see them!
B^)
+1 lol.
Going to try out some Teflon tape, thanks [chris].
the fact i had to google it first to make sure that the word is correct doesn’t help :)
Flat screens are hitting the curb now. They have excellent diffusers behind the LCD panel. Forget plasma. The package may be a good housing for your project. Recycle! There is a separate layer that diffuses light only in a forward direction instead of just 180 degrees, send more light where you want it.
UV cure nail varnish. Worked for me, the “secret sauce” is gel base & top coat from the Boots kit.
I tried this on some WS2812’s and it set up just with the blue set to 100% for 15-20 minutes.
Variant of this is to mix in some salvaged fround up yellow phosphor from defective LED lamps with bad blue emitters,
depending on manufacturer some can be scraped off with ease.
Intriguingly I had this idea to make my own UV to IR phosphorescent material thanks to some folks publishing the recipe on the Internet, see http://aip.scitation.org/doi/abs/10.1063/1.3097381?journalCode=jap also http://spectrum.ieee.org/energywise/energy/renewables/solar-cells-could-capture-infrared-rays-for-more-power
I plan to try crumpled-up bubble wrap next time…
Explain the Panzer as a diffusor?
Haha, that threw me too. It’s a demonstration of a lightbox with an object inside.
I think it was used to diffuse the allied forces in WW2,
Inkjet pcb paper works great too :)
Mount the LED so it is facing backwards towards a reflective surface like crumpled-up aluminum foil and smooth it out flat or make it concave (like a photography flash umbrella). Cover that with a opaque polymer of some type for a pleasing external appearance.
For my application (custom word clocks) I’ve found that two sheets of baking paper between the stencil and the cavity works perfectly
I’ve been using the diffuser out of some old lcds. Its really sturdy frosted plastic. Made a nice photography light box with it too. http://imgur.com/TCqA4Ax
Which project was the “Colossus in Action” pic taken from ?
You’re not going to like this: Colossus. It’s about halfway down in the diffusers section, right next to the foamcore grid picture in the body text.
Just what I was looking for. ( adjusting glasses )
Like some of you said, backlight of lcd screen it’s a good source of inspiration.
More than diffuser the interesting point is spreading evenly the light on large surface with led only on the edge of the shape, all that with a very thin thickness. Normally they use a special kind of Fresnel lens but I have found a lot with normal acrylic raster with a special pattern.
The pattern look like half-tone, small dot with space between them close to the light and bigger dots closer together as you approach the centre.
Because rastering take time I have found that if you engrave vector line (a lot faster on a laser cutter) with space between them close to the edge and less and less as you approach to the centre that work great.
An picture is always better than words… http://imgur.com/a/PzWVy
Add a layer of diffuser on top and you have a beautiful large and very thin area of light.
The tricky part is to found the right ration with power of the light and quantity of line…
candlepower forums has many discussions on diffusers with lots of testing with light level sensors. all sciencey.
A white polyethylene cutting board cuts up nicely into very cheap and effective diffusers; you can cut them with a jigsaw or circular saw, but you have to move the work slowly to avoid melting the low density PE.
From a rackmount product of mine with front panel LEDs: I had the RGB LEDs mounted on a vertical PCB shining through circular holes on the relatively thick aluminium fascia. Refections from the (unpainted) inside of the holes were sufficient to diffuse the light.
My goal had more to do with the viewing angle (which is really important for rackmount equipment) rather than the colour mix though.
White plastidip spray, but it rubs off easy
White cotton fabric, like a tshirt
(h/l)dpe sheets
I’m currently working with quartz rock. Going to make an awesome lamp.
Tracing/draft paper. The thicker the better. Also 3M will provide samples of many types of diffusers they make for LCD’s.
As with all diffusers, they will, by their nature, reflect back much of the light – because they are designed to scatter light in all directions. This is where a diffuse, white, reflector cavity comes into its own. The light can bounce around inside the cavity and completely randomise. It is pretty much the only way to get ‘even’ colour mixing.
As mentioned, broken LCD screens from laptops (ebay job-lot anyone?) will provide several sheets of diffusers, prismatic film (which narrows the viewing angle in a given plane) high efficiency reflectors and foil. Handy for one-off projects.
The actual black-light ‘light-pipe’ is sometimes called a diffuser, but it isn’t. It is designed to allow light from the edge to be bounced around inside it, until it hits etched or moulded marks on the back, which scatter the light and allow it to escape. So it becomes a sheet of light ‘dots’, which the diffuser then averages to make a very thin backlight.
I know it’s not the “hacky” way to do things, but if you’re going for an easy, quality solution, you really can’t go wrong with theatrical diffusion gels, which are thin, flexible, usually tinted sheets of polycarbonate. “Frost” gels are what you’d normally think of using for diffusion, whereas “silk” gels have a pronounced, pseudo-random grain to them (rather like silk), and both come in a range of strengths-of-diffusion, for lack of a better term. They are fairly inexpensive, withstand high temperatures, are easy to cut, and are very reusable. Personally, I use Rosco brand, but that’s mostly because I can salvage the otherwise-garbage off-cuts from the sheets we buy at work.
If I have two optical diffusers separated at distance X giving a diffusion factor of Y will 2X give me 2Y or a greater value? Is there some value in using very thin diffusers arranged in layers rather than bulk material that could attenuate light as well as diffuse it?
For a *really* uniform light field, you can use a light integrating sphere. Works very well for colour mixing as well.
The one I built is described here: http://www.ee.ryerson.ca/~phiscock/
in the ‘astronomy’ section. Or search for ‘Integrating Sphere for Luminance Calibration’, Hiscocks.
Peter
This was done with “frosted privacy window film”. Its available at home depot and comes in rolls that you apply to glass/plastic with water. Cheap and emulates the effect of a sandblast/etch.
https://www.youtube.com/watch?v=5Jfv1JN32Y8
Translucent silicone caulking is something I have used to good effect.
I used to do small sculpture shoots with a sheet of fiberglass cloth stretched over a frame on a work light. You can pick up a square yard of it under the bondo brand at an automotive store or much heavier versions at boat supply shops and online. Among the examples given in the article, its the only material that 1. Requires no finishing to make it uniform 2. Colorless and 3. Able to withstand the searing heat of a studio light without discoloring or burning.
We had fun diffusing with LEGO here in the UK (not LEGOs!) :) The Unary Clock project demonstrates both reflective cavities (the holes in technic lego) and diffusers (using those little round 1×1 LEGO plate things). To improve diffusing we dropped in a4 office paper from a hole punch… http://hackaday.com/2016/05/14/unary-clock-for-the-binary-challenged/
I’ve had some good results with white shower curtains. Pretty obvious that they’re made to diffuse.
The honest to truth best way to diffuse an LED, or any light source for that matter, is distance. A frosted/diffuse material will work wonders to help spread the light out in different directions but the greater the distance the LED is from the diffuse material, the better the effect. It greatly diminishes spotlighting.That’s why bouncing a flash off the ceiling in a room when shooting photos makes everything so soft. The greater the distance a ray of light has to pass, the greater it mixes with fellow rays (unless we are talking about lasers). So, either a thick diffuser or distance from the diffuser.
I’ve used packaging material from boards as a diffuser with reasonable results:
http://img.weiku.com/waterpicture/2011/11/2/4/White_EPE_Anti_Static_Plastic_Packaging_Foam_634562650938215361_4.jpg
Stick on “clear” rubber feet (mostly a bit milky or frosted)
Dow Corning 732 white silicone
1/16″ white Delrin
Or just hit your cornea woth some 600-grit wet-dry, then everything is nicely diffused!
I’m a motion picture lighting tech and we use an unthinkable array of materials to diffuse light. One of the more important aspects beyond the material itself is the distance from the source to the diffusion. With zero distance the diffuser does nothing to increase the size of light and just scatters the light and thus reduces the amount that reaches the subject. Putting the diffuser farther away makes it far more effective without reducing output as much as using a “heavier” diffusion.
One (kind of crappy) method I’ve used in the past, for small diffusers, is to cut the top surface out of a plastic bottle cap. I *think* the ones I had used were basically textured polypropylene.
Matte presentation transparency printer film for overhead projectors is also useful, especially if you use the inkjet compatible film and print in colors. Matte Vynil film and (if you have one) a cheap Vinyl cutter can make some interesting LED diffuser patterns. Ping-pong balls are useful for RGB LED lamps, especially the “dumb” ones with only three LEDS (this becomes an experiment in Human color-balance perception). Finger-nail “polishing sticks” are useful for changing clear LEDs into diffuse LEDs. Transparent acrylic sheets of various thickness can be edge-lit with LEDs and become a semi-uniform backlight (or forelight-mask if you put a printed pattern on it. Acrylic sheets can also be edge-lit and scored to illuminate lines and patterns. There are numerous over-priced “analog” LED clock kits that use this technique. On and on…
Pieces of milk jug would probably work….. you can saw two slits and bend a piece over the top of a row of lights.
A white cap from a 2-liter bottle might make a decent and cheap cavity.
I also found ping pong balls to be excellent diffusers for full-size LEDs!
Here’s a holiday wreath I did using them: https://www.youtube.com/watch?v=MjPOFIJPyIw
This is using 12mm addressable LED pixels but will also work for regular LEDs.
Here’s the build log: http://www.sector67.org/blog/2012/led-holiday-wreath-build/
I was recently faced with the issue of diffusing the light from ws2812 for a wedding prop I was building. I was enclosing the LEDs in epoxy but it look so ugly when you see the light source. I tried wax paper and it worked ok but I couldn’t space it far enough to make it really great. A cosplayer friend of mine suggested to use multiple layer of frosted scotch tape. It did seem to work but what ended up doing was mix white spray paint in my epoxy and it turned out great. You can check it out on my blog but like many things, it does look much better in person.
http://www.dbwbp.com/index.php/10-electronic-projects/36-animated-led-weddings-initials-ws2812b
Great article, love all the examples!
This is a long post, so summary for the tl;dr crowd: 1) Matching coloured filters and diffusers can increase intensity and make LED displays more visible in bright areas. If you’re already 3D printing, moulding or laser-cutting, try using a different coloured material to enhance your LED’s effect, and 2) Clear lens non-diffused turn-signal indicators are dangerous yet feature on all new cars for unknown reasons (which I hope somebody can shed some light on). /tl;dr
From the age of five I built electronic kits, and many of my kits incorporated 7-segment LED displays. I always used red Cellophane in front of the red LEDs and green in front of the green displays so they were easily visible outside.This filter also helps blend the segments together, making the gaps slightly less visible. I was lucky enough to have been gifted Dick Smith’s Fun Way into Electronics Volumes 1-3 (Dick Smith Electronics was Australia’s answer to Radio Shack) which explained how to glue the filter inside your project box. These days I see many enthusiasts laser-cutting beautiful Perspex cases yet then cripple their projects by not facing their alphanumeric LED displays with a suitably coloured filter. They probably weren’t aware of how effective it can be. A suggestion is to use clear Perspex for the side panels, then suitably coloured Perspex (matching your display colour) for the front panel. If single LEDs are placed behind translucent material, using material that is already tinted the same colour as your LED can enhance the effect, particularly in well-lit areas. I can’t pretend to understand the physics of why adding a red filter makes red LEDs more prominent, but assume it absorbs other wavelengths and prevents them from being reflected, only allowing through the wavelength you want to see. As filters are never perfect I’m sure some diffusion is also involved. I’d love to see an article about colour filters to complement this awesome article!
Now for the bad news – unfortunately, the majority of new cars use clear lenses with no diffusers on their turn-signal indicators, which terrifies me. The design is extremely dangerous for multiple reasons, yet seems to have become the norm. Some examples:
1) Clear-lens indicators are nearly invisible in bright sunlight, as the sun completely swamps the tiny LED source. Amber lenses prevent this as sunlight cannot enter the cavity, so the turn-signal will only glow amber if it is internally lit. Without the filter, the cavity’s mirror reflects ALL wavelengths instead of just amber. The viewer is left trying to spot only the amber wavelengths after being mixed with full-spectrum sunlight. Last I heard, humans did not evolve prisms inside our eyes.
2) At certain angles sunlight or even another car’s headlight beam can enter the turn-signal housing which makes the entire cavity glow, so the indicator glows yet the flashing LED inside is invisible. Again, amber lenses prevent this as external light cannot enter the cavity.
3) Non-diffused cavities mean the LED appears as a bright spot somewhere inside the cavity, which moves around and changes intensity depending on the viewing angle. As cars by their very nature move, it becomes very difficult to differentiate a tiny inconsistent dot of yellow light from everyday passing reflections. Simply moving your head from side to side can change the intensity.
4) LEDs have a very narrow beam so they can be blindingly bright from the front yet almost invisible from above, below or the side. A car nearly hit me when I walked across a road in front of it because its turn-signal was invisible to a standing adult. After I’d jumped out of the way and the car skidded to a halt I bent down to catch my breath, and noticed that the turn-signal was in fact flashing but was only visible to somebody less than around a metre high. The driver jumped out to yell at me but was very understanding after I demonstrated the problem. He realised that he should take extra care around pedestrians, as his “indicators” are not fit for purpose. Old style diffused amber turn-signals never had this problem.
5) Some rear turn-signals are at eye level to the car behind and are so bright they leave dazzling after-images in my eyes which take a few minutes to clear, which impairs my vision at night. A diffuser would negate this effect.
6) Clear turn-signals mounted on side mirrors sometimes act as a mirror themselves and simply appear to be a reflection of sunlight from the edge of the car’s bodywork instead of a prominent safety device. Again, amber lenses prevent this.
7) Many cars mount the front turn-signal indicator inside the clear headlight assembly, so if the headlight is turned on the indicator can only be seen if you stare directly into the headlight.
8) Some cars use what appears to be a thin strip of LEDs mounted at the bottom of a deep horizontal channel for their turn-signals (the internals look similar to a single row from Maniacal Labs’ “Colossus” project after the foamcore dividers are added, but with no diffuser.) This further reduces the viewing angle, as the edge of the channel blocks any light between the LED source and the viewer’s eye. The LEDs also appear as a row of – to quote your article – “tiny, blinding points of light” instead of a single light source. An amber diffuser which refracts light would solve this.
The only reason I can think of for this trend is that car manufacturers deliberately want to cause more crashes, so they can sell more cars and spare parts. I did consider fashion, but as the “fashion police” haven’t yet made clear tail lights or brake lights mandatory, had to rule it out. I can’t comprehend how anybody would think clear non-diffused lenses were a good idea for safety devices. If hobbyists working on LED projects in their spare time can work this out, why can’t professional automobile engineers? /rant
Thanks again for the inspiring article, and look forward to reading about why I’m completely wrong about clear non-diffused turn-signals. ;) I really would like to hear what other people think about this.
The current state of LED indicators on newer vehicles drives me crazy as well. At least they seem to be slowly making the LED headlights less blinding to other drivers, but those turn signals are still whacked.
Ohh, and what’s up with everything being blue on the dashboard in newer models!?
All DIY solutions suck and are expensive compared to the real deal!
Companies like http://www.luminitco.com/ make holographic diffusers using a roll-roll process (cheap) that is infinitely better than any hacked technique you’ll struggle with above. It’s the process used for LCD backlight optics.
What’s even better is they can actually be tuned to steer the light like a lens in addition to diffusing it!
My company buys in bulk at <$0.20 per square foot, but no reason why someone couldn't do a group buy thing here though. Maybe HaD could sell it on their website?
Let me see if I understand what you just said:
I’m a salesman for my company and will sell large quantities to anyone who will help the unwashed masses,
but I won’t.
Does that sum it up ?
Um, no – he doesn’t work for Luminit, his employer buys from them.
I’m working on a project for which I need to diffuse some LEDs, so this is a very timely article!
I had been planning on using polymorph as a diffuser; it seems to be about the right translucency, and I can use cookie cutters to shape it! One worry I have though is that it may be hard to get the thickness consistent.
Has anyone had any experience with this?
Hmm… I’m looking to do a filter for some LED displays, but I’m kinda going for the opposite effect. Rather than diffuse, I’m looking to obscure the LED entirely when unlit, but shine through clearly when lit. I’m not entirely sure what to even search for. Ideally, I’m looking for a material that is neutral grey, possibly slightly metallic. A gold hue is acceptable for the application. primary light passed through would be green, however a few other colors would be present.
I know such a thing is possible, as some of the displays were salvaged from a video effects controller, and I initially didn’t even REALIZE there were displays… The screen printed plastic top panel obscured the displays when they were unlit. That’s what I’m trying to mimic, but I need a much larger window. I’m unsure of the materials I need to find.
To specifically give an idea of the effect I’m after, I’m building a Kerbal Space Program instrument panel, with heavy inspiration from the instrument panels from the Apollo program, and I’m trying to create a digital readout that is visually similar (though not identical) to the DSKY.
I think cheapo fiber-optics would be an excellent fit. Tiny points of light behind some thin diffusing plastic.
That’s a whole lot of added complexity for something already assembled with traditional segmented displays. The only thing I’m missing is the filter itself. As I said, I’ve seen it done simply on the video effects board I salvaged, with nothing more than a sheet of plastic… I just don’t know what type of plastic I need to actually search for. It appears grey in color, and masks the displays VERY well… I honestly didn’t realize they were there till I tore it open. The camera flash does highlight some of the display windows, so clearly, they have a different texture. I have no idea if I can strip the plastic off the effects enclosure, and possibly use a solvent to take off the screen printing, but I’m also not sure any areas are even remotely big enough to cover the display area I’m using.
http://i.imgur.com/ahWl2pw.jpg
*(If the image doesn’t embed, then it should still be clickable… I’ve had issues with some imgur links on HaD)
The video effects board has twelve separate displays, one being a long display. The angle of the camera flash makes some of these stand out, but in person, I honestly didn’t even realize there even were green dot matrix displays on this device at all! there are four that obviously stand out against the flash angle below the encoders in the top left, one above the trackball, four int he fader lever section, two in the bottom right corner, and the long display is actually right below the trackball, between he EXTRA label and the setup buttons.
This is the material I’m trying to find. It’s dark, uniform, and very well conceals the displays beneath them, but it also allows the displays to clearly and precisely illuminate through. I need a sheet about 5×7 inches in size, and there is simply no continuous area I can salvage from that panel that is that size, that that’s not an option.
When I shine a light through the windows, I can make out objects even a few inches behind, with just a little softness around the edges, so very little diffusion is occurring. They simply obscure anything not illuminated. Obviously, if you shine a light directly at the window, it reflects back on what’s behind it, but under normal ambient lighting, the material practically makes the displays invisible. Light shining through the material has a “smokey” look. White light going through it tends to look “warmer” as it shines through.
I pulled the old digital effects controller out of my back room and cut a piece of the plastic out. From what I can tell, it’s perfectly smooth on the back side, slightly textured on the top. It does have some very light diffusing effects. If I pull the plastic away from the LED, it gives it a soft edge, and creates a general area glow, but the digits are still pretty clear up close.
I think my best bet might be to take the sample to a sign shop, and see if they have something similar that they use for screen printing.
…
That said… I HAVE stumped them on materials before! It’s a fun game! XD
Cool! That board is way larger that what I had imagined.
Yeah, I’m not quite sure exactly what material I’m dealing with, but I think it’s nothing more than a tinted material with a textured matte finish on the surface, and a smooth gloss finish on the surface toward the display. There is only a TINY amount of diffusion happening.
Since it appears I’m dealing with tinted material, I decided to just order some window tint film. I ordered a mirror finish gold tint, and some plain grey tint. I want to see how it looks with the grey over the gold “mirror” finish tint. Will I be able to see the gold tint? will the mirror finish look right underneath grey? Who knows. Free Amazon shipping takes too long! LOL
If the effect of the mild diffusion matters, I could try lightly sanding the surface of some transparent film sheets, and sandwich it under or between tinted film layers. This is really all very experimental.
On the offchance that you see this years later: Had this exact constraint on a project, we used this stuff: https://www.tapplastics.com/product/plastics/cut_to_size_plastic/black_led_sheet/668 which worked beautifully.
That same manufacturer (chemcast) appears to make white & black varieties of the same stuff, it’s effectively totally opaque unless there’s a light behind it.
Hey guys,
does anybody of you have an idea how to get a diffusor layer on a transparent silicone body? I would like to illuminate a body which is a bit flexible (therefore Silicone could work) but it should look like the light is coming from the surface, so i need a diffusor layer on top of the body.
Any ideas are highly appreciated :)