The year was 2014, and KORG’s volca line of pint-sized synthesizers were the latest craze in the music world. Cheap synths and drum machines were suddenly a reality, all in a backpack-friendly form factor. Now practically anyone could become an electronic music sensation!
I attended a jam with friends from my record label, and as was the style at the time, we all showed up with our latest and greatest gear. There was the microKORG, a MiniNova, and a couple of guitars, but all attention was on the volcas, which were just so much fun to pick up and play with.
There was just one problem. Like any game-changing low-cost hardware, sacrifices had been made. The volcas used 3.5mm jacks for audio and sync pulses, and the initial lineup came with a bassline, lead, and drum synth. Syncing was easy, by daisy chaining cables between the boxes, but if you wanted to record or mix, you’d generally need to stack adapters to get your signals in a more typical 6.5mm TS format used by other music hardware.
After mucking around, I did some research on what other people were doing. Most were suffering just like we were, trying to patch these little machines into full-sized mixing desks. It seemed like overkill — when you just want to muck around, it’s a bit much to drag out a 24 channel powered mixer. I wanted a way to hook up 3 of these machines to a single set of headphones and just groove out.
To solve this problem, we needed a mixer to match the philosophy of the volcas; simple, accessible, and compact. It didn’t need to be gold-plated or capable of amazing sonic feats, it just had to take a few 3.5mm audio sources, and mix them down for a pair of headphones.
I’d heard of people using headphone splitters with mixed results, and it got me thinking about passive mixing. Suddenly it all seemed so clear — I could probably get away with a bunch of potentiometers and some passives and call it a day! With a friend desperate to get their hands on a solution, I decided to mock up a prototype and took it round to the studio to try out.
The First gMIX
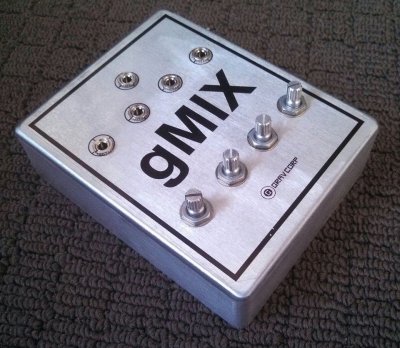
Right away, it was a success. I wired up four inputs through four pots to a single output for headphones. Hook up anything from a micro-synth to an iPod and you could mix away and jam to your heart’s content. I was running an electronics company called Grav Corp at the time, so I dubbed the device “gMIX”. Creative, I know.
At this point I realised that with the success of the volca line, it was likely that more than just my friends could benefit from this device. With the hardware being little more than pots and connectors, I figured I could probably make these fairly cheaply and have a great market to tap into.
The next step was research, which I consider to be a major cornerstone of the design process. The prototype was hand wired, and in a huge case. This was overkill for the intended use and took a long time to make. I needed to optimise the device for size and cost of manufacture. I spent many hours behind the computer screen considering each and every kind of stereo potentiometer and stereo connector I could lay my hands on for a reasonable price. I also knew I didn’t want to sit around soldering these up myself, so I investigated ways of getting them manufactured, too.
Recognizing Good Ideas from Other Products
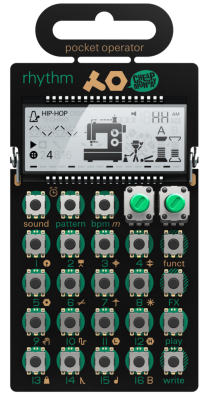
By this point, it was January 2015, and Teenage Engineering launched the Pocket Operator series of compact synthesizers. This was perfect timing — micro-synths were taking off, and all their users were potential customers for the gMIX. What’s more, I found inspiration.
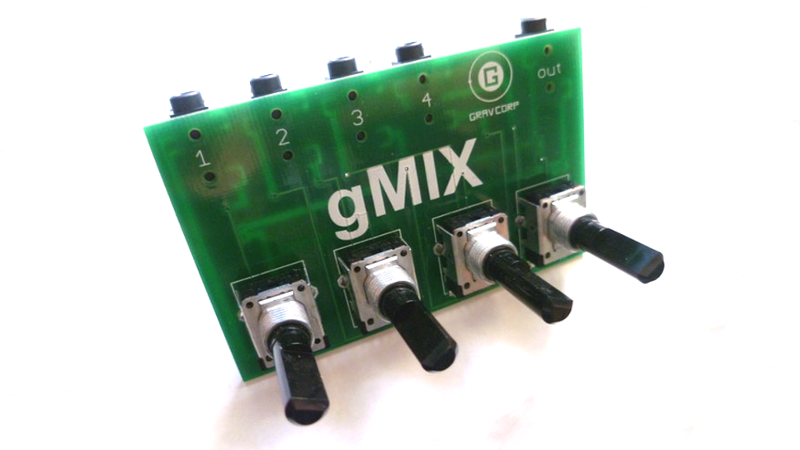
The Pocket Operator line of synths are constructed without an enclosure. Components are soldered straight to the PCB, which even includes a hook to hang the synth on a sales rack. It was a stroke of genius that gave Teenage Engineering a unique aesthetic and a way to bring a synth to market at a frankly ridiculous US $59 price point. It also showed me the way forward.
Looking at their success I realised I could build the gMIX as a bare PCB, saving the cost of an expensive enclosure. With this in mind, I began to hunt for a company that could manufacture small-run products at an affordable cost. Once I found one, I started to use their list of preferred suppliers to guide my hunt for components.
I chose surface mount resistors and audio jacks as it’s much cheaper than paying for the labor of through hole assembly. I then settled on Phillips potentiometers, for their perceived quality and the fact that they could be pressed into the board and then soldered. This would mean the potentiometers would self-align to holes cut in the PCB, which avoided having to rely on the assembly technicians to position the pots perfectly straight.
Getting Their Attention
I was ready to go ahead with production. Because it was in vogue, and because it reduced the need for a major capital investment, I decided to take a crowdfunding approach, starting a Kickstarter campaign. After promoting it online through my friends and business associates, a thought then clicked in my mind. This product wasn’t just useful to volca users. I had recently begun to mix in the Australian chiptune scene, and they were heavy users of the Nintendo Game Boy in their composition and live performances. Like the volca, this relied on a 3.5mm stereo output jack, which can be quite a headache to use in a stage environment.
A product only succeeds if you can get it into the hands of people who want to use it. Perhaps the greatest master stroke that got the gMIX into production was that I shared my Kickstarter with an international chiptunes group, where it gained a huge amount of attention overnight. Following this, I then sent off a press release to every music hardware blog I could possibly find. This is where I saw a contrast; chiptune users saw a cool product that solved a problem they’d been having for ages. Volca users were typically new to electronic music and seemed to feel quite the same way. Conversely, the rusted on gearheads at the music blogs were deeply offended at the idea of paying $35 AUD and up for “just a passive mixer”.
The age old cry went out – “I can build that at home for $5!”
This was something I fully expected. The curmudgeonly are right — it is possible to build a passive mixer very cheaply, particularly if one has plenty of old audio hardware lying around as scrap. However, it isn’t really possible to sell a nicely designed and integrated mixer, made with high-quality pots & connectors, and ship it all over the world, for $5. Well, at least not when your initial production run is less than 200 units and you’re based out of Australia.
In the end, however, the fans won the day. The simple fact was that while $35 might feel a little spendy for what is a very simple product, there wasn’t a better way to do it cheaper at the time. I shifted many more units than I expected, and learned a lot in the process, like how to work with an overseas production house, and how to promote a product to the media.
Logistics are Tricky
The best part was seeing the gMIX out in the wild, and shipping hardware all over the world. The worst part was trying to understand Swiss and Turkish addresses well enough to get the products to their far-flung destinations. It was a successful product that filled a market niche, and while it was only on sale for a short period, it brought in a healthy profit, too. While Grav Corp is no longer trading, the gMIX did its job, and has since been followed by a cavalcade of products by other companies, all competing to be the groovebox mixing champion. Overall, it was a fantastic learning experience and one that made me a tidy profit, to boot. Plus, I’ve always got a pocket mixer handy for those surprise jam sessions.
I highly recommend that anyone kicking around for a project in their spare time consider designing a commercial product. It’s a lot of work, but the skills can serve you well for years to come. You need to make yourself an expert in the field your product will fill. What people want, what they actually need, and what is already out there — these are questions you have to answer when getting ready to pull the trigger. Successfully connecting with user, funding the production run, and actually seeing the process through to fill all of your orders is a roller coaster in itself. My one warning: be prepared to spend a lot of time at the post office.


I ended up going with the Rolls passive mixer. Kudos on wading the waters :)
Rolls is like Hammond : old company with no innovation or future.
I opted for Pokket Mixer, a German made slick passive mixer, perfect for improvised parties!
It’s jacks and pots, how crazy can it be lol?
I have to agree, I own no other Rolls gear.
Cool! I wanna learn more about how to build analogue synth stuff.
http://musicfromouterspace.com/
https://www.amazon.com/Make-Analog-Synthesizers-Electronic-Synth-DIY/dp/1449345220
I would have left the pots off and just used mixing resistors, or even add some means of stereo channel assignment. Why no pots in a mixer? Redundant controls are always a pain as there is a right way and lots of wrong ways to set them.
There is already an output volume control on virtually every piece of gear. Yeah, theyr’e not in one place but at each piece of gear. KISS.
Yeah, I would have thought being able to adjust left and right channel volume for each input would be better. For people who want the bassline slightly to the right?
The passive mixer is actually taking a weighted average of all the inputs, and the weights are dependent on all the impedances in the input side of the circuit, which differ, so one device might be really loud while another is barely audible. One device might be designed to drive 38 ohm headphones, while another is designed to output line level signals and has kilo-ohms of output impedance – it can barely drive earbuds without distortion. Naturally when you add this impedance in series with your fixed resistors inside the mixer, it’s going to skew the result heavily to the device with the stronger output amplifier.
Hence why you need the pots to balance things out – so that when you set equal volume in each device, they all play equally loud at the output, or however loud you want the maximum to be, so you can “open” the sound to the desired level by turning the volume knob to 100% in the actual device.
If kilo ohm resistors are used in the mixer, the device with low impedance output will have to be turned down about 6 dB relative to the others. Doable. Not much for a volume control about 80dB. You would not even notice this. KISS!
Yes you would notice. -3 dB is half the intensity, and -6 dB is half of half. While the ear has a logarithmic sensitivity, you’ll still note a 6 db difference between your instruments, because one pad or synth etc. just pops out like a sore thumb while the other falls in the background.
Part of the problem is auditory masking, because the stronger source masks the weaker source as heard by the person.
The other point being that when you want to bring your instruments in by opening the volume, you want to get them at pre-set levels instead of tweaking 1/13th turn differences in the volume knobs – so you pre-set them at the mixer.
KISS!
https://www.youtube.com/watch?v=uCnsw9oRDsM
-1 dB is the smallest perceptible difference in laboratory conditions
-3 dB is the smallest perceptible difference under normal conditions
-5 dB is clearly percieved
-10 dB is halving the subjective sound level
So if the disrepancy of two sound sources is between -5 … -10 dB, that’s a pretty bad match, and exactly why the potentiometers are needed.
https://www.amazon.com/Make-Analog-Synthesizers-Electronic-Synth-DIY/
Please delete mods
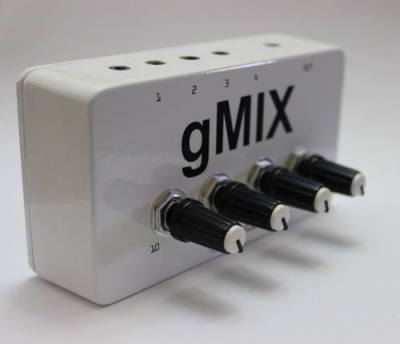
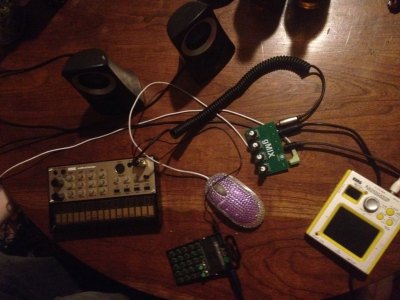
“A US-based gMIX customer sent this photo plugged into a Volca Keys, a Pocket Operator, and a Kaoss Pad.”
Actually, the yellow/silver thingy in the picture is the Kaossilator, not the (mini) Kaoss Pad.
Great article!
Having done a small-scale home-commercial electronics project before, dealing with order fulfillment was far and away the least fun part. I ended up spending inordinate time just printing out packing slips, stuffing and weighing padded envelopes, filling customs declarations and dealing with weird country-specific postal issues (and of course hauling orders a few-at-a-time to the post office). Small projects like the one in this article are often in a weird place volumes-wise where more formal order fulfillment services with large monthly membership fees or stock requirements don’t make sense, and this is also the one major thing even Tindie punts on. Dealing with this end of small commercial electronics projects more efficiently (or companies that handle this for you at those volumes) might make for a great follow-up article (hint hint).
Hear, hear!
Though, I do enjoy the fulfillment part. For me it’s a nice balance to the brainy side of development work. And after a bit of preparation and a lot of practice, it takes me less than 5 minutes per order.
That being said, Fulfillment by Tindie would be a cool service. But I can see how that gets impractical quickly, especially for international orders.
I’d totally write that followup article if I had actually found an efficient way to handle it. :P
Thanks for reading! What did you make?
This was an open-source redesign of the Rez trance vibrator (http://tim.cexx.org/projects/vibe/resource.htm). There were some ~400 sold before I decided my day job pays plenty well enough and stuffing envelopes at night on top of the usual issues (tech support, part obsolescence, etc.) wasn’t fun anymore. I had looked around for a suitable fulfillment path other than wrestling with Paypal and its printable-postage Java app that never worked, but didn’t find anything at the time. I haven’t searched again lately, but maybe that has changed!
Thanks for the article – have a fair idea of what the circuit must be like but is there a diagram available where I can check my assumptions?