You Can Use A Crappy Mixer As A Neat Synthesizer

[Simon the Magpie] found himself in possession of a Behringer mixer that turned up in someone’s garbage. They’re not always the most well-regarded mixers, but [Simon] saw an opportunity to do something a bit different with it. He decided to show us all how you can use a mixer as a synthesizer.

[Simon] actually picked up the “no-input” technique from [Andreij Rublev] and decided to try it out on his own equipment. The basic idea is to use feedback through the mixer to generate tones. To create a feedback loop, connect an auxiliary output on the mixer to one of the mixer’s input channels. The gain on the channel is then increased on the channel to create a great deal of feedback. The mixer’s output is then gently turned up, along with the volume on the channel that has formed the feedback loop. If you’ve hooked things up correctly, you should have some kind of tone feedbacking through the mixer. Want to change the pitch? Easy – just use the mixer’s EQ pots!

It’s pretty easy to get some wild spacey sounds going. Get creative and you can make some crunchy sounds or weird repeating tones if you play with the mixer’s built in effects. Plus, the benefit of a mixer is that it has multiple channels. You can create more feedback loops using the additional channels if you have enough auxiliary sends for the job. Stack them up or weave them together and you can get some wild modulation going.

Who needs a modular synth when you can do all this with a four channel mixer and some cables? Video after the break.

Continue reading “You Can Use A Crappy Mixer As A Neat Synthesizer”

Spy Transceiver Makes Two Tubes Do The Work Of Five

Here at Hackaday, we love following along with projects as they progress. That’s especially true when a project makes a considerable leap in terms of functionality from one version to another, or when the original design gets more elegant. And when you get both improved function and decreased complexity at the same time? That’s the good stuff.

Take the recent improvements to a vacuum tube “spy radio” as an example. Previously, [Helge (LA6NCA)] built both a two-tube transmitter and a three-tube receiver, either of which would fit in the palm of your hand. A little higher math seems to indicate that combining these two circuits into a transceiver would require five tubes, but that’s not how hams like [Helge] roll. His 80-m CW-only transceiver design uses only two tubes and a lot of tricks, which we admit we’re still wrapping our heads around. On the receive side, one tube serves as a mixer/oscillator, combining the received signal with a slightly offset crystal-controlled signal to provide the needed beat frequency. The second tube serves as the amplifier, both for the RF signal when transmitting, and for audio when receiving.

The really clever part of this build is that [Helge] somehow stuffed four separate relays into the tiny Altoids tin chassis. Three of them are used to switch between receive and transmit, while the fourth is set up as a simple electromagnetic buzzer. This provides the sidetone needed to effectively transmit Morse code, and is about the simplest way we’ve ever seen to address that need. Also impressive is how [Helge] went from a relatively expansive breadboard prototype to a much more compact final design, and how the solder was barely cooled before he managed to make a contact over 200 km. The video below has all the details.

Continue reading “Spy Transceiver Makes Two Tubes Do The Work Of Five”

How To Build Jenny’s Budget Mixing Desk

Jenny did an Ask Hackaday article earlier this month, all about the quest for a cheap computer-based audio mixer. The first attempt didn’t go so well, with a problem that many of us are familiar with: Linux applications really doesn’t like using multiple audio devices at the same time. Jenny ran into this issue, and didn’t come across a way to merge the soundcards in a single application.

I’ve fought this problem for a while, probably 10 years now. My first collision with this was an attempt to record a piano with three mics, using a couple different USB pre-amps. And of course, just like Jenny, I was quickly frustrated by the problem that my recording software would only see one interface at a time. The easy solution is to buy an interface with more channels. The Tascam US-4x4HR is a great four channel input/output audio interface, and the Behringer U-PHORIA line goes all the way up to eight mic pre-amps, expandable to 16 with a second DAC that can send audio over ADAT. But those are semi-pro interfaces, with price tags to match.

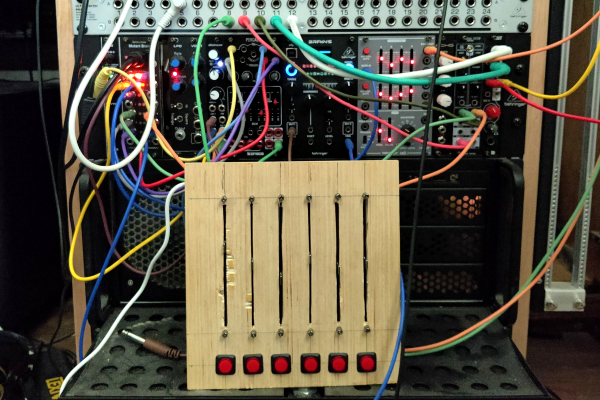
But what about Jenny’s idea, of cobbling multiple super cheap interfaces together? Well yes, that’s possible too. I’ll show you how, but first, let’s talk about how we’re going to control this software mixer monster. Yes, you can just use a mouse or keyboard, but the challenge was to build a mixing desk, and to me, that means physical faders and mute buttons. Now, there are pre-built solutions, with the Behringer X-touch being a popular solution. But again, we’re way above the price-point Jenny set for this problem. So, let’s do what we do best here at Hackaday, and build our own. Continue reading “How To Build Jenny’s Budget Mixing Desk”

Take A Deep Dive Into A Commodity Automotive Radar Chip

When the automobile industry really began to take off in the 1930s, radar was barely in its infancy, and there was no reason to think something that complicated would ever make its way into the typical car. Yet here we stand less than 100 years later, and radar has been perfected and streamlined so much that an entire radar set can be built on a single chip, and commodity radar modules can be sprinkled all around the average vehicle.

Looking inside these modules is always fascinating, especially when your tour guide is [Shahriar Shahramian] of The Signal Path, as it is for this deep dive into an Infineon 24-GHz automotive radar module. The interesting bit here is the BGT24LTR11 Doppler radar ASIC that Infineon uses in the module, because, well, there’s really not much else on the board. The degree of integration is astonishing here, and [Shahriar]’s walk-through of the datasheet is excellent, as always.

Things get interesting once he gets the module under the microscope and into the X-ray machine, but really interesting once the RF ASIC is uncapped, at the 15:18 mark. The die shots of the silicon germanium chip are impressively clear, and the analysis of all the main circuit blocks — voltage-controlled oscillator, power amps, mixer,  LNAs — is clear and understandable. For our money, though, the best part is the look at the VCO circuit, which appears to use a bank of fuses to tune the tank inductor and keep the radar within a tight 250-Mz bandwidth, for regulatory reasons. We’d love to know more about the process used in the factory to do that bit.

This isn’t [Shahriar]’s first foray into automotive radar, of course — he looked at a 77-GHz FMCW car radar a while back. That one was bizarrely complicated, though, so there’s something more approachable about a commodity product like this.

Continue reading “Take A Deep Dive Into A Commodity Automotive Radar Chip”

Microwave Sampler Is Like Time Domain Mixer

[Gregory] is building some microwave gear and wanted to convert a 3.3 GHz signal to a 12 MHz intermediate frequency. You might think of using a mixer, but you’d need a local oscillator of nearly 3.3 GHz which is not only hard to build, but also will be very close to the signal of interest which is not a great idea. Instead, [Gregory] opted for a sampler, which uses an effect you usually try to avoid — aliasing — to allow downconversion with a much smaller local oscillator. You can see the design in the video below.

In the case of converting 3.3 GHz to 12 MHz, the local oscillator is around 100 MHz. How does that work? Watch the video and find out. The final project will triple the 3.3 GHz signal and we presume the 12 MHz downconvert is to easily phase lock the frequency using a PLL (phase-locked loop).

Continue reading “Microwave Sampler Is Like Time Domain Mixer”

This Audio Mixer Is A Eurorack

Music making and DJing have both become arts predominantly pursued in a computer, as the mighty USB interface has subsumed audio, MIDI, and even DJ turntable interface controllers. There was a time though when an indispensable part of any aspiring performer’s equipment would have been an analog mixer, a device for buffering and combining multiple analog audio signals into a single whole. A mixer is still a useful device though, and [Sam Kent] has produced a very nice one that takes the form of a set of Eurorack modules made from PCB material. There are two types of modules, the main channel module which you can think of as the master module, and a series of isolator modules that handle the individual inputs.

Mixer preferences are as individual as each user, so for example where we’d expect sliders he’s used rotary potentiometers, and for us placing the master channel on the left-hand side is unfamiliar. But that’s the beauty of a modular design, there’s nothing to stop anyone building one of these to simply configure it as they wish. We notice that for a mixer described as for DJs there’s no RIAA preamp for the turntable fans, but it’s not impossible to fix with an off-board preamp. Otherwise, we like it and have a sudden hankering for it to be 1992 again with a pair of Technics SL1200s and a room full of people.

Designing a mixer, even a simple one, isn’t easy. Our own [Lewin Day] wrote a retrospective of his experiences with one.

A musical cyberdeck

Musical Cyberdeck Is Part Synth, Part MIDI Controller, And All Cool

When a new project type starts to get a lot of exposure, it’s typically not long before we see people forking the basic concept and striking out in a new direction. It happened with POV displays, it happened with Nixie clocks, and now, it seems to be happening with cyberdecks. And that’s something we can get behind, especially with cyberdecks built to suit a specialized task, like this musical cyberdeck/synth.

Like many musicians, [Benjamin Caccia] felt like he needed a tool to help while performing with his band “Big Time Kill.” He mainly needed to trigger track playbacks on the fly, but also wanted something to act as a mega-effects pedal and standalone synth. And while most of that could be done with an iPad, it wouldn’t look as cool as a cyberdeck. The build centers around a Raspberry Pi 4 and a 7″ LCD display. Those sit on top of a 25-key USB MIDI keyboard and a small mixer. Alongside the keyboard is a USB keypad, which has custom mappings to allow fast access to buried menu functions in the cyberdeck’s Patchbox OS. Everythign was tied together on a 3D-printed frame; the video below shows it in action, and that it sounds as good as it looks.

We think [Benjamin]’s cyberdeck came out great. Need to see some other specialized cyberdecks? Why not take a look at this battle-ready cyberdeck, one that aims to be distraction-free, or a cyberdeck for patrolling the radioactive wastelands.

Continue reading “Musical Cyberdeck Is Part Synth, Part MIDI Controller, And All Cool”