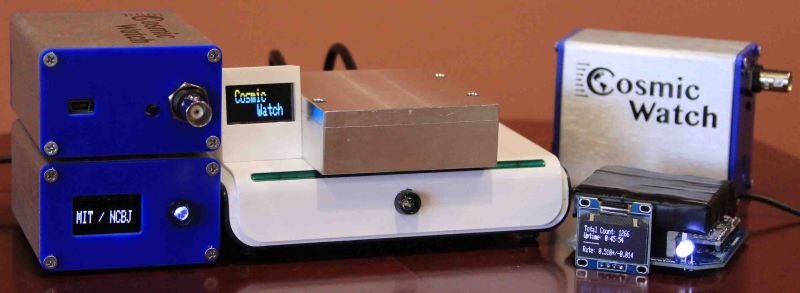
A little over a year ago we’d written about a sub $100 muon detector that MIT doctoral candidate [Spencer Axani] and a few others had put together. At the time there was little more than a paper on arxiv.org about it. Now, a few versions later they’ve refined it to the level of a kit with full instructions for making your own under the banner, CosmicWatch including PCB Gerber files for the two surface mount boards you’ll need to assemble.
What’s a muon? The Earth is under constant bombardment from cosmic rays, most of them being nuclei expelled from supernova explosions. As they collide with nuclei in our atmosphere, pions and kaons are produced, and the pions then decay into muons. These muons are similar to electrons, having a +1 or -1 charge, but with 200 times the mass.
This pion-to-muon decay happens higher than 10 km above the Earth’s surface. But the muons have a lifetime at rest of 2.2 μs. This means that the number of muons peak at around 10 km and decrease as you go down. A jetliner at 30,000 feet will encounter far more muons than will someone at the Earth’s surface where there’s one per cm2 per minute, and the deeper underground you go the fewer still. This makes them useful for inferring altitude and depth.


How does CosmicWatch detect these muons? The working components of the detector consist of a plastic scintillator, a silicon photomultiplier (SiPM), a main circuit board which does signal amplification and peak detection among other things, and an Arduino nano.
As a muon passes through the scintillating material, some of its energy is absorbed and re-emitted as photons. Those photons are detected by the silicon photomultiplier (SiPM) which then outputs an electrical signal that is approximately 0.5 μs wide and 10-100 mV. That’s then amplified by a factor of 6. However, the amplified pulse is too brief for the Arduino nano and so it’s stretched out by the peak detector to roughly 100 μs. The Arduino samples the peak detector’s output and calculates the original pulse’s amplitude.
Their webpage has copious details on where to get the parts, the software and how to make it. However, they do assume you can either find a cheap photomultiplier somewhere or buy it in quantities of over 100 brand new, presumably as part of a school program. That bulk purchase makes the difference between a $50 part and one just over $100. But being skilled hackers we’re sure you can find other ways to save costs, and $150 for a muon detector still isn’t too unreasonable.
Detecting muons seems to have become a thing lately. Not too long ago we reported on a Hackaday prize entry for a detector that uses Russian Geiger–Müller Tubes.


If the MCU were of another cheap variety that stretch in the pulse would not be needed.
Their website tells about how they actually calculate the initial pulse strength by measuring the decay of the pulse through the amplifying circuit. Which other ‘cheap’ MCU is able to accurately measure a voltage that lasted half a micro second?
Half a microsecond is pretty long, any modern cheap microcontroller could measure it by gating a timer, clocked with 100 MHz or whatever. Also easy to implement e.g. with the PIO module of a $1 Raspberry Pi Pico, which could probably also detect a shower with short distances between the pulses.
This kit could also be used as a neutron detector for anyone experimenting with plasma fusion generators (featured a while back here on Hackaday).
Hi, I’m also known as DCFusor for my work with plasma fusion generators. I have just about every type of detector here in my lab. While there’s a version of scintillating detector for neutrons (called a Hornyak), most scintillators are far too sensitive to well, everything else that could get in there, especially including photons (X or gamma rays). In fact we have 3 TSA brand scintillators we call “Henny Penny” that were eventually rejected for use by the … TSA because they’re too flaky and detect…existence, not just the people they wanted to grope. For neutrons, we use one of Hornyak – the least efficient but good for fast neutrons, moderated 3He (the most sensitive and also the fewest falsies), B10, or BF3 detectors. For other uses we use a pancake geiger for example, to measure silver activation (which produced beta activity). Scintillators are just too sensitive and sensitive to too many things for reliable discrimination. While yes, the huge pulse heights are in general from cosmic rays, and in general those showers have muons in them…it’s an awful big stretch to call them a muon detector except by coincidence.
This doesn’t mean the thing is worthless, far from it. But I find it better to call things what they are.
Given that the photomultiplier they named in the BOM is $120, I’m not sure where they’re getting the $100 figure.
“However, they do assume you can either find a cheap photomultiplier somewhere or buy it in quantities of over 100 brand new, presumably as part of a school program. That bulk purchase makes the difference between a $50 part and one just over $100.” – you need to find 99 people who share your desire for a cheap photomultiplier, and who read articles before posting comments.
Cheap PM’s can often be found as surplus items on Ebay and various physics junkyards and college auctions. Since they don’t go bad often, they’re around for those who take the trouble to look hard. Often you can find data sheets if you have the number and/or a picture.
FWIW, an easier way to detect cosmic showers is to NOT time-smear the output, and use the great time-resolution of a good scintillator and PM with a reasonably fast counter to detect that a ton of events happened almost simultaneously. Time resolution of 10ns is fairly easy to get. The underlying theory is that when a shower is created well above the measuring point (most are) all the particles don’t get the same energy or velocity towards you on the ground, and show up as a burst. A slow geiger tube sees one event, but a phototube setup will see 100’s to 1000’s of counts in a very short burst. Since nothing else (I know of) creates this kind of bursty signature, you can be sure it’s a cosmic ray (and pretty sure some of it is muons – but we see neutrons and pretty much anything else here too). All they were accomplishing by time-smearing is an easier measurement of total energy – at a speed an a/d could easily handle. A hardware counter, even at the speed of a cheap uP will do just as good a job with the right code (you can check the counter really fast) – if you handle the fast scintillator/PM part right, and that’s easy. Surplus (from abandoned TSA projects) fast (5ns) plastic scintillator is cheap and abundant out there.
And how about we skip the photo multiplication part and go straight to avalanche breakdown in a reverse-polarised (but far enough from usual breakdown voltage) PN junction? That’s even simpler and cheaper.
Could probably use an avalanche photodiode, since it’s a pretty loud signal. Dunno about speed there, as I don’t use them here – phototubes work fine and are plentiful as cheap surplus, newer stuff, not so much. For grins I just went to ebay and typed in “photomultiplier tube” and got page after page with many under $50. So unless you’re blindly following a recipe without understanding, the cost of the tube isn’t a real problem. If you have a clue, you can pick a suitable tube and build with that. I’d provide various links, but for fairly good reasons, this forum isn’t link-friendly.
However, anyone who wants to talk to me about it should know that my nick here, without the year number, is my gmail address and my youtube channel. I also have a forum about nuclear stuff and other sci/tech topics (guess how I know about the dangers of posters putting random links on the forum?).
Gee, those two-tone SSD1306 OLED screens sure are a hoot, huh? They’re advertised as ‘blue and yellow’, which they are; 15 or 16 rows of yellow, and 47 or 48 rows of blue!
It’s weird, though. They also have all-blue and all-white screens, but I have yet to see an all-yellow one.
I’m using the SSD1306s here myself. If you like small fonts…they’re great. The yellow/blue variant has about one dead row space visually between the colors FWIW, but that doesn’t matter here. The gap isn’t in the addressing, just the physical display. They look really cool IRL. An ESP8266 drives them effortlessly. Not much room for the library and required ram in an Uno – they just barely fit there.
Out of interest? What happens indoors vs outdoors?
Does it make a difference? Thought it was a pretty cool idea maybe for an art installation?
But not sure it can be outdoors.
And there’s a lot of bigger buildings around where I work. Was wondering if position matters to the detection?
Be really cool if I could put them on different floors and you get different pings or lights.
Another though was what would happen if you put it in an elevator? Since the height changes?