It’s amazing how fragile our digital lives can be, and how quickly they can fall to pieces. Case in point: the digital dilemma that Paris Buttfield-Addison found himself in last week, which denied him access to 20 years of photographs, messages, documents, and general access to the Apple ecosystem. According to Paris, the whole thing started when he tried to redeem a $500 Apple gift card in exchange for 6 TB of iCloud storage. The gift card purchase didn’t go through, and shortly thereafter, the account was locked, effectively bricking his $30,000 collection of iGadgets and rendering his massive trove of iCloud data inaccessible. Decades of loyalty to the Apple ecosystem, gone in a heartbeat.
cosmic ray13 Articles
Cosmic Ray Detection At Starbucks?
Want to see cosmic rays? You might need a lot of expensive exotic gear. Nah. [The ActionLab] shows how a cup of coffee or cocoa can show you cosmic rays — or something — with just the right lighting angle. Little bubbles on the surface of the hot liquid tend to vanish in a way that looks as though something external and fast is spreading across the surface.
To test the idea that this is from some external source, he takes a smoke detector with a radioactive sensor and places it near the coffee. That didn’t seem to have any effect. However, a Whimhurst machine in the neighborhood does create a big change in the liquid. If you don’t have a Whimhurst machine, you can rub a balloon on your neighbor’s cat.
Cosmic Ray Navigation
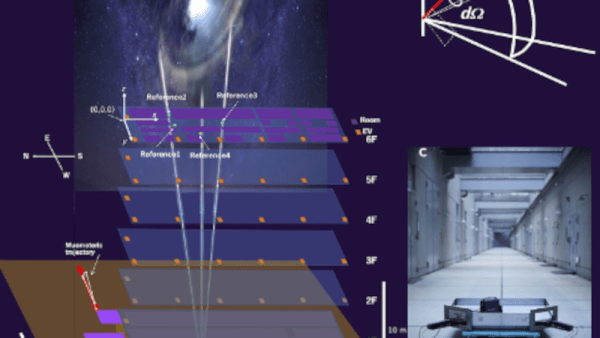
GPS is a handy modern gadget — until you go inside, underground, or underwater. Japanese researchers want to build a GPS-like system with a twist. It uses cosmic ray muons, which can easily penetrate buildings to create high-precision navigation systems. You can read about it in their recent paper. The technology goes by MUWNS or wireless muometric navigation system — quite a mouthful.
With GPS, satellites with well-known positions beam a signal that allows location determination. However, those signals are relatively weak radio waves. In this new technique, the reference points are also placed in well-understood positions, but instead of sending a signal, they detect cosmic rays and relay information about what it detects to receivers.
The receivers also pick up cosmic rays, and by determining the differences in detection, very precise navigation is possible. Like GPS, you need a well-synchronized clock and a way for the reference receivers to communicate with the receiver.
Muons penetrate deeper than other particles because of their greater mass. Cosmic rays form secondary muons in the atmosphere. About 10,000 muons reach every square meter of our planet at any minute. In reality, the cosmic ray impacts atoms in the atmosphere and creates pions which decay rapidly into muons. The muon lifetime is short, but time dilation means that a short life traveling at 99% of the speed of light seems much longer on Earth and this allows them to reach deep underground before they expire.
Detecting muons might not be as hard as you think. Even a Raspberry Pi can do it.
Raspberry Pi Cosmic Ray Detector
[Marco] has a sodium iodide detector that indicates cosmic radiation by scintillation. The material glows when hit by cosmic rays and, traditionally, a photomultiplier tube detects the photos from the detection. After a quick demonstration that you can see in the video below, he built the Cosmic Pi, a CERN project to create a giant distributed cosmic ray detector. The Cosmic Pi uses scintillation, but not from a crystal. It uses a plastic scintillator and silicon photodetectors, so it is much easier to work with than a traditional detector.
Using a four-layer board and some harvested components, the device detects muons. There are two scintillation detectors and muons striking both detectors presumably don’t have a local origin. The instrument has a GPS to get accurate time and position data. There are other sensors onboard, too, to collect data about the conditions of each detected event.
Do Androids Search For Cosmic Rays?
We always like citizen science projects, so we were very interested in DECO, the Distributed Electronic Cosmic-ray Observatory. That sounds like a physical location, but it is actually a network of cell phones that can detect cosmic rays using an ordinary Android phone’s camera sensor.
There may be some privacy concerns as the phone camera will take a picture and upload it every so often, and it probably also taxes the battery a bit. However, if you really want to do citizen science, maybe dedicate an old phone, put electrical tape over the lens and keep it plugged in. In fact, they encourage you to cover the lens to reduce background light and keep the phone plugged in.
Make A Cheap Muon Detector Using Cosmicwatch
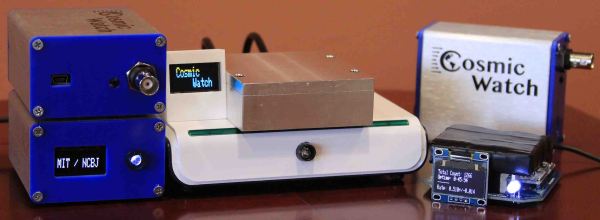
A little over a year ago we’d written about a sub $100 muon detector that MIT doctoral candidate [Spencer Axani] and a few others had put together. At the time there was little more than a paper on arxiv.org about it. Now, a few versions later they’ve refined it to the level of a kit with full instructions for making your own under the banner, CosmicWatch including PCB Gerber files for the two surface mount boards you’ll need to assemble.
What’s a muon? The Earth is under constant bombardment from cosmic rays, most of them being nuclei expelled from supernova explosions. As they collide with nuclei in our atmosphere, pions and kaons are produced, and the pions then decay into muons. These muons are similar to electrons, having a +1 or -1 charge, but with 200 times the mass.
This pion-to-muon decay happens higher than 10 km above the Earth’s surface. But the muons have a lifetime at rest of 2.2 μs. This means that the number of muons peak at around 10 km and decrease as you go down. A jetliner at 30,000 feet will encounter far more muons than will someone at the Earth’s surface where there’s one per cm2 per minute, and the deeper underground you go the fewer still. This makes them useful for inferring altitude and depth.
How does CosmicWatch detect these muons? The working components of the detector consist of a plastic scintillator, a silicon photomultiplier (SiPM), a main circuit board which does signal amplification and peak detection among other things, and an Arduino nano.
As a muon passes through the scintillating material, some of its energy is absorbed and re-emitted as photons. Those photons are detected by the silicon photomultiplier (SiPM) which then outputs an electrical signal that is approximately 0.5 μs wide and 10-100 mV. That’s then amplified by a factor of 6. However, the amplified pulse is too brief for the Arduino nano and so it’s stretched out by the peak detector to roughly 100 μs. The Arduino samples the peak detector’s output and calculates the original pulse’s amplitude.
Their webpage has copious details on where to get the parts, the software and how to make it. However, they do assume you can either find a cheap photomultiplier somewhere or buy it in quantities of over 100 brand new, presumably as part of a school program. That bulk purchase makes the difference between a $50 part and one just over $100. But being skilled hackers we’re sure you can find other ways to save costs, and $150 for a muon detector still isn’t too unreasonable.
Detecting muons seems to have become a thing lately. Not too long ago we reported on a Hackaday prize entry for a detector that uses Russian Geiger–Müller Tubes.
Hackaday Prize Entry : Cosmic Particle Detector Is Citizen Science Disguised As Art
Thanks to CERN and their work in detecting the Higgs Boson using the Large Hadron Collider (LHC), there has been a surge of interest among many to learn more about the basic building blocks of the Universe. CERN could do it due to the immense power of the LHC — capable of reaching a beam energy of almost 14TeV. Compared to this, some cosmic rays have energies as high as 3 × 10²⁰ eV. And these cosmic rays keep raining down on Earth continuously, creating a chain reaction of particles when they interact with atmospheric molecules. By the time many of these particles reach the surface of the earth, they have mutated into “muons”, which can be detected using Geiger–Müller Tubes (GMT).
[Robert Hart] is building an array of individual cosmic ray detectors that can be distributed across a landscape to display how these cosmic rays (particles, technically) arrive as showers of muons. It’s a citizen science project disguised as an art installation.
The heart of each individual device will be a set of three Russian Geiger–Müller Tubes to detect the particles, and an RGB LED that lights up depending on the type of particle detected. There will also be an audio amplifier driving a small 1W speaker to provide some sound effects. A solar panel is used to charge the battery, which will feed the converters that generate the logic and high voltages required for the GMT array. The GMT signals pass through a pulse shaper and then through the logic gates, finally being amplified to drive the LEDs and the audio amplifier. Depending on the direction and order in which the particles pass through the GMT’s, the device will produce a bright flash of one of 4 colors — red, green, blue or white. It also triggers generation one of three musical notes — C, F, G or a combination of all three. The logic section uses coincidence detection, which has worked well for his earlier iterations. A coincidence detector is an AND logic which produces an output when two input events occur sufficiently close to each other in time. He’s experimented with several design versions, before settling on a trio of 555 monostable multivibrators to provide the initial pulse shaping, followed by some AND gates. A neat PCB design brings it all together.
While the prototypes are housed in wooden cases, he’s going to experiment with various enclosure and mounting options to see which works best — bollard lamp posts, spheres, something that hangs on a tree or tripod or is put in the ground like a paving block. Future prototypes and installations may include a software, pulse summing and solid-state detectors. Embedded below is a video of his current version of the detector, but there are several other interesting videos on his project page that are worth looking at. And if this has gotten you interested, check out this CERN brochure — LHC, The guide for a simple explanation of particle physics and information on the LHC.


