Behind The Scenes At A Pair Of Cell Sites

Those who fancy themselves as infrastructure nerds find cell sites fascinating. They’re outposts of infrastructure wedged into almost any place that can provide enough elevation to cover whatever gap might exist in a carrier’s coverage map. But they’re usually locked behind imposing doors and fences with signs warning of serious penalty for unauthorized access, and so we usually have to settle for admiring them from afar.

Some folks, like [Mike Fisher] aka [MrMobile], have connections, though, and get to take an up close and personal tour of a couple of cell sites. And while the video below is far from detailed enough to truly satisfy most of the Hackaday crowd, it’s enough to whet the appetite and show off a little of what goes into building out a modern cell site. [Mike] somehow got AT&T to take him up to a cell site mounted in the belfry and steeple of the 178-year old Unitarian Church in Duxbury, Massachusetts. He got to poke around everything from the equipment shack with its fiber backhaul gear and backup power supplies to the fiberglass radome shaped to look like the original steeple that now houses the antennas.

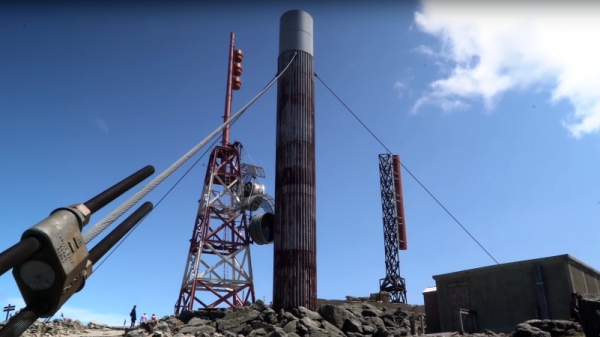
Next he drove up to Mount Washington in New Hampshire, the highest point in the northeast US and home to a lot of wireless infrastructure. Known for having some of the worst weather in the world and with a recent low of -36°F (-38°C) to prove it, Mount Washington is brutal on infrastructure, to which the tattered condition of the microwave backhaul radomes attests.

We appreciate the effort that went into this video, but again, [Mike] leaves us wanting more details. Luckily, we’ve got an article that does just that.

Continue reading “Behind The Scenes At A Pair Of Cell Sites”

Mbed Labs Chock Full Of Arm Goodies

One of the things we like about ARM processors is that there are a variety of options for library support. You can write your own code at the bare metal, of course, but you can also use many different abstraction libraries to make things easier. At the other end of the spectrum, there is Mbed, similar to the sort of libraries that Arduino supplies. Easy to use, although not always the best possible performance. Mbed now has an Mbed Labs site with a lot of extra goodies that go with the Mbed ecosystem, and it has quite a few interesting things.

You’ve always been able to write Mbed code in your browser — some people love that and some hate it and use locally-hosted tools like Platform.io. However, with the Mbed Lab, you can build and most importantly simulate your code in the browser (something we covered last year). There’s also a Javascript interpreter that runs on your chip, a small implementation of TensorFlow for deep learning, and a few other projects on the page.

Continue reading “Mbed Labs Chock Full Of Arm Goodies”

LED Tree Brings Gravity To Christmas

Here’s a fun entry into our coin cell challenge. The power source is the actuating force in [Frank]’s blinky LED Christmas tree, which takes advantage of the physical structure of coin cells and our old pal gravity to roll out some holiday cheer. Talk about forward voltage!

We love the concept, and the circuit couldn’t be more simple. A coin cell is released at the top of the tree and rolls down a series of angled foam board railings covered with 1/4″ copper tape. As the coin cell travels, the negative terminal shimmies along the face of the tree, which has corresponding ground rail tapes. There’s no microcontroller here—all that’s needed for blinks are breaks in the negative rail tape.

The challenging part of a project like this is the execution. Getting a coin cell to ride the rails without falling off required angle experimentation prior to and during the build. Now that it’s done, keeping the tree tilted back against the wall is key. [Frank] explored several options for returning the coin cell to the top using a camera motor and the gear assembly from an old inkjet, but for now, his six-year-old does the job without complaint. Check out his work ethic after the break.

Continue reading “LED Tree Brings Gravity To Christmas”

Color Changing Clock Gets A Pi Zero Heart

Hackaday reader [Don] dropped by the tip line recently to let us know about the latest version of his color-changing LCD clock project. This is his second version of the hardware which makes some pretty big improvements over the original, including moving from the Pi B to the Pi Zero and an internal simplification of the wiring. He mentions the next revision of the project will focus on Google Home integration, which should be interesting to see.

As a father of two pre-school age children, he was looking for a way to help his kids understand the concept of time and scheduled activities. Colors and shapes come fairly easy to children of this age, but time and how it relates to the day is a bit more difficult for them especially as their comprehension of numbers is still developing. [Don] reasoned that even if they couldn’t read the numbers on the clock yet, if he had the display change colors to indicate different periods of the day (sleep, play, cleanup, etc), it would not only keep them on schedule, but reinforce the meaning of the numbers on the screen.

ShiftBrite installed in the projector.

The project was made infinitely easier by a lucky find at a local retailer. For $10 he got a kid-friendly looking clock that utilized a simple projector to backlight the LCD display. This meant [Don] would just need to swap out the stock lighting module for a controllable RGB LED, and the hardware modifications would essentially be complete.

Even the Pi Zero fits perfectly inside the case of the clock, the only modification necessary was cutting a little hole in the back for the Pi’s micro USB port. His earlier version used an external Pi B connected to the clock via CAT5, so getting it all integrated into the one device is a huge improvement, especially when little kids are involved. Moving the Pi and its 5 V pins into the clock itself also allowed [Don] to drop the voltage regulator required previously.

With the basic hardware for a color changing LCD clock together, the rest of the project was just a matter of software. After some research, [Don] came across RPi-ShiftBrite by [Hive13] and made his own fork which added some features necessary for his project, namely the ability to quickly set the ShiftBrite to a specific color on the command line. To schedule the color changes, he used the very slick minicron: a web-based tool to create and monitor Linux cron jobs.

The Pi itself does not actually interface with the clock, and with no onboard RTC it’s necessary to keep it updated with NTP or else the times will become desynchronized. It can be necessary to sync the Pi’s clock to the Internet as often as every hour to make sure the colors shift at the appropriate times. The addition of a RTC module like the DS1307 could alleviate this issue and might be something to consider for a future revision.

All told, a fantastic project and something we’ll be sure to keep our eyes on as it progresses. We’ve seen our share of unique Raspberry Pi powered clocks, and even a few color changing ones, but this approach is easily the most straight-forward we’ve seen.

Continue reading “Color Changing Clock Gets A Pi Zero Heart”

Star Chart Watch Is A Romantic Tragedy

It’s becoming abundantly clear that [Colin Merkel] doesn’t know the definition of “good enough”. Not only has he recently completed his third (and most impressive) wristwatch build, but he also managed to put together one of the most ridiculously romantic gifts ever conceived. While some of us are giving our significant others a gift card to Starbucks, he made his girlfriend a watch with a chart on the face representing the position of the stars at the time and place of their first meeting.

As per his usual style, the documentation on this build is phenomenal. If paging through his gallery of build images doesn’t make you want to get a lathe and start learning metal working, nothing will. A chunk of stainless steel rod miraculously becomes a gorgeous wrist watch over the course of a few dozen images, perfectly encapsulating that old adage of “making it look easy”.

All you have to do is turn this into that. Easy.

Certainly the highlight of this build is the star chart on the face. To make it, he used PyEphem to plot the position of the brightest stars that were visible at the time and place of their first meeting. He then wrote a script to take those stars and convert their positions to G-Code the CNC could use to drill holes in the appropriate locations. The depth of the hole even corresponds to the magnitude (brightness) of each star, giving the chart a subtle 3D effect.

Unfortunately, [Colin] made a couple of mistakes during this build, to the point that he’s not exactly sure how to proceed. He mentions he might even be forced to start over from scratch. It’s hard to imagine how something that looks this good could ever end up being a failure, but the world of watch making is unkind.

To start with, he used 304 stainless instead of 303. This made machining the case much more difficult, and from his very first cut he realized it was going to be a problem. While it was an annoyance he mentions a couple times during the build log, he was at least was able to work through it.

The real problem came at the end, when he put the watch together. He originally made his designs assuming a front glass which was 0.5 mm thick, but in actuality used a piece that is 0.8 mm thick. This slight difference is just enough to cause the seconds hand to rub up on the glass, putting drag on the movement. The end result is that the battery dies extremely quickly, effectively rendering the watch useless.

We can’t imagine the heartbreak [Colin] felt when he realized what happened; we felt bad just reading about it. But given his track record, we have no doubt he’ll get the issue sorted out. It would be a shame to start over completely, but there’s some consolation in knowing it’s part of the learning process: you don’t become a master of your craft without making a couple mistakes along the way.

The predecessor to this watch was covered here at Hackaday last year, and made quite an impression. It’s interesting to see the improvements made between the two, and we’re certainly excited to see his next build.

Spectre And Meltdown: Attackers Always Have The Advantage

While the whole industry is scrambling on Spectre, Meltdown focused most of the spotlight on Intel and there is no shortage of outrage in Internet comments. Like many great discoveries, this one is obvious with the power of hindsight. So much so that the spectrum of reactions have spanned an extreme range. From “It’s so obvious, Intel engineers must be idiots” to “It’s so obvious, Intel engineers must have known! They kept it from us in a conspiracy with the NSA!”

We won’t try to sway those who choose to believe in a conspiracy that’s simultaneously secret and obvious to everyone. However, as evidence of non-obviousness, some very smart people got remarkably close to the Meltdown effect last summer, without getting it all the way. [Trammel Hudson] did some digging and found a paper from the early 1990s (PDF) that warns of the dangers of fetching info into the cache that might cross priviledge boundaries, but it wasn’t weaponized until recently. In short, these are old vulnerabilities, but exploiting them was hard enough that it took twenty years to do it.

Building a new CPU is the work of a large team over several years. But they weren’t all working on the same thing for all that time. Any single feature would have been the work of a small team of engineers over a period of months. During development they fixed many problems we’ll never see. But at the end of the day, they are only human. They can be 99.9% perfect and that won’t be good enough, because once hardware is released into the world: it is open season on that 0.1% the team missed.

The odds are stacked in the attacker’s favor. The team on defense has a handful of people working a few months to protect against all known and yet-to-be discovered attacks. It is a tough match against the attackers coming afterwards: there are a lot more of them, they’re continually refining the state of the art, they have twenty years to work on a problem if they need to, and they only need to find a single flaw to win. In that light, exploits like Spectre and Meltdown will probably always be with us.

Let’s look at some factors that paved the way to Intel’s current embarrassing situation.

Continue reading “Spectre And Meltdown: Attackers Always Have The Advantage”

Friday Hack Chat: Assembling In Quantity With MacroFab

Building one of something is easy. You see it here every day, and yes, building a single robot, or a board to convert Segas to HDMI, or an Internet of Things thing is easy. Manufacturing is another story entirely. You’re going to have BOMs to work with, you’ll have suppliers, and you need to deal with assembly, programming, and packaging. Do you even know where you’re going to store all those boxes of parts? Manufacturing is a difficult task, but luckily there are assembly houses and contract manufacturers ready to ease the burden a little.

For this week’s Hack Chat, we’re going to be talking about Assembly as a Service through MacroFab. MacroFab is an online assembly house and contract manufacturer that makes creating hardware simple. If you thought sending a board file off to OSH Park and receiving a PCB in a week is amazing, you clearly haven’t experienced MacroFab. Here, you can upload your board and BOM, and with minimal effort, receive a completely populated product in a few weeks.

Our guest for this week’s Hack Chat will be [Parker Dillmann], MacroFab co-founder, with backgrounds in embedded design and DSP. He runs longhornengineer, a blog full of amazing projects that fit in well with the usual Hackaday fare. Shoutouts are especially deserved for the Game Boy VGA adapter.

During this week’s Hack chat, we’re going to be talking to [Parker] about manufacturing, the pitfalls, how you can better design for manufacturing (DFM), the machines used by MacroFab, pogo pin adapters, solder fountains, and all the cool stuff that turns one of a thing into thousands of a thing. If you’re wondering what MacroFab’s results look like, you’ve probably already held a few in your hands; the badge for this year’s Hackaday Superconference was manufactured by MacroFab, as were a lot of the independent badges at last year’s Def Con.

During this Hack Chat, we’ll be discussing:

  • What is the process for a first-time manufacturer?
  • Where can you find out how to design better for manufacturing?
  • What kinds of products are made at MacroFab?
  • What kinds of equipment is typically used for board assembly?

As always, we’re looking for questions from the community, you can add those as a comment on the Hack Chat event page.

join-hack-chat

Our Hack Chats are live community events on the Hackaday.io Hack Chat group messaging. This Hack Chat is going down Friday, January 12th at noon, Pacific time. Time Zones got you down? Here’s a handy countdown timer!

Click that speech bubble to the left, and you’ll be taken directly to the Hack Chat group on Hackaday.io.

You don’t have to wait until Friday; join whenever you want and you can see what the community is talking about.