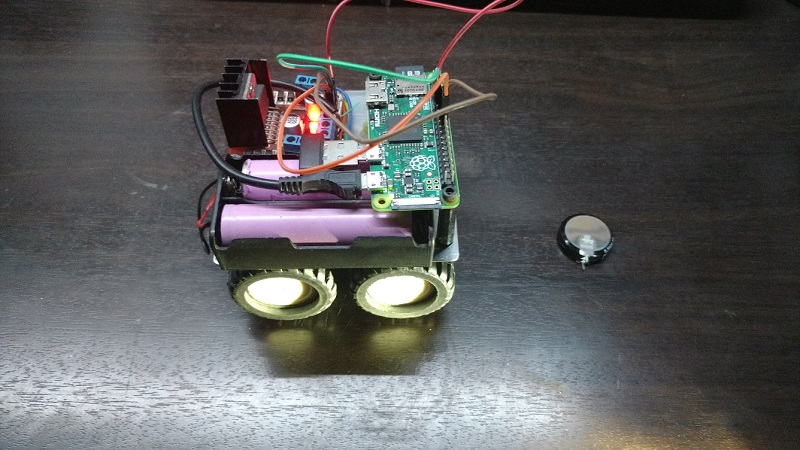
We’re not sure which is more fun – putting together a little RC truck with parts laying around on your workbench, or driving it around through a Linux terminal. We’ll take the easy road and say they’re both equally fun. [technodict] had some spare time on his hands and decided to build such a truck.
He started off with a great little chassis that can act as the base for many projects. Powering the four motors is a cheap little dual H bridge motor driver and a couple rechargeable batteries. But the neatest part of this build is that it’s controlled using a little bit of python and driven directly from a terminal, made possible by the Raspberry Pi Zero of course.
With Raspberry Pi Zero now having built in WiFi and Bluetooth – we should see a lot more projects popping up with one at its heart. Be sure to visit [technodict’s] blog for full source and details. And let us know how you could use that little chassis for your next mobile project!


N20 seems to be a nice little motor.
I’d have to see some youtube vids on the performance with some different gear ratio’s…
N20 also has versions with build in encoder and that seems much preferable for applications like this.
Addition:
And please stop using those ancient L298 drivers.
There are so many much better H-bridge chips available.
Any precise reference to these better H-bridge chips?
Without looking close at spec’s: L9110 or DRV8871 DRV8833 choise for small motors.
BTS7960 for somewhat bigger motors.
For even bigger stuff you can get geared BLDC motors with driver ciruits designed for bicycles for reasonable prices from Ali.
30 Amp ESC boards for USD10…
Ali / Ebay / China is full of that stuff they want to get rid of.
For USD80 you can get a VFD for a 1.5kW motor.
https://www.aliexpress.com/w/wholesale-vfd.html?groupsort=1&SortType=price_asc&g=y&SearchText=vfd
If the power required is low enough, the L293/L293D or the SN754410 are better options. The L298 is quite wasteful with respect to efficiency. The DRV8835 is a pretty sweet deal, 1.2A @ 0-11V for about $10 shipped.
But I have over 40 left to use up from my order of 50.
True but they’re so cheap…. it’s around $7 per motor for DRV8871 from China, vs $2…
WARNING: The first link has three 21 megapixel images. Better don’t click it if you are on mobile.
Anyone know how noisy this is ?
The PCA-I2C-PWM-driver boards fit quite nice to the zero.
I wrote a simple script using basic kernel drivers for joystick/pwm to make an PS4-Gamepad bluetooth controlled Lego brick, worked like “out of the box”.
Gives 8 “rc servo style” outputs and you can use HK-stuff to drive things behind this.
I printed some enclose around…
ToDo: Inplement LIRC/solder LED to interface Lego IR stuff.
https://imgur.com/a/tnKQM
Nice! I really like the LEGO printed enclosure. Been thinking of butchering some old lego wth a dremmel to make a pi-zero enclosure and control a servo board with a PS3 or wireless controller. Very cool! Consider sharing your 3d enclosure?
Thxs,
“Consider sharing your 3d enclosure?”
Yes, but had no time to ask/check legal status as it’s kind of a copy.
Drop me me a mail with my nick @mailbox.org an I’ll send you the freeCAD files/ugly code. One shell is for the pi, one for the pca, the 4 top-holes can only be used to “half depth” as the pcbs are slightly to big/covering them inside. The side clips are just “for service”, there are “normal holes” there.
The PCA-pcb is only connected to i2c/gnd. You’ll have to use a 2nd power source but that was my intention (servos/DC-flters…).
I wanted to add slots for sd/cam, but had no time…
BT/PS4DS worked with the kernels joystick driver, the PCA driver is also included in newer Kernels and you can just write to /pwmx. Once BT is coupled it will reconnect after reboot and you just need to read joystick/write to pwm via a script. I did a first iteration with pygaming, but that was much slower (may have been my lack of programming experience). I had just testing code for analog sticks and 4 additional axis (“bench projekt”: OK, works.. next), the PCA supplies 16 pwm devices to the kernel. I didn’t try the touchpad.
LIRC has the Lego-PF protocoll, so with a transciever or just IR-LED for TX and some hours of fiddeling around it should be also very easy to implement.
I never got it to “near live video” with the cam (was always laggy), so I switched to one if this 20$ 5,8GHz Cam-TX combos for this part. Much less pain in the …, you can also use it as a low quality video downlink for the pi via RCA/video switch. E.g. if you didn’t finish OSD and want to have “a quick look” or to create a “map button” (switch video to gmaps/GPS on the pi’s screen).
Yikes, $30 for that chassis? And that’s AliExpress! There’s FPV quadcopters on the same site for ~$40, but a plate of steel and a couple of dinky brushed motors goes for $30?
Crazy how expensive these robot/rover chassis parts are. I guess because market is so small they feel they can put the markup higher and get away with it.
Although its not so bad just for the raw parts. You can make 2 rovers with those parts, or one rover with an arm or grappler or forklift using the extra motors. Not cheap, but an OK value.
Add a half-depth (or full depth) 2 gang electrical box for a lid or chassis and it would be quite robust.
I do agree given the choice between the metal plates and 2 more motor and wheel kits I would pick more motors and wheels and build my own frame.
I would like to make this but I would like to get a cheaper chassis.
Any chance to get a see a connection schema? I’m trying to understand how the 4 n20 motors are connected on that motor driver..
Any chance to get a connection schema for this? I’m trying to understand how everything is hooked up :)