In one hand you hold the soldering iron, in the other the solder, and in two more hands the parts you’re trying to solder together. Clearly this is a case where helping hands could be useful.
Luckily helping hands are easy to make, coolant hoses will do the job at under $10. Attach alligator clips to one end, mount them on some sort of base, and you’re done. Alternatively, you can steal the legs from an “octopus” tripod normally used for cell phones. So why would you 3D print them?
One reason is to take advantage of standardized, open source creativity. Anyone can share a model of their design for all to use as is, or to modify for their needs. A case in point is the ball and socket model which I downloaded for a helping hand. I then drew up and printed a magnifying glass holder with a matching socket, made a variation of the ball and socket joint, and came up with a magnetic holder with matching ball. Let’s takea look at what worked well and what didn’t.
Isn’t Open Design Great?


The ball and socket model I started with was [Alex Rich’s] Locking ball and socket arm which has design files up on Thingiverse. Why choose that one? One reason is that the ball can be locked into the socket and another is that the same mechanism tightens the socket’s grip on the ball, making the arm more rigid. Putting a ball into a socket can take some effort but it’s made easier with the help of four slots cut into the socket so that the socket can expand during assembly.
His optional twist lock ring is another reason to try this design. There are three grooves built into the socket where the ring goes. Twisting the ring into successive grooves further compresses the socket around the ball. He demonstrates the resulting tensile strength by suspending a drill from ten of them connected together.
[Alex] also included an alligator clip holder with a socket for connecting to the last ball in the arm. Luckily I already had the perfect fitting alligator clip in an old electrical clip kit, but if I hadn’t then I could have simply loaded his model into a modeling program, Blender in my case, and resized the hole. Check out the gallery on his Hackaday.io page for more photos of the locking ball system in use.
What about a base? That’s where sharing your designs and allowing others to riff on them really shines. [Alex] got his starting point from trying out [giufini’s] PCB Workstation with Articulated Arms. In there I found a choice of bases to print. And because that was [Alex’s] starting point, the balls on the bases already fit these sockets.
First Impressions and Printing A Taller Ball And Socket


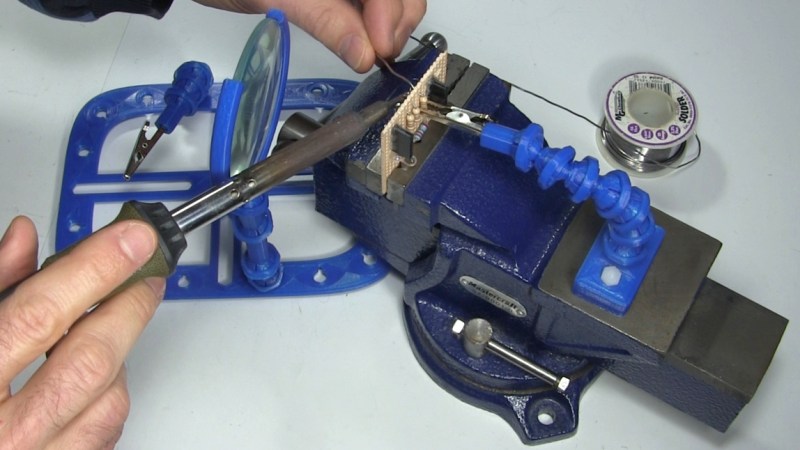
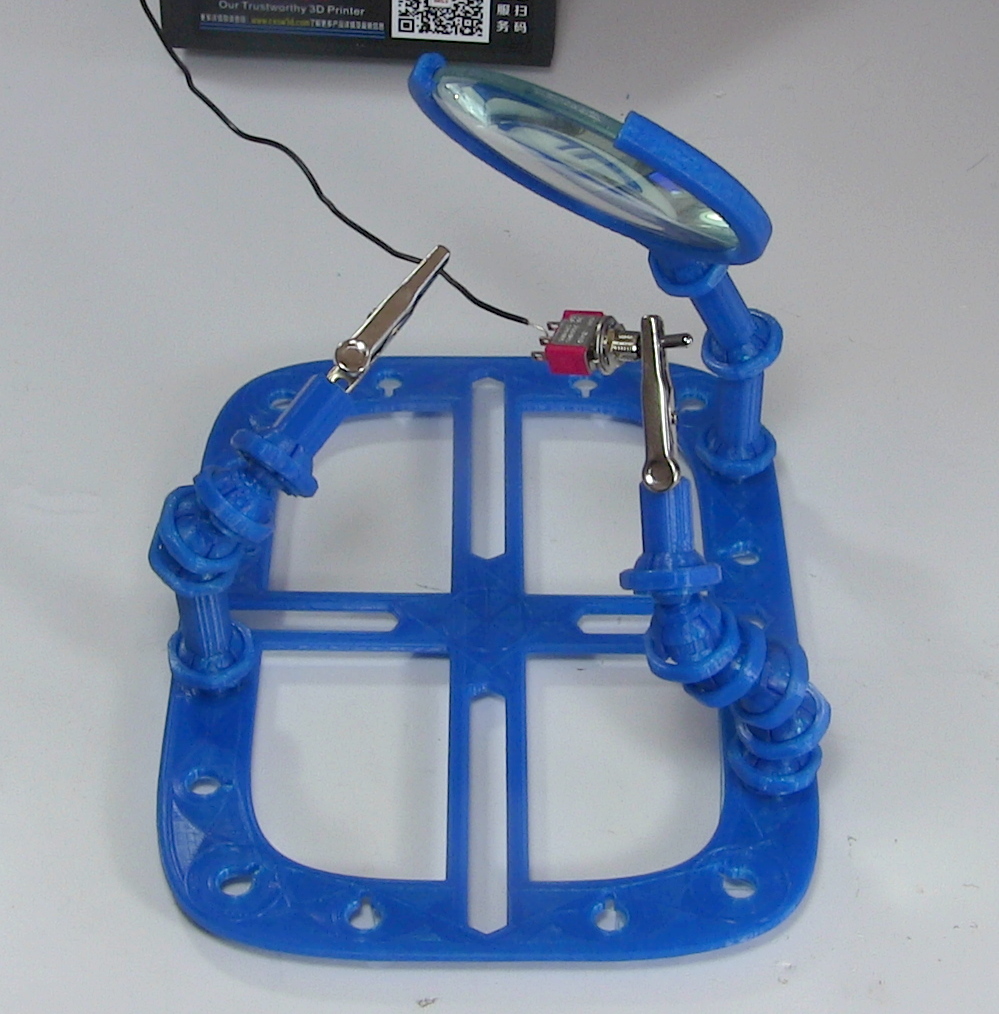
Printing on my Creality CR-10 3D printer went flawlessly. The chain of arms held up the alligator clips just fine, and I was able to easily solder a wire to a switch. The arms remained in whatever shape I put them in. A little experimenting showed that there was no noticeable difference between printing with 0.25 mm or 0.1 mm layer heights.
However, my aim was also to get things up high off the table where there’d be plenty of room to work. Each ball and socket is only two cm long, which means I needed around six of them for each arm. I can see why they’re designed to be short, to make it easy to form curves. But I wanted height too so I loaded a joint into Blender and simply stretched out the center part so that the whole was four cm long. That reduced the count by one joint and I could probably have replaced another if I wanted to.
The taller midsection also meant that I could get two wrenches in place to help twist the ring to the third groove. I was printing with PLA, however, and while this sometimes worked, I did crack one socket this way. This trick maybe should be left to ABS parts.
Adding A Magnifying Glass


If you’re like me, your eyes have been around for a while and you sometimes need a magnifying glass. I found one at a dollar store that had a fair sized lens (7.5 cm) and a good depth of field. The good depth of field means that I would have a large area behind the lens where I could put things and they would still be in focus. It took less than a minute of cutting with a hacksaw at the magnifying glass’s rim to free the lens.
For the holder, I recalled seeing models for some on [giufini’s] Thingiverse page. They were the wrong size so it was back to Blender. Loading one up, I found the polygon count for the cradle portion was too high to make resizing easy, so borrowing from the basic design I drew up my own cradle. For the socket, I imported one of [Alex’s] ball and socket models, deleted the ball, and attached the socket to my new cradle. The first print showed that the lens was just a little too loose in the cradle, but a quick edit and reprint fixed that. For added robustness, I also made the cradle bulkier and upped the infill from 50% to 60% for that second one. The lens now fits snuggly and holds very solidly in place.
But it was hard to get the joints stiff enough to hold it in place at an angle. That’s no surprise given that the lens weighs in at a relatively heavy 83.5-grams. It did work, but just barely. That’s where my new four cm long joints came in handy again. They reduced the number of joints from five to three and tend to droop less. It would still be nice to find a small, lightweight fresnel lens though.
Magnetic Holders


So far what I’d printed helps with soldering components together but I also do a lot of through-hole soldering with perfboards. If you’re like me, you run into the problem of trying to hold a component neatly in place on one side of the board until you can secure it by soldering on the other side of the board. At those times, my vice usually holds the board vertically so I can access both sides. That led me to the idea for another add-on, a helping hand which could be attached with magnets to the ferromagnetic vice.
I mulled over designs that included boxes for placing the magnets inside but it’s tricky coming up with a box that can be 3D printed and be closed well enough that the magnets won’t come flying out when accidentally brought near some metal object. In the end I went with magnets with holes in them which could be bolted in place. That way the box could have openings for the magnets in one face, something that’s easy to print. To keep from damaging the magnets from frontal impacts, I recessed the magnets a little inside the box.
My first attempt with just two magnets didn’t pass a rough strength test (pulling on it by hand), so I made a new one that was deep enough for two sets of two. I wouldn’t rely on it to hold the magnifying glass but it turned out perfect for holding the odd resistor or capacitor.
Final Thoughts
I couldn’t have pulled this off so quickly without the prior work to start from. The power of Open only holds up if you pass the torch for the benefit of others. The magnetic holder, four cm ball and socket, and the magnifying glass holder can all be found in a collection on Thingiverse as “remixes” of [Alex’s (alexrich82)] original models.
These helping hands work well for lightweight objects, but naturally, there is a limit. The 7.5 cm, 83.5-gram magnifying glass is at the edge of that limit. Perhaps scaling up the ball and socket to provide more resistance through friction would help there.
On the plus side, coolant hoses are reportedly difficult to disassemble and reassemble in different lengths, whereas doing so with this lockable system is easy and they won’t come apart once locked in place. But the biggest reason I’d recommend them is the ease of designing and attaching custom parts. Think Meccano or LEGO for helping hands.
Though if it’s a delicate circuit board you’re working with then a metal vice may be a little too harsh. Consider this 3D printed plastic vice that’s held shut using a rubber band which our [Tom Nardi] improved upon.


” coolant hoses will do the job at under $10″
I would never discourage anyone from making something themselves. Even when there is no other benefit it is very rewarding. Every time you use or even see it you can feel good knowing you did that! not to mention having the practical opportunity to customize your tool as you make it, getting something that works optimally for your personal needs.
But… I would never use monetary price as one of those benefits to making one’s own helping hands.
h t t p s : / / http://www.harborfreight.com/helping-hands-60501.html
It’s kind of hard to beat $4.99 and even if you can… so you saved some amount less than $5?
A nice thing about that Harbor Freight one is that it would better hold up my heavy magnifying glass, or anything else that’s heavy which you can dream up. It looks like you can loosen up the wingnuts and insert your own 3D printed object with a suitably sized ball joint.
Great writeup – so that’s you who was remixing last week! I talked a little about the off the shelf coolant arms in this project log. They are pretty useful but have some drawbacks. https://hackaday.io/project/5739-locking-ball-and-socket-gooseneck-system/log/18348-evaluation-of-loc-line-brand-coolant-arms
The $4.99 HF or Ebay helping hands are ok but they are usually short and sort of weirdly annoying to maneuver
Guilty! I finally got my own 3D printer just before Christmas after having used ones at makerspaces for so long, and at the top of my thing-I-want/excuses-to-print lists were helping hands. Yours came in handy ;-).
I can never get those off-the-shelf arms to work together in unison. They’re okay at gripping a board on two sides, but holding a wire and a component they’re awful.
At this point I will often use my stickvise (thanks Alex!) and the off the shelf 3rd hand. This ball-joint arm method is something I want to try out.
That has very limited flexibility, as far as positioning the clips goes. It’s fine for what it is, but it’s limited.
Also if it’s like the identical one I have, the base is pretty light which means it can tip over.
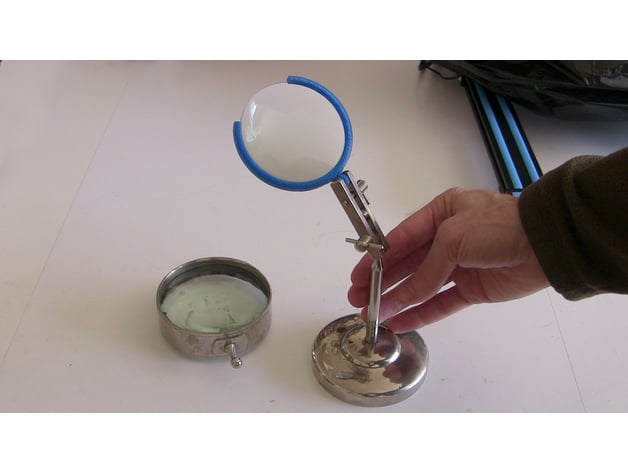
Oh! That just gave me the idea to try this. It uses the 3D printed magnifying glass holder but with a ball instead of a socket. I have one with a ball because I had a brain fart when I made my first version. It turns out to have been useful after all! The lens that came with the stand wasn’t very good, short depth of field and so only a small area close to the glass is in focus. This dollar store lens is much better. I think I got the stand from a yard sale, so no online source.
As suggested in the article, a lightweight fresnel lens solves many of the problems above. I got a 10-pack of credit card sized ones with little protective sleeves in two days from the usual culprit for less than $10.
They’re super handy (I now have them stashed all over the house, with several to spare), especially for the person you know that *needs* glasses to read but hasn’t gotten used to *having* glasses.
Is a fairly large volume behind the fresnel lens in focus or just a small area? I know with the larger fresnel lens I have (10″x5″?) a large area is in focus meaning that you wouldn’t have to move the lens around a lot while working on something, such as various locations on a circuit board.
If a cheaper product *with the same functionality* existed, I’d agree with you. In my experience those cheap wingnut/ball and socket helping hands are almost useless, because poor tolerances on the “spherical” balls mean the joints very rarely clamp properly in the position you want, and having a single joint limits the end placement. I’d definitely pay twice the price for something that actually clamps in the position I want it, I think the point of saying that was “you can have something much better than those crappy $5 helping hands for not many more dollars”
Sorry, those are crap. I’ve had two from different places, and neither worked well even when new, and after a year or so’s use, they deteriorated.
The coolant hoses are much more adjustable and reliable so far.
Then there is this one also:
https://www.harborfreight.com/jumbo-helping-hands-with-led-lights-65779.html
It sounds like you’re reading into it too much. The mention of $10 was just to clarify how cheap of an option hoses are.
How’s smooth is movement of the joints, do the layers ever grab each other?
I haven’t experienced any grabbing at all. If anything, the danger is the opposite, that the movement becomes too easy. So far, so good though. I’ve since soldered a few more things with it and it’s held up my parts, including a small circuit board.
They are a usually fairly smooth but quite tight they can stick if they’ve not been moved in a while.
I should imagine the printed ones would grab a lot. Maybe acetone vapour would improve it a bit.
I think I’d try mounting them in a drill chuck and holding a cloth to them. Let friction heat the surface and keep it nice and round at the same time.
I printed up a set of these a while ago and attached them to my Panavise. I find the motion not to be smooth, and they are difficult to position precisely enough to hold things where you need them.
Hm, that locking ring is definately an interesting idea, but it seems somewhat unpractical if you need tools to fully lock that thing in the third position. With a bit of CAD trickery it should not be too hard to make a slightly expansing thread on the outside of the socket and then have a nut you can screw on there that gradually compresses the ball socket the further you turn the nut down.
For even better control, you could probably design some kind of breaking pad inside the ball socket. You then screw in a bolt from outside the socket that pushes against that breaking pad giving you gradually adjustable joint tightness. If you don’t have wing bolts and don’t want to have a tool ready to adjust the helping hands, you can just use hex head screws and print yourself a knurled head for the screws to make manual adjustments easyer.
Agreed, discrete spots is less ideal than continuously variable control, the trick is getting your “setting” to stay where it is. If threaded, the nut can back off over time requiring retightening. It’s worth testing though, maybe with a tight enough threadform it would be self locking.
If you want a good locking mechanism, look at ‘magic arsms’ For video use.
Pretty sure you meant “magic arms” (adjustable articulating support arms for camera, lights, etc.)
I’ve been tossing around an idea to make a version of these with a tensioner system running through the middle attached to a spring and a high torque hobby servo, with touch sensor to control tensioning/ relaxing of the holding force. Perhaps one button on a timer, relax for 5-10 seconds, then automatically retension while you hold it in place so it then holds itself. Rosie O’Donnell picture on the touch sensor for universally-understood “language localization”.
Oooh.. That would be nice! I wonder, how would the resulting degree of freedom be? Fishing line for the pulling?
Also do we want maybe a spring for the tension and the servo to temporarily release, or is that just as good/bad as it needing to be plugged in to hold? Maybe a spring with lever would work, main question as i forsee is if we can get enough force to hold good combined with keeping the needed travel short enough.
That would be quite a trick, send it to the HaD tip line if you pull that off!
Really liking this new series of posts, nice to see actual applications of 3D printed parts that aren’t one-off repairs or game/movie props. Those are cool in their own way, but very narrow scope.
3D printers have come far enough that they are legitimate tools now, and it’s good to see them being treated as such.
Question: Can something like this be done
I’m thinking of a ball & socket with one end being a cylinder 1/4″ dia,, 1/2″ long, the ball & socket end having a flat surface atached to it around 3-1/2″ x 3-1/2″..
Its a small gadjet..
The distance from the plate attached to the ball & socket end to the end of the 1/4″dia end rod equals about 1- 1/8″.
The ball of the ball & socket about 3/8″ dia.
The movement(rotation) of the ball to have friction (like the ball & socket movement of a rear view mirror on a car)
This ball & socket gadjet would be in line, not 90 degrees