When you think of machine tooling, what comes to mind might be an endmill made of tungsten carbide or a punch and die made of high-speed steel. But surely there’s no room in the machine tool world for 3D-printed plastic tools, especially for the demanding needs of punching parts from sheet metal.
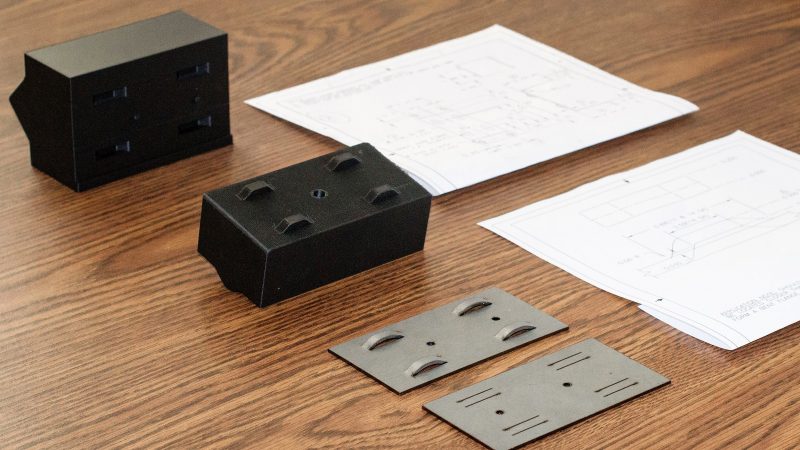
As it turns out, it is possible to make a 3D-printed punch and die set that will stand up to repeated use in a press brake. [Phil Vickery] decided to push the tooling envelope to test this, and came away pleasantly surprised by the results. In fairness, the die he used ended up being more of a composite between the carbon-fiber nylon filament and some embedded metal to reinforce stress points in the die block. It looks like the punch is just plastic, though, and both were printed on a Markforged Mark 2, a printer specifically designed for high-strength parts. The punch and die set were strong enough to form 14-gauge sheet steel in a press brake, which is pretty impressive. The tool wasn’t used to cut the metal; the blanks were precut with a laser before heading to the press. But still, having any 3D-printed tool stand up to metal opens up possibilities for rapid prototyping and short production runs.
No matter what material you make your tooling out of, there’s a lot to know about bending metal. Check out the basics in our guide to the art and science of bending metal.
Thanks for the tip, [Oahu].


14 guage steel, pretty impressive. For reference thats about what cars used to be made of, and as a ex body work tech I used to love working on them, now its closer to 20-22 guage, paper thin.
The metal inserts in the lower die are pretty clever as well. It sounds like he needed a limited number of these brackets for a customer, I wonder how long these would hold up on a large production run? If 1000 parts were made, i’d be curious to compare part 1 to part 1000.
Solid work.
Just a subtle note, I wouldn’t call this a “punch and die”, but rather a forming tool. The material was pre-cut. Bending 14ga is pretty promising though.
+1
It is hard to see in the video but it looks like the two holes are already punched out, and the sides of the slots are pre cut. All he is doing is bending the ribs out. Not nearly as impressive.
That’s what it says in the post as well.
Awesome. I’d love to see somebody try it with regular nylon (or even PLA?) and not Markforged, which is outrageously expensive. I wonder what extent the difference would be. All of the strength testing I’ve seen thus far has shown regular, non-composite filament consistently out-perform fancy filament, which makes it seem like it’s more a marketing thing to me.
Markforged does do some cool and different stuff with continuous fiber, but I don’t think that their tech is about enhancing compressive strength.
I have used a similar technique to bend brass sheet metal prototypes in the past. Stuff like EMI shields, battery contacts that fit into a custom case, even a ring of spring fingers that connected a round PCB to a metal tube. You do need to cut a flat pattern on a CNC, but gone are the days of needing to outsource small formed sheet metal parts just to do the bends.
Durability – I churned out medium production of 20-30 parts and no sign that a single 3d printed tool couldn’t have done a couple hundred. You don’t need fancy filament necessarily, I just used ABS. The pressing can often be done by hand for brass, or you could use a vise for stiffer materials. I did use 100% infill on the print to maximize support.
Please share pictures of this (forming of metal shielding each c)