Logging data with an Arduino is old-hat for most Hackaday readers. However, [Patricia Beddows] and [Edward Mallon] had some pretty daunting requirements. Their sensors were going underground and underwater as part of an effort to study conditions underwater and in caves. They needed to be accessible, yet rugged. They didn’t want to use batteries that would be difficult to take on airplanes, but also wanted more than a year of run time. You can buy all that, of course, if you are willing to pay the price.
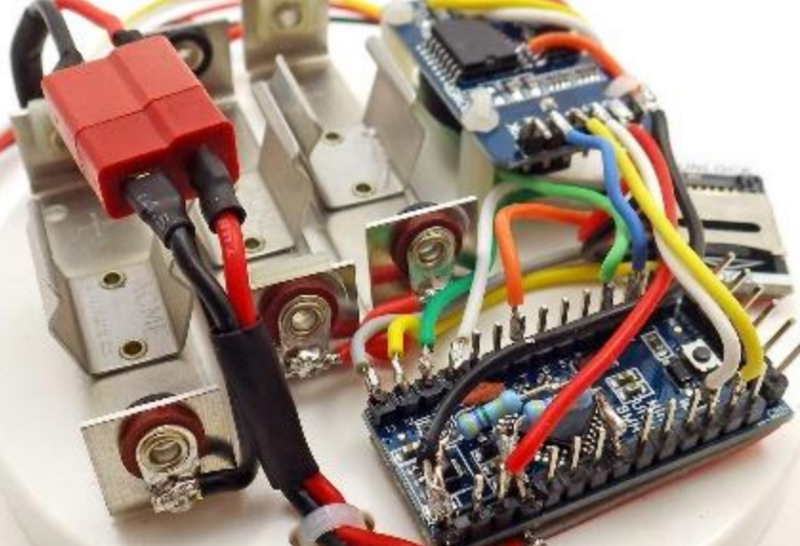
Instead, they used off-the-shelf Arduino boards connected together inside PVC housings. Three alkaline AA batteries are compact and give them more than a year of run time. They wrote a journal paper to help other scientists use the same techniques for the Sensors journal published by the Multidisciplinary Digital Publishing Institute.
If you regularly read Hackaday, you probably won’t find the electronic part of the build remarkable. However, that’s kind of the point, as this is all off-the-shelf and inexpensive. They do however modify the boards in some cases to allow the controller to power them down, for example.
In fact, they put a lot of thought into reducing power requirements. Since your eye is more sensitive to green, for example, they use green LEDs with very low currents as indicators. They also speed up the serial bus going to sensors because they found that the increased power required was more than offset by finishing the transaction faster (and, thus, going back to sleep sooner).
The PVC enclosures are also interesting. The paper shows some practical deployments in some very harsh conditions. If you want more practical details, the Cave Pearl project has been blogging about their development of these loggers for a while. They have a good “how to” page, as well.
If an Arduino seems too last-year for you, we’ve seen long-duration logging done with ESP8266s and ESP32s. However, they did use lithium-ion cells. Spoiler alert: The ESP8266 lasts longer than the ESP32. If you want to minimize power when sending things out over a network connection, consider MQTT.


Edward has brought together tons of diverse information in his Cave Pearl pages, from getting the best out of cheap DS3231 RTC boards to calibrating sensors for better accuracy. Be prepared to lose a few hours once you start following his articles.
30K resistor for a led, less tan 50uA, that must be dim
1) i like this author’s mindset, zero is ALWAYS less then “something”…
2) good to take advantage of the processing load vs processing time.
3) shelf-life andor leak-resistance diminishes as the (alkaline) cell’s charge level decreases due to internal corrosion. i believe this corrosion is over a magnatude faster when the battery is (very) low, not a major issue, just factor in the 1$ cost of new battery holders on every (1-year) set of batteries, and keep the batteries either contained with disposable bag/box/tape/ect. buying only the best cells doesnt hurt either…
4) to “jacques” he is talking about the new green LEDs with efficiency simillar to modern blue LEDs.
if you are trying to make a directly-viewed status indicator with those LEDs, even 50uA will kill your nightvision. personally, ive made (directly-viewed) status lights with those SUPER-high efficiency LEDs running on 10uA (ie 0.01mA), and i still noticed a small reduction in nightvision after direct-viewing. this was all assuming 100% duty (ie “on”)… at 10% duty you will need 10x the current for the same brightness
i just tried it with a 1Meg resistor and it was more then enough to see in the dark from accross the room when viewed directly. test was a 3.2v high-efficiency green. all LEDs will have reduced voltage at those super-low currents and the voltage must not be confused with the voltage of a LOW-efficiency LIME-green LED at maximum current (ie 2.1v@20mA) this test used a 4.9v power-supply and my cheapest multimeter read 1uA-ish; 0.001mA
PS: i realise i could accurately measure the current by measuring the resistor’s exact resistance and then measuring the voltage drop accross the resistor then divide, but this was just an approximate test.
I made a navigation light for the front of my boat a couple of years ago using 10 hi-efficiency clear red LEDs on one side and 10 clear green on the other fed by a pair of current regulators starting both at 15-16 mA and the green side was lighting up the bank at over 10 yards out and I kept cranking down the current to below 5 mA and it’s still a bit brighter than the red side.Something seldom mentioned is blue LEDs can really mess up your night vision and are banned by the US military in their gear. Yet the Herd Mentality of manufacturers make them (over) use them in nearly all consumer gear despite the fact they are horrible for displays because you eyes can’t properly focus on blue light and causes unnecessary eye strain.
Wow! I know I’m late to the party, but I just read through the PDF whitepaper — it’s a phenomenal resource for anyone planning to build a datalogger, any kind of sensor apparatus, anything running a long time on batteries, or anyone interested in the kind of science you can do with parts we all take for granted.
Really. Go read.
A visiting researcher dropped by my humble basement workshop with questions about the physical skill level students would need if they added one of these DIY data loggers to their environmental curriculum. I figured the easiest way to cover that was to simply build one, while they recorded the process.
The result of that three hour session is now available on YouTube:
https://www.youtube.com/playlist?list=PL79ZjHgoYtfzvDKPADJH7HPYDFFlxSLXt
More recent build video: https://www.youtube.com/watch?v=9pgqgV6ujKU
The component stack described in the 2017 tutorial (previous post) is great for getting your logger into 2″ PVC pipe for underwater deployments, but that soldering tends to be a bit of a challenge for beginners. So for the latest ‘classroom version’ we spread the parts out, and use Dupont jumpers to cut down the assembly time (~1 hour). It’s a much easier build for people having their first try at environmental monitoring.