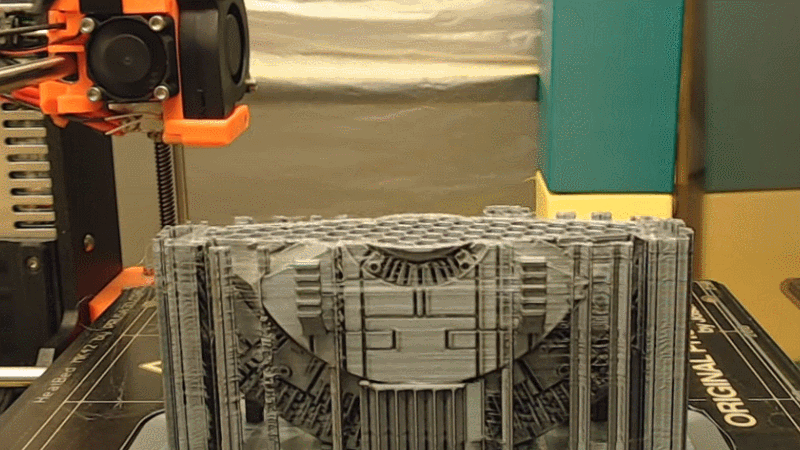
Most time-lapse videos of 3D prints show a steadily growing print with a crazy blur of machine movement everywhere else. This is because an image is captured at a regular time interval, regardless of what’s physically going on with the machine. But what if images were captured at consistent machine positions instead? [FormerLurker]’s Octolapse plugin for OctoPrint came out of beta recently and does exactly that, and the results are striking. Because OctoPrint knows where a 3D printer’s print head is at all times, it’s possible for a plugin to use this information to create time-lapse videos where the print head position is consistent instead of a crazy blur, or even have the print head absent from the shot altogether.
[FormerLurker] had originally created stabilized time lapses by hand editing G-code, which had great results but was inefficient and time-consuming. This plugin is the result of his work at automating and enhancing the process, and is also his first serious open source programming project. We’ve covered upgrading a 3D printer with OctoPrint before, and the plugins functionality of OctoPrint means features can be added independently from the core system, which itself largely remains a one-woman effort by creator and maintainer [Gina Häußge].


So cool. How did you remove the print head? Love to see more videos.
Move it out of frame, take pic, start next layer, repeat. ;)
Could also take video of the entire process then post process frames that lack the head but this seems a bit easier and more practical given you already know when the head is out of frame and can simply take the photo then.
Here’s a version I did a while back that includes some more videos. The approach is similar, but uses a webcam for grabbing the images instead of GPIO solution.
http://www.makermusings.com/2015/09/01/making-time-lapse-video-of-3d-prints/
Sort of like the problem of machine guns mounted behind the propeller of WWI aircraft, and getting the gun to not shoot if the propeller is directly in front of it.
Very good analogy…
+1
That is one of the only things I remember from my high school history class
First generation didn’t bother with synchronizing, they just added a steel wedge to the propeller so it wouldn’t break. Unfortunately the main bearing wore out much faster instead (just to add insuly to injury since the pilot already had to endure a spray of laxative trying to keep it lubricated).
Well visualized example.
https://www.youtube.com/watch?v=ysB-SH19WRQ&t=2m15s
This could be done without changing the gcode (and thus print time or thermal properties) by just taking the photo when the head is nearest the xy origin on each layer. This would give a nice “deposition” effect as the object seems to come out of the nozzle fully formed.
It’s possible to do something similar with Octolapse, though it doesn’t have a built-in gcode pre-processor at the moment. However, it does have a ‘gcode trigger’ that allows you to insert a special code that triggers a snapshot. One could insert the gcode into the slicer’s layer change script. I’m guessing that some slicers at least would be able to align the seams similarly to the way you describe. Also, the stabilization can be turned off per axis, as well as the z-lift and/or retract, which would (not exactly) mimic the behavior you are suggesting.
However, a perfect implementation would need a preprocessor of some kind so that each snapshot point could be determined ahead of time. Currently Octolapse consumes a line-by-line stream of gcode right before it is sent to the printer, limiting its ability to gain information about the layers, like min-x min-y, etc. This would be a great enhancement, and would allow a ton of other new features.
Here’s a couple videos I found of doing exactly that (print appearing to flow directly from a stationary head):
https://www.youtube.com/watch?v=EuU1sDk3UyU
https://www.youtube.com/watch?v=lBrVpVzzdG4
It’s not necessary for the head to move out of frame, it can be in a consistent spot every shot which I think is a much more visually interesting result.
What would be a good cheap camera for this setup?
Canon with CHDK.
i don’t think that is a good option, how would it know when to take the picture?
Canon can be remote-triggered. CHDK adds a *lot* of remote trigger options.
Remote trigger, data line interface or some other trick that the book scanner crowd use.
Here’s one from RC groups.
https://www.rcgroups.com/forums/showthread.php?1705217-DIY-USB-remote-for-Canon-camera-s-using-CHDK
From a quick skim it sounds like you could put a (reed) switch on the gantry that sends +5v to the camera so it would take the picture when the switch is opened again. +5v focuses, 0v triggers exposure.
There have been lots of requests for external camera trigger options, like GPIO and bat/bash script support. It would be awesome to see a 4k timelapse made from a DSLR.
@FormerLurker: Isn’t it possible to have one single pin trigger on OctoPrint? Because then all you’d need is an optoisolator and a trigger wire to the camera to fire a Canon.
@Phrewfuf, It’s not possible from Octolapse yet, but it might be possible in conjunction with some other plugins (Gcode System Commands plugin comes to mind). At some point GPIO support for OctoPi will be added. I thihnk it could be useful for other things too, like lighting control. I think one could also probably write a bash script to trigger USB IR emitter, though it would probably take some effort to make that work.
Marco Reps did something similar at the beginning of the year: https://youtu.be/5JZ6yT_WM58?t=373
This is one of the things I wanted but never bothered to work to get it. Well done, its very useful!
You could also trigger the camera from the Z axis motor step pulse
If the build platform is stationary, you could also use an ND filter and a very long exposure time like every 30 seconds. The flurry of the print head whizzing to and fro may look nice too, like a ghost laying the layers one by one :)
That’s an ingeniously simple solution. Too bad my base moves!
I’ve done similar timelapses with CHDK + remote trigger via GPIO via Octoprint.
https://www.youtube.com/watch?v=8ZEkBYgiRMk
https://www.youtube.com/watch?v=DFpeTO_IRyw
Of course many timelapses they try to put motion blur in to give you an impression of speed so it obviously it depends on your taste!!
My wife has an older Canon T1i. You can trigger it remotely. I found this page take talks about the interface to the Canon and I think to many other cameras. I like to hack with stuff I have, using this I could have an arduino listen for the pulse on the Z drive and snap a picture using the arduino and relay. That would be cheap and easy and fun to try out.
What is a good way to take all the pics and make a movie from them?