
3D models drawn in Blender work great in a computer animated virtual world but don’t always when brought into a slicer for 3D printing. Slicers require something which makes sense in the real world. And the real world is far less forgiving, as I’ve found out with my own projects which use 3D printed parts.
Our [Brian Benchoff] already talked about making parts in Blender with his two-part series (here and here) so consider this the next step. These are the techniques I’ve come up with for preparing parts for 3D printing before handing them off to a slicer program. Note that the same may apply to other mesh-type modeling programs too, but as Blender is the only one I’ve used, please share your experiences with other programs in the comments below.
I’ll be using the latest version of Blender at this time, version 2.79b. My printer is the Crealty CR-10 and my slicer is Cura 3.1.0. Some of these steps may vary depending on your slicer or if you’re using a printing service. For example, Shapeways has instructions for people creating STLs from Blender for uploading to them.
Fixing Shape Issues
 Slicers will often highlight a few issues with your part such as if a section of it hangs out in mid-air with no support under it. But Blender can also show you these things, allowing you to fix them before getting to the slicer and thereby avoiding going back and forth between the two programs.
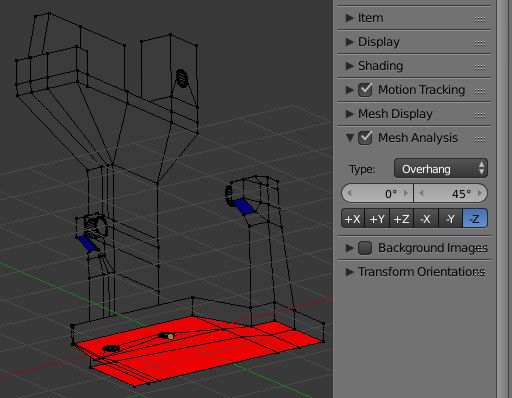
Some of this is done through the Mesh Analysis panel in the Properties region (the area on the right in the 3D View which you bring up by press N).
Here we’re showing it highlighting overhangs, anything in the range of 0° to 45°. The red area is the bottom of the part and will be sitting on the print bed so it won’t be a problem. The areas in blue, however, can be fixed by increasing their angle as measured from the horizontal.


Other issues available by clicking on the Type dropdown are:
- Sharp – These are edges or points where faces meet which may be too sharp to print well.
- Distortion – A three-sided polygon will always have a flat surface but Blender supports polygons with any number of sides, called n-gons. These can be flat but they can also be distorted such that different sections of their face point in different directions. This may confuse some slicers.
- Intersect – This is where one section of a part is inside another section. In the example shown, I made a knob by simply jamming a cylinder partway into the side of vertical face such that one end is inside the mesh but not connected to it.
- Thickness – This is a section which may be too thin to print, perhaps a thin wall.
Fixing Problems In The Mesh
Other things which may confuse a slicer are usually more problems with the mesh which aren’t visible or are inside the part. Luckily Blender has tools to help with that too.
 Many of these issues come under the heading, non-manifold geometry, or geometry which cannot exist in the real world. Examples are:
- vertices or edges which are not connected to any faces, perhaps left over when deleting vertices but missing some
- duplicate geometry, perhaps left over when pressing E to extrude a face, thereby creating a new face, but then deciding not to pull it away after all and then deleting only parts of it or none at all
- holes in the side of your object, perhaps where an edge is actually two unconnected edges but looks like a single one
- geometry left completely enclosed inside an object.
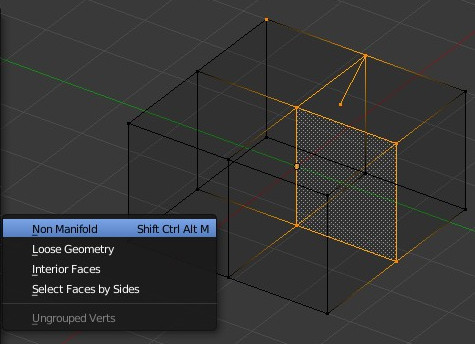
Before exporting anything for 3D printing, you should go into Edit mode, set your Viewport Shading to Wireframe, and make sure none of your geometry is selected. Then do Select > Select all by trait to get a menu of tools which will select types of any problem geometry listed above.
The most likely culprits it’ll show you will be unnecessary geometry inside so simply delete it while being careful to not delete stuff you still need. For example, when deleting an interior face with some edges still connected to the outer surface, use Only Faces and Only Edges & Faces in the Delete menu.
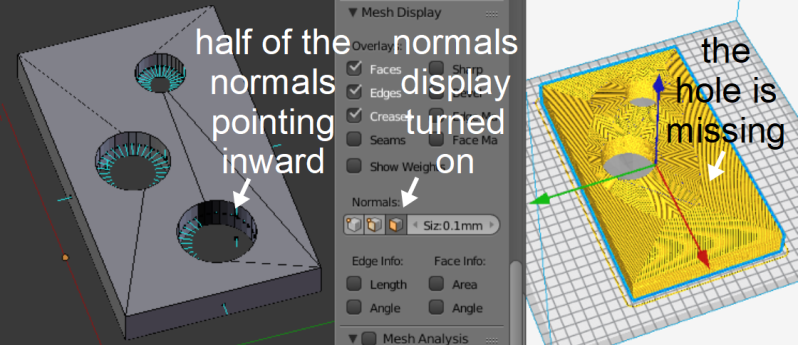
Another frequent culprit is incorrect normals. Normals are indicated by lines which point perpendicular to a polygon. The lines are shown emitting from one side of the polygon and the other side has a dot. You want all the normals on the outside of the object to be pointing in the same direction otherwise slicers may get confused. On the right in the illustration is the object in Cura and you can see that the hole is missing. A good habit before exporting is to select everything in Edit mode and then go the Tool Shelf, the Shading/UVs tab, and select Recalcuate to make all normals point in the same direction.
N-Gons Are Bad For Slicers
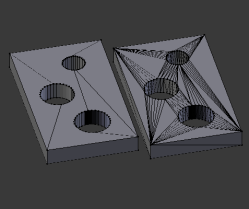
I’ve found that checking for and fixing the above-mentioned problems works but that you can be a little bit forgetful about doing so if you convert n-gons to triangles before exporting your objects for the slicer. In Blender you do this by selecting everything in Edit mode and then doing Mesh -> Faces -> Triangulate Faces (Ctrl-T).
Scaling And Exporting
The odds are good that the scale you’ll be drawing your part in will be different from the scale used by your slicer. Once you’re ready to export the part to an STL, OBJ, or whatever format of file works with your slicer, you have a choice of either scaling the part in Blender and then exporting or exporting it as is and then scaling it in the slicer. I most often do the former.


The very first part I printed on my CR-10 was a filament guide which I downloaded from Thingiverse as an STL file. When opened in Cura it needed no scaling. So when I was ready to print the first part of my own design, I created a new Blender file from scratch and imported the filament guide. I then appended my part, an eyeball to which a Pi Camera can be attached (File -> Append, drill down to the eyeball Object in the file). The filament guide was around five centimeters long and the eyeball appeared tiny by comparison so it was clear that the eyeball needed to be rescaled. Multiplying all the scale values by ten did the job. I then deleted the filament guide and exported my eyeball as an OBJ (smoothness on rounded shapes seems to be lacking in Blender’s STLs when opened in Cura).
I then saved that Blender file with the properly scaled eyeball. Now whenever I’m ready to slice a part, I open that file, append the new part, do whatever scaling is needed, delete the eyeball, and export the part.
That seems a lot clunkier than simply exporting the part directly from the Blender file in which I created the part in the first place and then rescaling it in Cura. And you’re probably right. However, I almost always create multiple interlocking parts and there doesn’t seem to be any way to tell Blender to export just one of them.
A Few Final Tips
Depending on the modifiers, you may want to apply them before some of the steps mentioned above. The Mirror modifier is one good example.
There have also been Blender Add-ons which consolidate many of the above steps into one place. Go to the list of Add-ons by doing File -> User Preferences and search for “3D print” to find any.
Many of the above problems stem from the fact that Blender is a mesh-type modelling program rather than a solids-based one like SolidWorks and FreeCAD. But for free-form or sculpted 3D objects, Blender shines. By keeping in mind the above tips when making your models and checking with Blender’s tools before exporting, printing should go smoothly.


Why go through all the hassle when things like Fusion 360 are free? I used to even use SketchUp but finally got rid of that trainwreck
I don’t particularly care for Blender, but CAD tools optimized for a very different task than 3D modeling tools like Blender. For example, sculpting a miniature figurine would be downright painful in Fusion 360.
But modeling it in Blender then importing it into Fusion is easy-peasy.
My experience with trying to produce prints from blender have been uniformly horrific failures. I’ve never had a single problem in Fusion 360.
Autodesk might be the devil, but they’re the devil with a product that actually does what it’s supposed to at this level.
I’ve modeled loads of stuff in Blender and not had any problems exporting as STL for printing, both with FDM and SLA. If there are any errors in the exported file, those errors will presumably still be there when you import into Fusion 360, so where’s the benefit in doing that? They’re different tools for different jobs.
I’d never dream of doing something that needs lots of specific dimensions in Blender and I’d never dream of sculpting something in CAD software. I had a project recently where I needed a fairly complex motorised mechanism as part of a creature sculpt, so I did the mechanism in Solid Edge, then imported that into Blender and sculpted / modelled the creature around it. Worked out great!
For some of us the hassle of licensing Fusion 360 alone is enough to not even bother for the occasions when we do need something like that… FreeCad OpenScad and Blender it is then.
I’ve gotten to where I can make some fairly complex things straight in OpenScad…
https://www.thingiverse.com/thing:3181038
licensing Fusion 360? even if you are to big for free license the use loophole to do freelancing for own company
I think it’s usually because of a preexisting skillset. I already do poly modeling for work doing games and film effects, so I’m much faster and better at modeling using these tools instead of learning CAD. I just need to know how to lay out my topology and export so the slicer doesn’t get all confused. As a bonus, the file size is often way smaller and it’s optimized for real-time so I can share it more easily with a service like p3d.in to let people thoroughly inspect the 3d geometry in-browser before they print. It has drawbacks too, of course.
Also SketchUp is not representative of most of these software suites. The topology SketchUp spits out is horrendous fried dogshit. It’s really horrible. I tried to use it once to see if I could easily get some geo out of it and port it into a more traditional suite. Nope. Just made a ton of clean-up work for me.
the differences between things like autocad and 3dsmax aren’t that huge. autocad really just has the renderer stripped out, and has a few engineering tools thrown in in their place. most of which you dont need for 3d printing.
1. Fusion 360 is not suitable for repairing .stl files with bad geometry. Sometimes, you download a file that someone else created, and find that it’s an unprintable mess. (In my outdated experience, Sketchup was *terrible* at producing printable .stl files.)
2. It is much easier to “sculpt” in Blender than in Fusion 360. (This is a great technique for producing shapes like figurines and masks.)
3. Blender has lower system requirements than Fusion 360.
4. To people who object to non-FLOS software, or to Autodesk de-open-sourcing Makerbot, Fusion 360 is not an option.
5. Autodesk killed off 123D; there’s no telling what they will or won’t do with Fusion 360 (or its licensing terms) in the future.
6. Fusion 360 is only available on Windows and OSX. Users on Linux, BSD, etc. must use other options. (Blender is supported on all of these platforms.)
As Wade said, Blender and Fusion 360 are quite different tools. Blender is painful to use when you realize you need to tweak the dimensions of your part — it has no concept of geometric constraints. (FreeCad and Solvespace are more direct competitors to Fusion 360 in this regard.) Blender, on the other hand, has an whole suite of capabilities that Fusion 360 lacks, including (but not limited to) animation, compositing, and camera tracking.
Between the two, Fusion 360 is what I would suggest for designing all of the parts for a car, and Blender is what I would suggest for making a movie or video game. Because people 3D-model and 3D-print parts for all sorts of uses, one tool is not generally recommendable over the other.
I have never had Fusion fail to fix the geometry in a not-completely-fucked part. I’ve never had Blender succeed in producing a part with unborked geometry.
Don’t get me wrong, blender’s obviously better for a bunch of stuff – but I always move it into fusion before printing.
Certainly, Blender makes no assurances that the its models are printable. It is, however, possible to fix arbitrary mesh errors in Blender.
Since I can’t use Fusion 360, I’m curious — what happens when you import a broken file into it, and how do (can?) you fix it? For example, this ocarina, which has some wild polygons poking through some of the finger holes:
https://www.thingiverse.com/thing:2755765
In Blender, I would, for each stray vertex:
1. select the vertex
2. “select more” to select all of the verticies connected to it
3. unselect the stray vertex
4. snap the 3D cursor to the mean of the selected (neighboring) verticies
5. re-select the stray vertex
6. snap the stray vertex to the 3D cursor’s location
(Or, alternatively, delete the stray vertex, then select the verticies it had been connected to, and make a new, triangulated face between them.)
How would this model be fixed in Fusion 360?
Fusion360 free? Ho, hum.
yeah. atm fusion is free… but guess what business models tend to change…
As to Blender export of single scaled element – there is this addon: https://github.com/dairin0d/export-selected . Besides, recent Blender allows exporting only selected to STL (but I prefer mentioned addon).
AFAIR, Cura allows importing blend files.
I miss in your article some hints regarding increasing polygon count via bevel, subdivision and smoothing. It greatly enhances prints quality.
Just wondering — since Blender’s .stl exporter has a checkbox for only exporting the selected object(s), what do you prefer about the addon?
It’s just faster to select – that’s all. I can pick “Export selected” and don’t bother to mark a checkbox later. But it’s just a nuance.
Besides I also script things, so I find it useful to use classes defined in other addons in my own scripts. For instance, as I make projects consisting of tens of parts sometimes, I write now a small addon that saves any element named along the pattern “p3d-xxxxx” as STL. This is where I prefer using already defined classes over blender builtins usually due to coding convenience.
I selected an object, exported STL, no dialog popped up. Then I thought, hang on, maybe something appears in the Tool shelf? I see it now. Thanks. That’ll speed things up.
my modeler of choice is still 3ds max.
So far I Haven’t had any problems printing files created with Blender (except with ngons). If the mesh/topology is messed up, that’s my fault, not the software.
As for scaling objects for exports, that seems like I cumbersome way to do it, since both the. OBJ and. STL exports have options to scale on export (for. OBJ I made a “printing preset” with scale and up direction set ho suitable values [as well as only export selected], sadly the stl export doesn’t have presets, but it has batch export..)
i used to use autoCAD back in 2010 to design parts in high school for robotics but then my student license ran out. I tried blender but never quite liked the flow when doing parts that had to actually function, modeling figures is good. For the last 6 years i’ve been using potato SketchUp with STL exporter. It’s simple and i like the flow but it is a train-wreck if your mesh is just a tiny bit misaligned.