Re-enacting TRON On The Apple IIgs

TRON is a science fiction classic, hitting cinemas in the midst of the burgeoning home computer era. It’s the film that created the famous light cycle, which spawned many video game recreations in the following years. Many years ago now, [Daniel] decided to flex his programming muscles by coding a version of the game for the Apple IIgs, with accidentally excellent results.

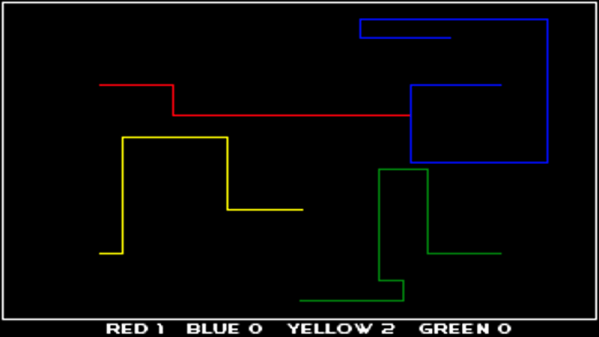
In the film, the characters find an escape from the light cycle game by forcing another player to crash into the walls of the play area. The resulting explosion left a hole, allowing the players to exit the light cycle game and explore the rest of the computer. Amusingly, due to a coding oversight, [Daniel] had created exactly this same flaw in his own code.

[Daniel]’s game differed from the original in that players were provided with missiles to destroy enemy trails. However, these missiles did not discriminate, and due to the simplicity of the code, were able to destroy the boundary on the play area. This was discovered when the computer player tried to escape an otherwise impossible situation. Upon blowing a hole in the arena wall, the computer player proceeded to drive off the screen – into invalid memory. This led to the computer crashing in short order, due to the unprotected memory space of the Apple II platform.

It’s a case of code imitating art – and completely by accident. The game managed to replicate the light cycle escape from the film entirely due to the unexpected behaviour of the simple missile code. [Daniel] steps through the code and how the bug happened, and covers the underlying principle behind the resulting crashes. It’s an entertaining tale of the risks of coding at low level; something we don’t always run into with today’s modern interpreted languages.

Thirsty for more tales of hacking the Apple II? How about going back in time to fix a 37 year old bug?

Centurion Bridge Layer, Now In RC

Radio controlled models are great fun. Most of us have had a few RC cars as children and maybe dabbled with the occasional helicopter or drone. It’s a rare breed of modeler, however, that gets to drive a radio-controlled bridge laying tank.

The lads prepare to fight the good fight.

The model is a replica of the British Centurion Bridgelayer – a modified tank designed to allow mechanized units to readily cross rivers and similar obstacles in European battlefields. While the genuine article relied on hydraulics, the RC version takes a different tack. [hawkeye3guns] built custom linear actuators out of motors, gears, and brass to deploy the bridge.

The build shows other smart techniques of the enterprising modeler. Rather than start from scratch, the Centurion is built on a modified KV tank hull. After the modifications were complete, the tank received a lick of paint in the requisite British Army green. The final result is rather impressive.

It goes to show what can be achieved with some off-the-shelf parts and ingenuity. We’ve seen other impressive RC tanks before – like this French build with a homebrew targeting computer.

Rock Out To The Written Word With BookSound

With his latest project, [Roni Bandini] has simultaneously given the world a new type of audiobook and music. Traditional audiobooks are basically the adult equivalent of having somebody read you a bedtime story, but BookSound actually turns the written word into electronic music. You won’t be able to boast to your friends that as a matter of fact, you have read that popular new novel, but at least you might be able to dance to it.

[Roni] says he’s still working on perfecting the word to music mapping, so the results shown in the video after the break are still a bit rough. But even in these early stages there’s no denying this is an exceptionally unique project, and we’re excited to see where it goes from here.

Inside the classy looking 3D printed enclosure is a Raspberry Pi, an OLED display, and the button and switch which make up the extent of the device’s controls. At the end of the arm is a standard Raspberry Pi Camera module, which gives the BookSound a bird’s eye view of the book to be songified.

To turn your favorite book into electronic beats, simply open it up, put it under the gaze of BookSound, and press the button on the front. Because the Raspberry Pi isn’t exactly a powerhouse, it takes about two minutes for it to scan the page, perform optical character recognition (OCR), and compose the track before you start to hear anything.

If you’re wondering what the secret sauce is to turn words into music, [Roni] isn’t ready to share his source code just yet. But he was able to give us a few high-level explanations of what’s going on inside BookSound. For example, to generate the song’s BPM, the software will count how many words per paragraph are on the page: so a book with shorter paragraphs will consequently have a faster tempo to match the speed at which the author is moving through ideas. Similarly, drum kicks are generated based on the number of syllables in each paragraph. In the future, he’s looking at adding “lyrics” by running commonly used words on the page through a text to speech engine and inserting them into the beat.

We’ve seen practical applications of OCR on the Raspberry Pi in the past and even similar looking book scanning arrangements. But nothing quite like BookSound before, which at this point, is really saying something.

Continue reading “Rock Out To The Written Word With BookSound”

3D Print Springs With Hacked GCode

If you’ve used a desktop 3D printer in the past, you’re almost certainly done battle with “strings”. These are the wispy bits of filament that harden in the air, usually as the printer’s nozzle moves quickly between points in open air. Depending on the severity and the material you’re printing with, these stringy interlopers can range from being an unsightly annoyance to triggering a heartbreaking failed print. But where most see an annoying reality of pushing melted plastic around, [Adam Kumpf] of Makefast Workshop sees inspiration.

Noticing that the nozzle of their printer left strings behind, [Adam] wondered if it would be possible to induce these mid-air printing artifacts on demand. Even better, would it be possible to tame them into producing a useful object? As it turns out it is, and now we’ve got the web-based tool to prove it.

As [Adam] explains, you can’t just load up a 3D model of a spring in your normal slicer and expect your printer to churn out a useful object. The software will, as it’s designed to do, recognize the object can’t be printed without extensive support material. Now you could in theory go ahead and print such a spring, but good luck getting the support material out.

The trick is to throw away the traditional slicer entirely, as the layer-by-layer approach simply won’t work here. By manually creating GCode using carefully tuned parameters, [Adam] found it was possible to get the printer to extrude plastic at the precise rate at which the part cooling fan would instantly solidify it. Then it was just a matter of taking that concept and applying it to a slow spiral motion. The end result are functional, albeit not very strong, helical compression springs.

But you don’t have to take their word for it. This research has lead to the creation of an online tool that allows you to plug in the variables for your desired spring (pitch, radius, revolutions, etc), as well as details about your printer such as nozzle diameter and temperature. The result is a custom GCode that (hopefully) will produce the desired spring when loaded up on your printer. We’d love to hear if any readers manage to replicate the effect on their own printers, but we should mention fiddling with your printer’s GCode directly isn’t without its risks: from skipping steps to stripped filament to head crashes.

The results remind us somewhat of the 3D lattice printer we featured a couple of years back, but even that machine didn’t use standard FDM technology. It will be interesting to see what other applications could be found for this particular technique.

Continue reading “3D Print Springs With Hacked GCode”

Mastering OpenSCAD Workflow

As you may have noticed in our coverage, we’re big fans of OpenSCAD around these parts. The fact that several of the Hackaday writers organically found and started using the parametric CAD package on their own is not only a testament to our carefully cultivated hive mind but also to the type of people it appeals to. Hackers love it because it allows you to model physical objects as if you were writing software: models are expressed in code, and its plain text source files can be managed with tools like git and make. If you’re a real Pinball Wizard you could design objects and export them to STL without ever using a graphical interface.

But as you might expect, with such power comes a considerable learning curve. OpenSCAD devotee [Uri Shaked] recently wrote in to share with us his workflow for designing complex interacting mechanisms, which serves as an excellent primer to the world of parametric design. From animating your models to recreating the “vitamins” of your build, his post contains plenty of tips that can help both new and veteran OpenSCAD users alike.

Perhaps the biggest takeaway from his post is that you should be thinking of your projects as a whole, rather than as individual models. [Uri] recalls his early attempts at designing mechanisms: designing each component individually, printing it out, and only then finding out if it fits together with the other pieces. This method of trial and error is probably familiar to anyone who’s designed their own 3D printed parts — but it’s slow and wastes materials. The alternative, as he explains it, is to design all of the pieces at the same time and “assemble” them virtually. This will allow you to check clearances and fitment without dedicating the time and materials to test it in the real world.

In fact, as [Uri] explains, you’re better off spending your time bringing real-world parts into OpenSCAD. By carefully measuring the hardware components you want to interact with (servos, gears, switches, etc), you can create facsimiles of them to use as a reference in your OpenSCAD project. As time goes on, you can build up your own library of drop-in reference models which will accelerate future designs.

He also spends a little time talking about something that doesn’t seem to be terribly well known even among the OpenSCAD converts: you don’t have to use the built-in editor if you don’t want to. Since OpenSCAD source code files are plain text, you can write them in whatever editor you like. The OpenSCAD model viewer even has an option specifically for this scenario, which will cause it to update the rendered preview as soon as it detects the source has been updated. For [Uri] this means he can create his designs in Visual Studio Code with a constantly updating preview in another window.

If you’re looking for examples of what the parametric capabilities of OpenSCAD can do for you, we’ve got no shortage of excellent examples. From creating customized computer cases to saving time by using mathematically derived components. Our very own [Elliot Williams] even has a write up about that most glorious of OpenSCAD commands: hull().

3D Printering: Blender Tips For Printable Objects

3D models drawn in Blender work great in a computer animated virtual world but don’t always when brought into a slicer for 3D printing. Slicers require something which makes sense in the real world. And the real world is far less forgiving, as I’ve found out with my own projects which use 3D printed parts.

Our [Brian Benchoff] already talked about making parts in Blender with his two-part series (here and here) so consider this the next step. These are the techniques I’ve come up with for preparing parts for 3D printing before handing them off to a slicer program. Note that the same may apply to other mesh-type modeling programs too, but as Blender is the only one I’ve used, please share your experiences with other programs in the comments below.

I’ll be using the latest version of Blender at this time, version 2.79b. My printer is the Crealty CR-10 and my slicer is Cura 3.1.0. Some of these steps may vary depending on your slicer or if you’re using a printing service. For example, Shapeways has instructions for people creating STLs from Blender for uploading to them.

Continue reading “3D Printering: Blender Tips For Printable Objects”

Friday Hack Chat: All About Crypto

What is crypto? Crypto means ‘hidden’, and it’s meant ‘hidden’ since before the Greek alphabet was written, but don’t let that stop you from arguing. For this week’s Hack Chat, we’re going to be talking all about cryptography, a medium of exchange for secrets. If you need confidentiality, integrity, or authenticity, you need cryptography.

Our guest for this week’s Hack Chat will be none other than Nick Sayer. Nick is a frequent attendee of the Hackaday meetups and he’s been building gadgets and gizmos and selling them on Tindie for years now. He’s given talks on design for manufacturing. This year, he designed and developed the Orthrus, an appliance that creates a cryptographically secured USB volume from two microSD cards. Basically, it’s like the Captain Planet team, only instead of rings, you need all the SD cards, and instead of Captain Planet, you summon your data.

For this week’s Hack Chat, we’re going to sit down with and talk about all things cryptography, including understanding what you need, what you don’t, and picking the correct tools. Items of interest will include:

  • When cryptography is needed
  • Cryptography tools
  • The best practices for cryptography

You are, of course, encouraged to add your own questions to the discussion. You can do that by leaving a comment on the Cryptography Hack Chat and we’ll put that in the queue for the Hack Chat discussion.

join-hack-chat

Our Hack Chats are live community events on the Hackaday.io Hack Chat group messaging. This week we’ll be sitting down on Friday, November 16th, at noon, Pacific time. If time zones got you down, we have a handy time zone converter.

Click that speech bubble to the right, and you’ll be taken directly to the Hack Chat group on Hackaday.io.

You don’t have to wait until Friday; join whenever you want and you can see what the community is talking about.