A while ago, [Eric Strebel] created a backpack hanger. The result was great — by just bolting this backpack hanger to the wall, he kept his backpack off the floor and out of the way. There was even a place for him to set his phone to charge. [Eric] is thinking about turning this idea into a product, and just posted a video on his process of making a cardboard mockup.
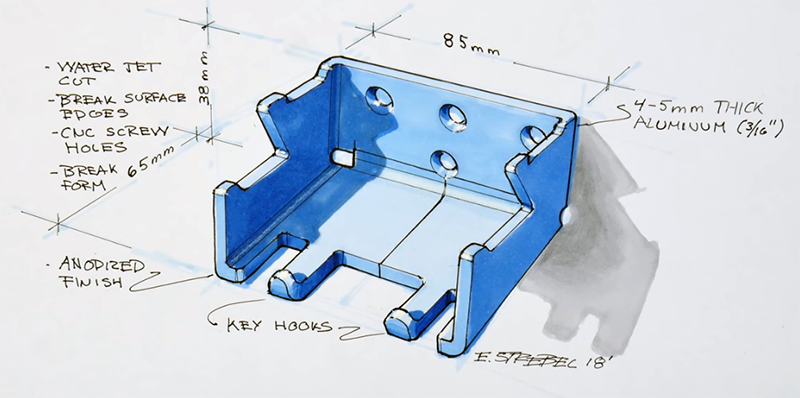
Since this is a study in industrial design, any mockup will need to keep in mind how the finished article will be constructed. In this case, [Eric] is going to use 4-5mm thick aluminum, cut on a water jet, bent into place, and finally anodized. The finished product will be made out of bent sheet aluminum, so this little bit of product design will use Matboard — a thick, heavy cardboard often used for mounting pictures in frames. The Matboard will substitute for the aluminum, as it is carefully cut, bent, and glued into shape.
The tools for this build are simple, just a hobby knife, razor blade, ruler, and a pen. But there are a few tricks to working with Matboard. To bend these pieces perfectly, [Eric] is painting one side with water. This loosens the fibers in the Matboard, allowing for perfect creases before one layer of the build is glued together.
Once a few layers of this Matboard are glued together, the finished product becomes less like cardboard and more like a very soft wood. This allows [Eric] to use belt sanders and countersink drill bits to give a little bit of polish to this one-off prototype. This finished article works great, and now [Eric] is looking at taking this idea into production.


Certainly a step up from papier-mâché. ;-)
Why waterjet cut though? Its a slow cutting process and expensive to boot. Lasercutting aluminium is faster and cheaper And they do the deburring for you.
Stamping on a press would be even better, I think.
Al needs a lot of energy for cutting and ist quite reflective. Many companies laser-cut it up to a certain thickness (sometimes only like 4-6mm). Waterjet-cutting is easily done to “whatever” thickness, though it’s more expensive.
and much slower. i have worked in those places and they cut 6mm alu no problem. waterjet cutting is only really handy if you have to cut stuff you cant cut with lasers like carbon fibre and such
Cardboard Aided Design :-)
That and corrugated box board! People would probably be surprised at how much stuff was/is mock fitted in this way, before cutting & welding the first piece of steel.
IF you have to retro fit to existing structures or locations, a mock up made from a few boxes can save a lot of headaches and wasted metal.
Ridged foam board(insulation) is handy too.
yea that’s what we called it, that or Cardstock Aided Design
good ole cad, its really handy when your not exactly sure on the shape you need, but you can get close mark trim and go with that as a template
If you have any doubts, go watch project Binky
I’m sure if they kept all their cardboard templates they’d have a second Mini by the end of it!
They are the masters of CAD templates! Such a great series.
I made one of these out of 1/8 laser cut plywood with finger joints, it took me half an hour to design and seems plenty strong enough. 4mm aluminum is surely strong enough to hold up a train.
Looking at this from a manufacturing standpoint: Make it from 10ga steel instead of Al. Powdercoat it black. Lose the countersinks. If he did that, he could probably make them for $10-12 each in small quantities, from Al it would be a $20-25 part in small quantities. He’s got 4 bends, 2 welds, tumbling, and finish. If he reduces the holes to 2, on wings in the back, he can get rid of the welding process because he can bend 2 tabs along the backside, from the 2 sides, and there won’t be any bending stress on a bent edge, trying to unbend it. If he made the tabs longer, where they just leave a small gap, he could get 4 holes staggered. Drywall would have a tough time holding 50lbs in that small of an area, so you’d have to attach it to a stud. If it’s designed for heavy weight, you’d need a couple holes in-line to attach to a stud, which necessitates the weld process to join the sides and back. Also, the bend radius looks a little tight for Al, 3/16 would need at least a 3/8 radius, because heat treated Al will just snap if you try to bend it too tightly.
It could be just me – but a 3d printer all but eliminates this cardboard replica step. Even if the part will be cut and bent – I wouldn’t see any benefit to the cardboard. Also good luck manufacturing the bend in the back that looks like it hits the screw hole – looks like a little more R@D will be needed to be a finished product.
It’s exactly the bending steps (going from flat stock to 3D product) that you want to test in this sort of assembly and exactly the stuff you can’t test on a 3D printed part. Doing this stuff from cardboard is very valuable for that reason. You’ll find the press break operators often mock up the part in cardboard first on new products so they can easily find the right fingers and order of operations without worrying about ruining a blank. Even if they have a very clear understanding of how it’s supposed to be made.
wood filament, and print it flat ????
Not trying to be a jerk here, but probably going to succeed…
Other than securing an advertiser (the cardboard vendor), I do not see the advantage to prototyping this concept with cardboard.
All the glue-up / dry cycles are time consuming and the challenge of precision cutting for those bends is not trivial. I can appreciate taking an unorthodox approach like this based on a dearth of prerequisite tools to implement in another medium, but even here, the video illustrates use of a crazy hole-punch in the process and also a belt sander, which I expect few would-be cardboard prototypers are going to have on hand. What I’m trying to say is, doing this out of cardboard does not make it a more accessible project. This could have been easily output from a 3D printer. Thin plywood probably would have been a pretty quick build.
If the goal is to experiment with how best to design the fold-out and folding process then doing it with a 3D printer or plywood is useless. You need something you can actually bend for those applications.
That hole punch is not crazy. It a garden variety hole punch you can buy in any DIY store. They’re very common items. Lot’s of people have them around to make extra holes in belts and such.
The belt sander is just lazyness basically. You can do exactly the same thing using your hands and a bit of sandpaper just takes 5 minutes instead of 1.
3D printing this part would probably take an hour or 2 after the time spent CADing it up. I doubt he’s spent much more time than that making the prototype in total. You can do other things while the glue is drying.
If the goal is just to get a feel for the size and shape, then yes, this could be done with a 3D printer, but that doesn’t necessarily make it a better solution. It’s just a different solution. Do what you feel is right. Doing it with cardboard is certainly a good and time proven way to make this sort of prototypes
That’s a neat hanger. IMVHO, a 1/4″ aluminium is way overkill in most cases. May be make a regular duty version from a 1/8″ or 10GA sheet and a heavy duty version from a 1/4″ sheet?
Anyhow, this gives me some ideas. Time to wheel out my welders. (c:
Probably to keep the thin metal edges from wearing through the cloth straps and eventually destroying the backpack. Honestly this product would be better if it were just made from injection-molded plastic with some reinforcing ribs; it’s really not doing a hell of a lot of duty or anything, and it would be trivial to give the hangar nice, rounded edges to avoid wear and tear–without extra tooling.
Seems a block of wood would suffice. The thin edges would not play well with the strap. I wouldn’t want my pack to hang from the top as access is limited or the flap would dump things out if opened all the way. I have a dedicated chair where it sits and I can see down into it inspect it’s contents. What goes in or comes out is of strategic importance.
I would just bang a nail into the wall and hang my backpack on that. If I wanted to do something fancy for the SO I might put in a pair of screw eyes and a rod through them that protrudes on both sides. If that hanger costs like $12 to make, what would it sell for? At least $20. Yikes. I can think of a lot of alternatives that I could make for essentially free. But I will admit, I am an awful cheapskate, though I take issue with the stingy part and I feel my solutions are often elegant in terms of price/performance. I do hate spending money though.
Ikea flat aluminum hook is around 99cents
Don’t take me wrong, I enjoy design and prototyping processes but I have seen few video of this man and the products ended to be often over done for their purpose and not specially clever.
The smartphone is likely to be on your desk or in your pocket all the time, so…