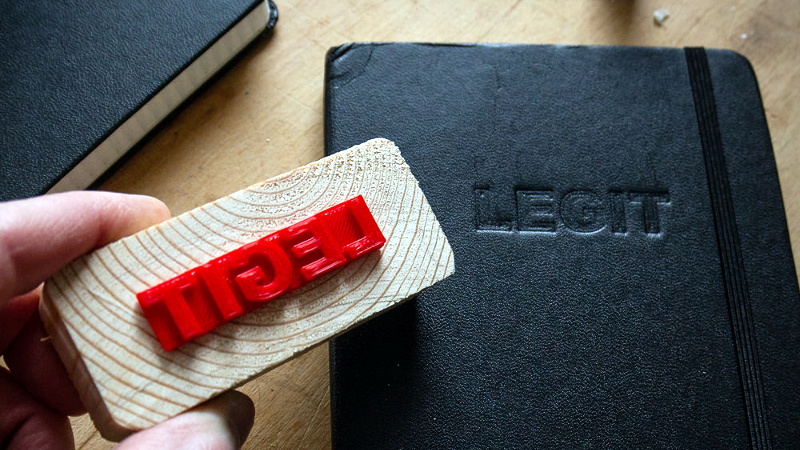
While it’s arguably a bit closer to the “Arts & Crafts” region of the making spectrum upon which we don’t usually tread on account our l33t sense of superiority, we’ve got to admit that the quick and easy notebook customization demonstrated by [Sean Hodgins] is very compelling. We don’t put ink to dead trees with nearly the frequency we used to, but when we do it might as well be Hemingway-style with a little black Hackaday emblazoned notebook.
 As demonstrated in the video after the break, the process starts by designing the stamp in your CAD package of choice. For optimal results [Sean] suggests fairly large capital letters, but with practice you should be able to get into some more creative fonts. Potentially you could even use the logo of your favorite hacking blog, but who are we to dictate what you do?
Whatever you chose, it needs to be mirrored and placed on a relatively thick backing. He recommends a 2 mm thick “plate” with the letters raised on top. You’ll want to print it at a high infill percentage, but even still it shouldn’t take more than 30 minutes or so to run off. Remember there tends to be diminishing returns on infill past 50%, so taking it all the way to 100% is not going to do much but expend more time and plastic.
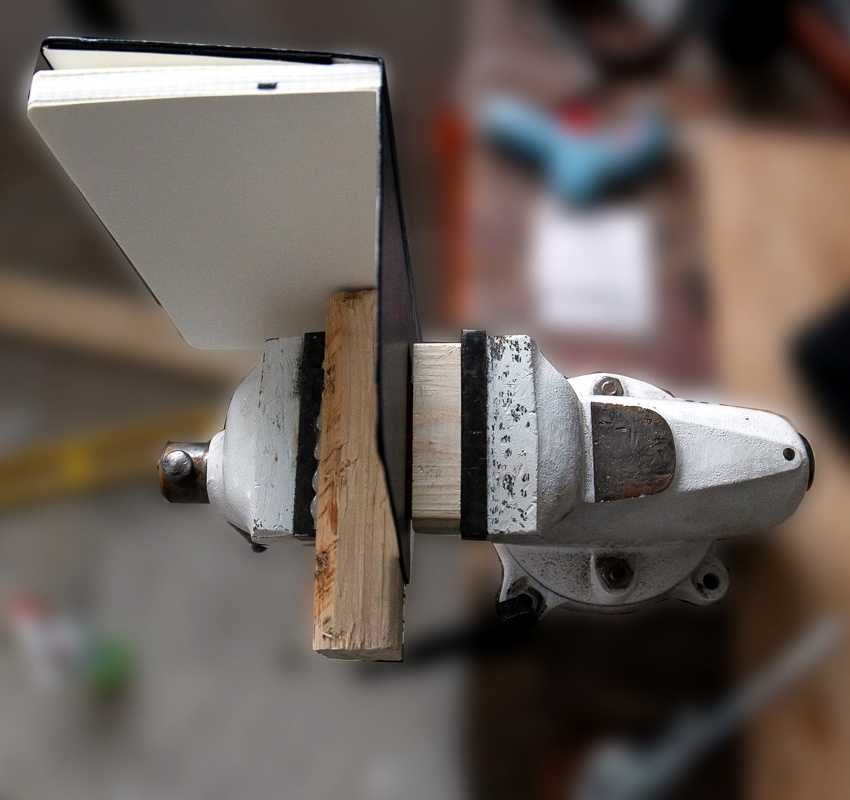
Once printed, [Sean] hot glues the stamp to a block of wood since putting pressure on the printed piece directly would likely crack it. Then it’s just a matter of getting your notebook, printed stamp, and blocks of wood lined up in to a suitably beefy bench vise. Getting everything aligned is one of those things that easier said than done, so expect to mess up the first couple until you get the hang of it.
When the alignment looks good, crank it down and let it sit for a few minutes. If you’re embossing the design into actual leather, wetting it a bit before putting the pressure on should help. The final effect is understated but undeniably very slick; and with the Holidays rapidly approaching this might be an excellent way to knock out some legitimately thoughtful gifts.
Ultimately the idea here is something of a lightweight version of the 3D printed press break dies used to bend aluminum or the punch and die set used for steel plates. At this point it seems there’s enough evidence to say that 3D printed objects are certainly strong enough (in compression, at least) to put some legitimate work in.


A nice idea for last minute gifts.
Doh – when I read the title I immediately thought of Notebook as in notebook computer….
and the n wonderd how this was going to work on a plastic cased machine? On my aluminum MacBook it would work a treat though
I guess I realy do work with dead tree products much less than I used to!
Probably a perfect summation of how a lot of HaD readers will react to a post like this.
Personally I think it’s neat, though would be nice to see some kind of jig that allowed you to align the text so it’s square on the face. Even in the one pictured here, it seems like the text is rotated a couple degrees relative to the spine.
Arts and crafts blurs into hacking, when you make your own crafting tools. And of course, 3D printing ANYTHING gets you an article on HaD.
Don’t get me wrong – this looks like a great idea, and I’m glad [Tom] wrote it up.
I also learned something tonight: when you emboss something in the other direction, it’s called debossing. The more you know™…
Looks legit.
( •_•)>⌐■-■
(⌐■_■)
Too legit to quit.
Obviously a bench vise can do the job, but an arbor press would make this quite a bit easier as you could lay everything flat and not fight gravity while tweaking the alignment.
True. Tried it with a machinist’s vise, which seems to also be an improvement, while probably not as ideal as an arbor press.
Looks like there might have been a little marring from the vice on the top, left hand corner of the cover? Great idea and our local library has two 3D printers. ????
Easy to align by making a U shaped frame wider that whatever you’re going to emboss, with guides on the uprights for the die on one side.
Is the 555 in the wood block?
I could’ve done it with a Teensy!
Oh, wait…
How to line up the text? I’d probably use some PostIT notes or sticky tape to mark a straight line on the notebook, then you have some guide to align the stamp when putting it together in a vise. Or 3D print yourself an arbor press so you can align everythin laying flat on the desk. ;)
If you can align it how you want by eye or using a square, you can then tape it down before picking it up and putting it in the vise. I would suggest either aligning it, draping tape over it, and tucking the tape under the back of the notebook, or putting tape down first, sticky side up, below the notebook, and folding it over the stamp once the stamp is aligned. The first method might be easier if you use two objects of equal height with space between them (such as the two sides of a wide-open vise…) and bridge the notebook over them, to have access to its back without lifting it at all.
Alternatively, you could press it horizontally using weights or a hydraulic press, and thereby avoid disturbing the alignment by keeping it horizontal.