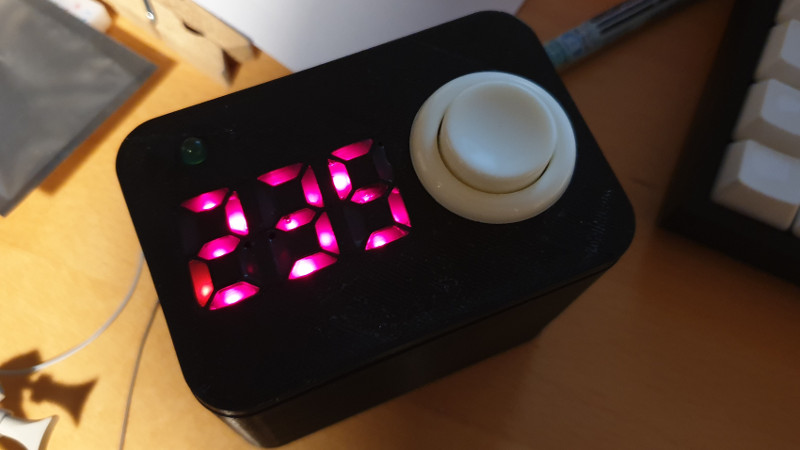
It’s safe to say that hot-melt glue is a staple of the projects we see here at Hackaday. There won’t be many readers who don’t have a glue gun, and a blob of the sticky stuff will secure many a project. But it’s not so often we see it used as an integral component for a property other than its stickiness, so [DusteD]’s reaction timer project is interesting for having hot glue as a translucent light guide and diffuser for its LED seven-segment display.
The timer is simple enough, being driven by an Arduino board, while the display is pre-formed into the 3D-printed case. The hot glue fills the enclosures behind each segment, and after several experiments it was found that the best filling method was from behind against a piece of Kapton tape. The LEDs were wired into a common cathode array, and along with the arcade-style button and the Arduino the whole fitted neatly in the box. You can see the result in action in the video below the break.
Of course, this display is unusual for its use of hot glue, but not unique. We’ve seen a different take on a hot glue light pipe display before.


hmm… I must keep this tip in mind. I’m sure it will come in handy some day.
Thanks for posting
+1
I’ve done similar, too https://imgur.com/gallery/gjuOpPp
Interesting…. Without any resistors, didn’t the LEDs run too hot ?
Button cells usually have such high internal resistance its not an issue
a red LED is still running a bit hot—energizer says the internal resistance of a new CR2032 is only about 10 ohms, so a 1.5V red LED will be getting somewhere around 150mA
I know in practice that the forward voltage of the LED would rise as more current flows through it, but it’s still going to be above rated conditions for a typical T-1 3/4 red LED.
Yea, I also did one for my transistor-based Kansas City tape decoder. https://github.com/SmallRoomLabs/KCSviewer#sep-29—final-touches. But it was hard to get a nice smooth surface of the glue…
Wow! That project alone is worthy of it’s own HaD writeup!
Which I see now it got in October:
https://hackaday.com/2018/10/07/reading-old-data-tapes-the-hard-way/
Many years ago I had a commercial “connector maker” which came in handy for those cannon connectors that we always seemed to have just one end of. If I had the right pins out of another connector, I just mated them into the other connector and filled in around them with the filler (essentially hot glue). A plastic film between the connectors kept them from sticking, and a collar taped into place around the pins made a connector body. It was a kit that came with pins, tape, pieces of plastic, and the gun and glue sticks.
How thick does the glue need to be to diffuse the LEDs?
It depends on the glue I think, mine was at the thin end, if I’d had brighter ones I’d have gone for 10mm of glue, but as it was, It was about 4mm of glue.
It is really a good idea. What feels like a century ago (in the Pentium 4 era) i have a computer with this cabinet:
https://imgur.com/orAsDQW
I decide to replace the black front part with a custom one:
https://imgur.com/K34zI6V
And for the HDD/power lights i fill the eye sockets of a skull (a disassembled PEZ candy dispenser) with hot glue and put the leds in the back, the effect was great. The computer no longer exists but i keep the fron panel and custom fan grill that i made for nostalgia purpose.
Sorry if my English is not good.
I have also done that–packing tape works well. It peels right off.