See What’s Inside Night Vision, And How To Build Your Own

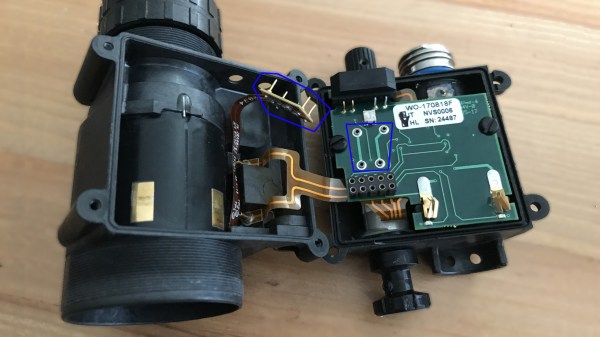
[Nick Chen] shared some fascinating and useful details about building a AN/PVS-14 monocular night vision device from parts. It’s not cheap, but the build would be a simple one for most Hackaday readers, at least the ones who are residents of the USA. Since the PVS-14 is export controlled under the International Traffic in Arms Regulations (ITAR), parts are not sold outside of the US. Still, [Nick]’s illustrated build instructions provide a good look at what’s inside these rugged devices.

The build consists of purchasing a PVS-14 parts kit (or “housing kit”) which includes nearly everything except the image intensifier module, which must be purchased separately. Once all the parts are in hand, [Nick] explains how to assemble the pieces into a working unit.

The view through a blemished (or “blem”) image intensifier. Cheaper, and perfectly serviceable as long as the center is clear.

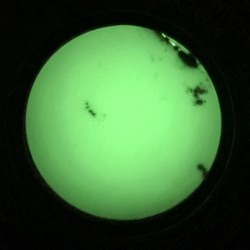
Since the image intensifier is by far the most expensive component, there is an opportunity to save money by shopping for what [Nick] calls “blem” units. These units are functional, but have blemishes or dead spots within the field of view. The good news it that this makes them cheaper, and [Nick] points out that as long as the center region of the tube is clear, they are perfectly serviceable.

How much can one save by building from parts? [Nick] says buying a complete PVS-14 with a Gen 3 tube (sensitive to 450-950 nm) can cost between $2500 to $4000. It’s expensive equipment, no doubt, but deals can be found on the parts. Housing kits can be had for well under $1000, and [Nick] has purchased serviceable image intensifiers for between $500 and $1000. He says searching for “blem tubes” can help zero in on deals.

Knowing the right terms for searching is half the battle, and along with his build instructions (and a chunk of cash) a curious hacker would have all they need to make their own. Heck, build two because the PVS-14 is designed such that two units can be combined to make a binocular unit! Not ready to drop that kind of cash? Check out OpenScope, the open source digital night vision tool.

This Is The Delay Pedal You Can Build Yourself

If you’re looking to make money in electronics, there’s no better market than guitar pedals and modular synths. The margins are high, and all the consumers are otakus who will spend outrageous amounts of money chasing the next big thing. The products are just one step above audiophile wank with zero oxygen cables, and if your opamp sounds ‘more transparent’, you’re going to make a fortune, never mind how something can sound more transparent, whatever that is to begin with.

If you want to do something really cool, build a delay, because everyone needs another delay. If you want to build the latest in delay technology, just grab a PT2399 chip. That’s what ElectroSmash did with their Open Source Time Manipulator delay. Everything’s right there, all the parts of the circuits are described, and you too can become an effects pedal engineer.

This pedal is based on the PT2399 chip from Princeton Technology, a digital delay chip that can be used with something that sounds like an old-school bucket brigade chip or something resembling a tape echo. As a digital chip, you’ve also got the clean, clear sounds of a digital delay, with just a few tweaks of the circuit. We’ve taken a look at the PT2399 before, but surprisingly not many people are sharing their secrets.

The circuit for the ElectroSmash Time Manipulator is built around the ATMega328, the same chip in the Arduino Uno, with two PT2399s that can be configured to operate in serial or parallel for everything from a slapback echo to a 600ms digital delay. If you set everything right, you can get choruses, reverbs, or some psychobilly flange-ish sounds.

The entire circuit is open, with a board designed in KiCad, the code is right there written in C, and the only hard-to-replicate tech is the PT2399 chip itself, which can be had from the usual vendors for less than a dollar a piece. It’s a great pedal, and be sure to check out the video below.

Continue reading “This Is The Delay Pedal You Can Build Yourself”