DIY Night Vision, Where Four Is Better Than Two

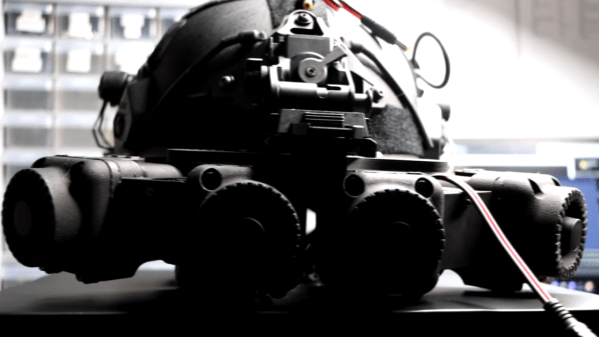
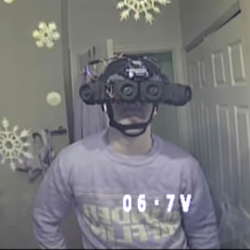
Night vision projects are great, and the hardware available to hobbyists just gets better and better. [Just Call Me Koko] shows off just such a build using four low-light, IR-sensitive cameras, four displays, and four lenses in 3D printed enclosures mounted to a helmet. Why four? Well, mounting two cameras and displays per eye is the easiest way to yield a wider field of view, and for bonus points, it sure looks extra weird.

At its heart, each of the four segments is the same. A Foxeer Night Cat 3 camera is mounted at the front, its output is connected directly to a 2″ diagonal NTSC/PAL display, and at the rear is a DCX (double convex) lens 38 mm in diameter with a 50 mm focal length. Add a printed enclosure, and the result is a monocular night vision display. Do it three more times and arrange them around one’s eyeballs, and one can make a night vision system with a panoramic view that probably takes only a little getting used to.

How well does it work? [Just Call Me Koko] does some walking around and also tries some target practice while wearing them, and concludes that while they don’t have nearly the clarity of the real deal (the 320×240 resolution displays limit the details one can perceive), they do work fairly well for what they are. Also, the cost of parts is a small fraction of the cost of the real thing, making it a pretty enjoyable project in the end.

The kind of hardware available to hobbyists today is what makes this kind of night vision project accessible, but there’s always the good old high-voltage analog method.

Continue reading “DIY Night Vision, Where Four Is Better Than Two”

Night Vision: Now In Color

We’ve all gotten used to seeing movies depict people using night vision gear where everything appears as a shade of green. In reality the infrared image is monochrome, but since the human eye is very sensitive to green, the false-color is used to help the wearer distinguish the faintest glow possible. Now researchers from the University of California, Irvine have adapted night vision with artificial intelligence to produce correctly colored images in the dark. However, there is a catch, as the method might not be as general-purpose as you’d like.

Under normal illumination, white light has many colors mixed together. When light strikes something, it absorbs some colors and reflects others. So a pure red object reflects red and absorbs other colors. While some systems work by amplifying small amounts of light, those don’t work in total darkness. For that you need night vision gear that illuminates the scene with infrared light. Scientists reasoned that different objects might also absorb different kinds of infrared light. Training a system on what colors correspond to what absorption characteristics allows the computer to reconstruct the color of an image.

The only thing we found odd is that the training was on printed pictures of faces using a four-color ink process. So it seems like pointing the same camera in a dark room would give unpredictable results. That is, unless you had a huge database of absorption profiles. There’s a good chance, too, that there is overlap. For example, yellow paint from one company might look similar to blue paint from another company in IR, while the first company’s blue looks like something else. It is hard to imagine how you could compensate for things like that.

Still, it is an interesting idea and maybe it will lead to some other interesting night vision improvements. There could be a few niche applications, too, where you can train the system for the expected environment and the paper mentions a few of these.

Of course, if you have starlight, you can just use a very sensitive camera, but you still probably won’t get color. You can also build your own night vision gear without too much trouble.

Scratch Built Tracked Robot Reporting For Duty

Inspired by battle-hardened military robots, [Engineering Juice] wanted to build his own remote controlled rover that could deliver live video from the front lines. But rather than use an off-the-shelf tracked robot chassis, he decided to design and 3D print the whole thing from scratch. While the final product might not be bullet proof, it certainly doesn’t seem to have any trouble traveling through sand and other rough terrain.

Certainly the most impressive aspect of this project is the roller chain track and suspension system, which consists of more than 200 individual printed parts, fasteners, bearings, and linkages. Initially, [Engineering Juice] came up with a less complex suspension system for the robot, but unfortunately it had a tendency to bind up during testing. However the new and improved design, which uses four articulated wheels on each side, provides an impressive balance between speed and off-road capability.

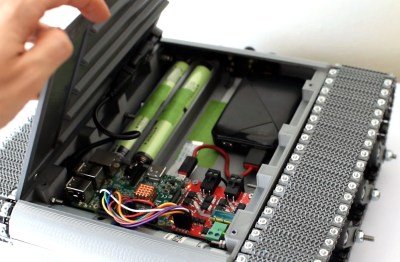
Internally there’s a Raspberry Pi 4 paired with an L298 dual H-bridge controller board to drive the heavy duty gear motors. While the Pi is running off of a standard USB power bank, the drive motors are supplied by a custom 18650 battery pack utilizing a 3D printed frame to protect and secure the cells. A commercial night vision camera solution that connects to the Pi’s CSI header is mounted in the front, with live video being broadcast back to the operator over WiFi.

To actually control the bot, [Engineering Juice] has come up with a Node-RED GUI that’s well suited to a smartphone’s touch screen. Of course with all the power and flexibility of the Raspberry Pi, you could come up with whatever sort of control scheme you wanted. Or perhaps even go all in and make it autonomous. It looks like there’s still plenty of space inside the robot for additional hardware and sensors, so we’re interested to see where things go from here.

Got a rover project in mind that doesn’t need the all-terrain capability offered by tracks? A couple of used “hoverboards” can easily be commandeered to create a surprisingly powerful wheeled platform to use as a base.

Continue reading “Scratch Built Tracked Robot Reporting For Duty”

Teardown Of Oddball Night Vision Shows Off Retro-futuristic Vibe

Night vision aficionado [Nicholas C] shared an interesting teardown of a Norwegian SIMRAD GN1 night vision device, and posted plenty of pictures, along with all kinds of background information about their construction, use, and mounting. [Nicholas] had been looking for a night vision device of this design for some time, and his delight in finding one is matched only by the number of pictures and detail he goes into when opening it up.

The GN1 rocks an irresistible retro-futuristic look.

What makes the SIMRAD GN1 an oddball is the fact that it doesn’t look very much like other, better known American night vision devices. Those tend to have more in common with binoculars than with the GN1’s “handheld camera” form factor. The GN1 has two eyepieces in the back and a single objective lens on the front, which is off-center and high up. The result is a seriously retrofuturistic look, which [Nicholas] can’t help but play to when showing off some photos.

[Nicholas] talks a lot about the build and tears it completely down to show off the internal optical layout necessary to pipe incoming light through the image intensifier and bend it around to both eyes. As is typical for military hardware like this, it has rugged design and every part has its function. (A tip: [Nicholas] sometimes refers to “blems”. A blem is short for blemish and refers to minor spots on optics that lead to visual imperfections without affecting function. Blemished optics and intensifier tubes are cheaper to obtain and more common on the secondary market.)

In wrapping up, [Nicholas] talks a bit about how a device like this is compatible with using sights on a firearm. In short, it’s difficult at best because there’s a clunky thing in between one’s eyeballs and the firearm’s sights, but it’s made somewhat easier by the fact that the GN1 can be mounted upside down without affecting how it works.

Night vision in general is pretty cool stuff and of course DIY projects abound, like the OpenScope project which leverages digital cameras and 3D printing, as well as doing it the high-voltage image intensifier tube way.

See In The Dark, The Simple Way

Night vision googles used to be the exclusive preserve of the military, and then of the well-heeled. Image intensifier tubes were very expensive, and needed high-voltage power supplies to keep them going. Now that we have solid-state infra-red cameras the task of seeing in the dark had become much simpler, and [Alex Zidros] is here to show us just how easy that can be. His night vision goggles take a selection of off-the-shelf parts and a little bit of 3D printing to produce a complete set-up for a fraction of the cost of those night-vision goggles of old.

At its heart is a little NTSC/PAL LCD display in a 3D printed bracket. These used to be a small display of choice, but we see them rarely now because standalone displays and the microcontrollers to drive them have become so much more useful. Driving the display is a video camera with its IR filter removed, and providing illumination is an IR flashlight. In effect it’s a classic analogue CCTV system in miniature, but the most important thing is that it works.

We might have expected a Raspberry Pi Zero and NoIR camera, but it’s difficult to argue with a functioning night vision system. If you want to look at a project with an image intensifier tube though, we’ve covered one of those in the past.

Hold 3500 Volts Up To Your Eye

Old military equipment can sometimes be found in places like flea markets and eBay for pennies, often because people don’t always know what they have. While [tsbrownie] knew exactly what he was getting when he ordered this mystery device, we’re not sure we could say the same thing if we stumbled upon it ourselves. What looks like a vacuum tube of some sort turns out to be an infrared sensor from an old submarine periscope that was repurposed as a night vision device. (Video, embedded below.)

Of course, getting a tube like this to work requires high voltage. This one specifically needs 3500V in order to work properly, but this was taken care of with a small circuit housed in a PVC-like enclosure. The enclosure houses the tube in the center, with an eye piece at one end and a camera lens at the other, attached presumably by a 3D-printed mount. The electronics are housed in the “grip” and the whole thing looks like a small sightglass with a handle. Once powered up, the device is able to show a classic green night vision scene.

Old analog equipment like this is pretty rare, as are people with the expertise to find these devices and get them working again in some capacity. This is a great video for anyone with an interest in tubes, old military gear, or even if you already built a more modern night vision system a while back.

Thanks to [Zzp100] for the tip!

Continue reading “Hold 3500 Volts Up To Your Eye”

See What’s Inside Night Vision, And How To Build Your Own

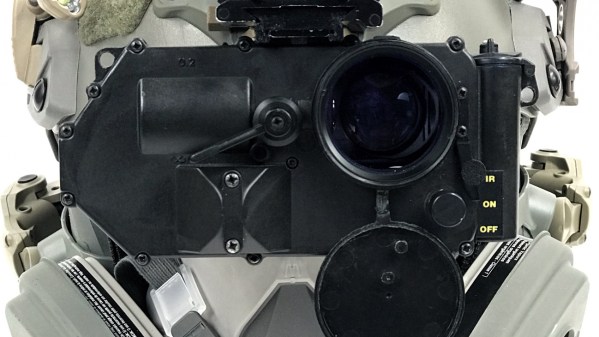
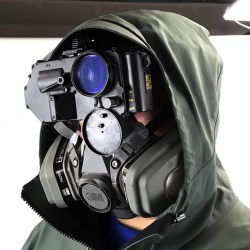
[Nick Chen] shared some fascinating and useful details about building a AN/PVS-14 monocular night vision device from parts. It’s not cheap, but the build would be a simple one for most Hackaday readers, at least the ones who are residents of the USA. Since the PVS-14 is export controlled under the International Traffic in Arms Regulations (ITAR), parts are not sold outside of the US. Still, [Nick]’s illustrated build instructions provide a good look at what’s inside these rugged devices.

The build consists of purchasing a PVS-14 parts kit (or “housing kit”) which includes nearly everything except the image intensifier module, which must be purchased separately. Once all the parts are in hand, [Nick] explains how to assemble the pieces into a working unit.

The view through a blemished (or “blem”) image intensifier. Cheaper, and perfectly serviceable as long as the center is clear.

Since the image intensifier is by far the most expensive component, there is an opportunity to save money by shopping for what [Nick] calls “blem” units. These units are functional, but have blemishes or dead spots within the field of view. The good news it that this makes them cheaper, and [Nick] points out that as long as the center region of the tube is clear, they are perfectly serviceable.

How much can one save by building from parts? [Nick] says buying a complete PVS-14 with a Gen 3 tube (sensitive to 450-950 nm) can cost between $2500 to $4000. It’s expensive equipment, no doubt, but deals can be found on the parts. Housing kits can be had for well under $1000, and [Nick] has purchased serviceable image intensifiers for between $500 and $1000. He says searching for “blem tubes” can help zero in on deals.

Knowing the right terms for searching is half the battle, and along with his build instructions (and a chunk of cash) a curious hacker would have all they need to make their own. Heck, build two because the PVS-14 is designed such that two units can be combined to make a binocular unit! Not ready to drop that kind of cash? Check out OpenScope, the open source digital night vision tool.